Super Mario Galaxy Strategy Guide Part 18: Engine Room Dome, Toy Time Galaxy

Heavy Metal Mecha Bowser
The first thing you need to do is jump on the train and get yourself to the Launch Star.
The next world will have an area where gravity will be reversed on the red area. You will see these toy frogs that are a lot of trouble, but you can crush them with a good ground pound.
Keep coming down until you learn about spinning attacks to loosen a bolt. Take the one that leaves a hole, and go down the hole. Spin attack over the blue bolt, and you’ll see a bridge extend. Take the trampoline up to the next level. You will then need to go to another red area, and this other area with a spinning thing going on. You can spin attack the bolt there, and get some free star bits. What you really need to do is unscrew the bolt and free up the Launch Star. You will then have to go all the way around to get to it.
Here, you need to beat a conveyor belt to the next area. Get the ?coin and a new Mushroom will be revealed, a Spring one. I actually despise this one, as it is hard to control at times. However, it is necessary to use it to get to the next level. So when that robot guy prompts it, hit A to go higher.
At one point, you can go two ways. One way will lead down a pipe. This pipe has some weird place where if you keep bouncing up, you will get to a ?coin which will release so many Star Bits you can get two 1Ups. The problem is that sometimes the platforms are so small that it’s hard to get there. I had to commit suicide to start it again, but I was glad when I got it.
From there, the Spring Mushroom is necessary to get past the robot firing lasers at you. You need to get to keep going up level upon level until you get to the Launch star.
You will then be on a place with a fork, spoon, and a Launch Star under glass. You need to use the Spring mushroom to get yourself to the top of the glass, then ground pound the top off. Take the Launch Star.
You will then be on a giant toy robot thing. You can take either leg up by wall jumping, but make sure you screw the leg, then take the pipe to the next leg. Screw that area, and take the Sling Star.
You will then be on a place where you need to unscrew four bolts. The two at the bottom are easy, but the two up top require dodging some flame. The panel will fall off, so you don’t want to go along with it. Get to the one area with the pipe, and get down the pipe.
Now, you will be in an area with two robot frogs. I usually take them out as they get in the way. What you got to do is jump on the green part of the arm. Then you need to go around, and beat the bats. You then unscrew the arm, and a Launch Star is revealed. Take the Launch Star and get to the next area.
Here there is a wizard that you can take out. What comes next is kind of tricky as you must Spring yourself to bounce up and get to the top of the robot’s head. The next level you have to avoid a laser shooting can, and at the next level, crush all the rocks with a Ground Pound at the peak.
The robot guy then explodes, and you can bounce your way toward the star and claim it your own.
Mario Meets Mario
Once again, you need to hop aboard the train and take the Launch Star.
You will then be at a place where an even buckethead will shoot a laser at you if you get too close. You need to get the Star Chip on the top of his head, so run toward him and hop on his head as soon as you can to avoid injury.
If you continue down past the electrical fields, you can pick up the rest of the Star Chips. The first is on a trampoline thing, and it’s easy. There is another one on the head of a giant screw, and you should take the time to spin it. The screw will go futher, and reveal another Star Chip. Another Star Chip is located nearby on the cubical area, but is surrounded by crystal and guarded by a robot toad. Go to the end of the screw to the Launch Star.
This next area is very tricky. You need to step on the green spaces to get to the turn around spots where the stars are. From there, you need to get back. My advice is get the stars in the order that they are closest, and step on as little green areas as possible. Keep jumping on the other areas to avoid being flipped off. I usually grab that 1Up Mushroom every time, just in case I am killed, which happened often.
Bouncing Down Cake Lane
Once again, you will need to take the train to the Launch Star.
You will then go to a place, where you need to get the Spring Mushroom and do a wall jump in order to get up higher. You will then need to go to this blue conveyor belt that puts out chocolate bars that you must bounce over. As soon as you get to the other side, simply jump off the other side to the cake plate below.
On the cake plate, you have to use the Spring Star to bounce around until you get to the twirling cake nearby. There are places missing, so watch out for it. If you keep going around, you’ll see the Sling Star that you need to take.
Now you’re on an Ice Cream Cone. Go to the other side and jump until you are on a stick. Jump to the next stick, then the other, and wait until the lollipop merry-go-round comes by before you jump on it. You’ll have to dodge one of those shockwave robots, but keep jumping until you get to the other side.
From here, it is mostly ice, so watch your step. I found that it was easier to take out each bad guy with a Star Bit, then jump to the other side to knock him off altogether. Since you can easily slip and fall, you don’t want to do Spin attacks.
Wait for the break in the shockwave attacks before you jump onto the next lollipop merry-go-round. Take it to the other ice side, then you might want to smash the crystals there so you can get the Red Mushroom. Watch out for the bad guy there, but you can take him. Also watch out as spin attacks turn into skating which can easily take you off the edge.
Once you got your 6 lives, hop to the pole and go up. Take the cannon to the Launch Star, and then jump from fork to fork up. When you are on the cake, you must get to the edge of the second layer, then spin attack. This will blow a candle out, and when all five are out, a Launch Star will appear.
You will then have to face a big boss. He is probably some relative of the mole you faced on that other level, and he can be defeated in a similar manner. What you need to do is get the Spring Mushroom and bounce up to him until you are on top of where he is shooting. Then ground pound him from there.
The first two hits are somewhat easy. On the last hit, he fires his gun more often and his charges his thing as a defense. Do not hit him when he is charging up, but wait in between.
I found that I had more victory when I took the time to get rid of the robo frogs. That way I could get some coins and they would be out of my way.
I found it difficult to control the Spring Mushroom, which made getting the Red Mushroom a great challenge. I’m not certain if you should waste your time, as the bigger fish is the mole guy.
The Flipswitch Chain Secret Star
This particular one involves you getting to the Hungry Luma. You will see it on the next world you go to off the Launch Star. Now it needs 50 Star Bits. That isn’t hard to get, as when you go through the Launch Star, you will see several Star Bits that you can get along the way.
Go to the world, and you’ll see a place where Whomps like to go over Question Mark spaces. Your mission is of course to turn those question marks into Exclamation points. You can simply go underneath them provided they are hollow, like you did elsewhere. There will be a point where a robot will tell you to jump. A good jump will send you sailing to the other side, where you must turn every Blue into yellow.
I found going under the Whomps was just easier that way. The places with the spiky platforms were difficult, but a good jump got me over them. The most difficult part is finding the ? mark spots, so just keep looking.
Fast Foes of Toy Time
Same strategy as the secret star, only faster. It isn’t that difficult.
Related

Easy Comfort Food While Cruising: Chicken Enchilada Casserole

Famous Fictional Robots We Want in Real Life
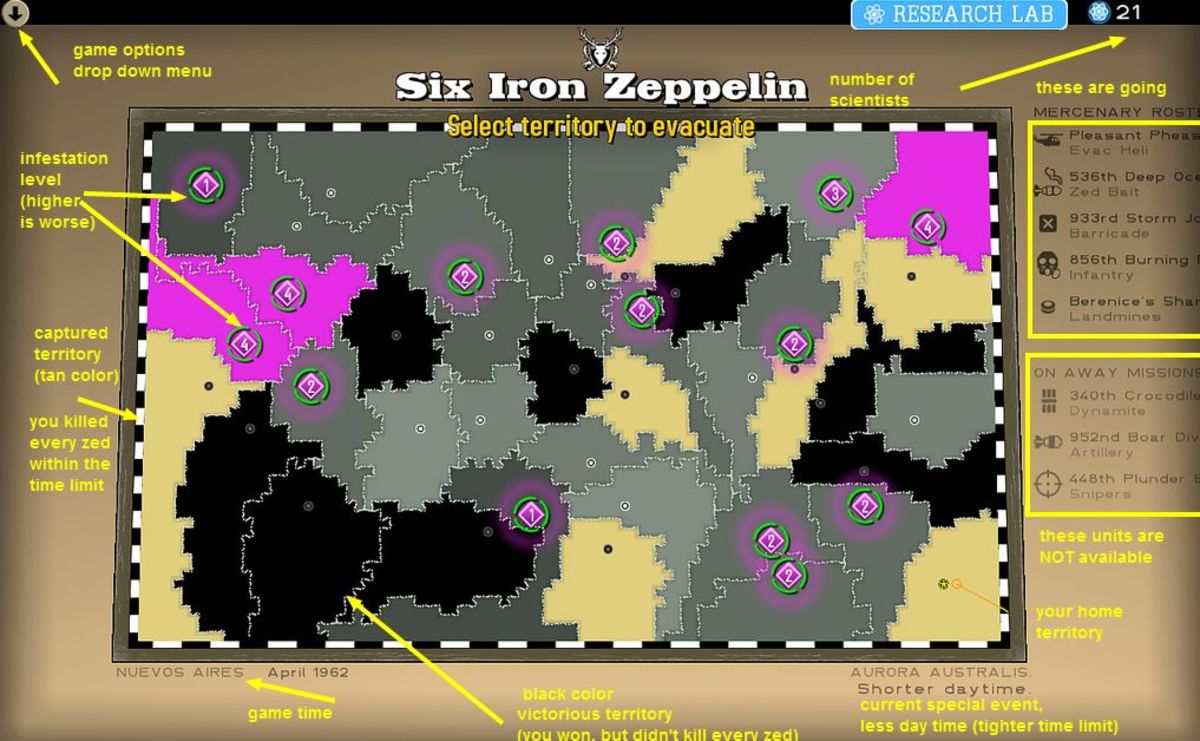
"Atom Zombie Smasher Strategy Guide": How to Beat Back the Nuevo Aires Zombie Infestation With Your Mercenaries
"Kingdom Come: Deliverance": Skills and Tactics Strategy Guide

Dragon Mania Legends Tips and Battle Strategy Guide