- HubPages»
- Technology»
- Computers & Software»
- Computer Software
Changing the orientation of one page in Word 2007 using sections
Introduction
Hi, and welcome to my latest hub for Word 2007. This hub came about because one day I needed to fit in a particularly wide screenshot into a Word document. I wanted that page’s orientation to be landscape and the rest of the document to be in portrait. Trouble was, when I changed the layout of that page, the whole document switched as well. A number of results in Google promised the answer I needed but none of them delivered a step by step guide that worked completely from beginning to end, so once I figured out the whole process I decided to write my own.
Creating and configuring the three sections required
To achieve this, I first needed to create three sections in my document in Word.
Sections allow you to change the formatting or layout in a part of your document. Although I will only look at changing the orientation of the page in this guide, you can change everything from page and line numbering to columns and margins in the different sections created in your document.
- First, open a new document and ensure that the orientation is set to Portrait (it should be your default setting). If it is not, click the Page Layout tab and in the Page Setup group, click on Orientation and select Portrait (all the buttons used in this guide are on the Page Setup group on the Page Layout tab as shown below)

- Next let’s create the two additional pages that will form the basis of the three sections we need to create
- Click the Insert tab and then in the Pages group select Blank Page. Alternatively, you can just hold down Enter / Return to create the blank pages.
- On page one, click on the Page Layout tab and then the Breaks button in the Page Setup group. Select Continuous under Section Breaks
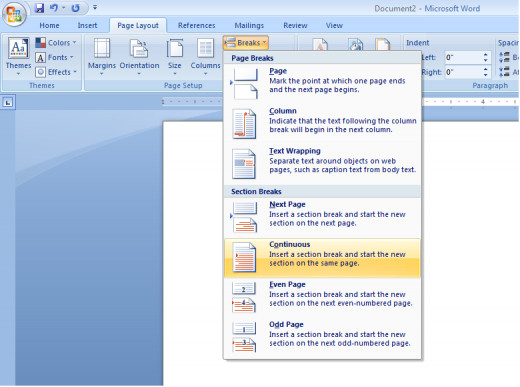
This creates an initial section in your Word document.
- Next move to Page two
- Click on the Page Layout tab and then the Breaks button on the Page Setup group. Select Continuous under Section Breaks.
- Once again on the Page Layout tab and in the Page Setup group, click on Orientation and select Landscape
This creates a second section in your document which is setup using Landscape rather than portrait for the page orientation. You will notice that the third page also switches to Landscape. Don’t worry, by creating the third and final section we will be able to switch the page orientation back to Portrait.
Finally, select page three. Once again,
- Click on the Page Layout tab and then the Breaks button on the Page Setup group. Select Continuous under Section Breaks.
- Follow the instructions for page two for setting up the orientation of your page except choose Portrait instead of Landscape for your page orientation.
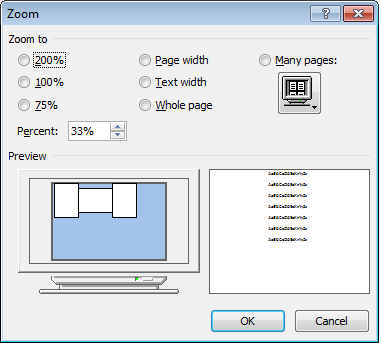
We now have three sections in your document, each with a different page layout (for those of you who are curious as to how I got the three pages to look like that, I zoomed to 33% using the Zoom button in the Zoom group on the View tab as shown below).
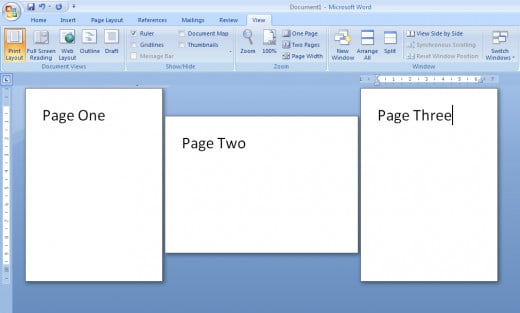
To add additional pages to your sections, simply click on the first page of that section and press the Blank Page button in the Pages group on the Page Layout tab. Please note that additional pages within the section will automatically pick up any formatting changes you have made to the initial page in the section itself.
Guide for preparing documents for printing
When creating documents remember to consider whether the document is likely to be printed out, or whether it will only be read electronically. Most companies now configure printers to print on both sides automatically and some in fact do not allow single sided printing at all. With this in mind, to ensure that your document prints well, ensure that any page orientation changes affect an even number of pages. That way, your pages will come out of the printer with the pages oriented correctly and will not look odd when printed.
Conclusion
I hope that you have found my guide to changing the orientation of a single page useful. The key point to take home is that the sections must occur in threes. In this example, we have sections where the orientation is Portrait, Landscape and finally Portrait. With only two sections you would not get the desired effect of having a single page different to the others. Sections of course are useful whenever you want to have a particular area of your document formatted differently to the rest of the document. That could include paper orientation as well as numbering, headers and footers and columns.
As I created this hub to allow me to fit in a rather large diagram, I have also made a sister hub to this one on working with pictures in Word 2007. That hub can be found here http://robbiecwilson.hubpages.com/hub/Using-grouping-and-working-with-pictures-in-Word-2007
Many thanks for reading; I do hope you have found it useful. Feel free to add any comments you may have below.

