How to build a potato gun

Potato Gun Instructions
The Potato Gun is a classic destructive toy built by teenagers and adults who never wanted to grow up and to some of us just out of sheer destructive curiosity. This will be an instructional as to how to construct a combustion type potato cannon (aka "Spud Gun").
(Flaming, explosive, black powder, or living projectiles can often make a legal spud gun illegal in many jurisdictions. Many heavily populated areas have ordinances on projectiles and loud noise.)
The real trick on a combustion based potato gun is finding the right ignition source. Some will tell you that a stun gun is the best ignition source, but stun guns aren't legal everywhere. So we have came up with a few alternatives. Try finding a twist-type ignitor for a coleman stove or lamp. You can also buy a Weber or other barbecue manufacturer push-button ignitor switch which is usually sold at hardware stores or anywhere that sells barbecues.
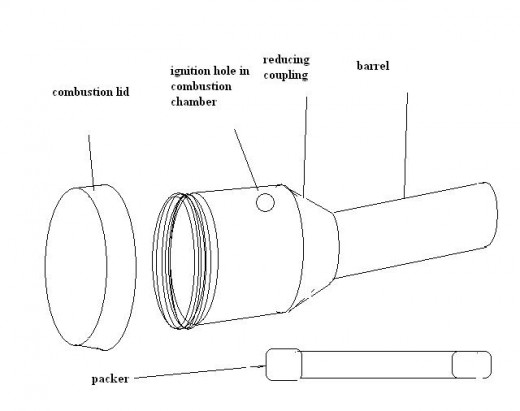
Buy a solid thick length of a high schedule PVC 2-3" pipe and a solid 1" pipe with a threaded cap on the end. (We highly recommend using pink teflon tape and threaded ends as opposed to flammable glues). The 2-3" barrel should be cut at around 18-24" keeping the end of the barrel ar enough away from the body and allowing a straighter flight path for the potato. The skinnier 1" pipe will serve as your "Packer" and should be measured in length and capped on one end to allow at least 6" of space between the combustion chamber and the tip of your packer inside the barrel (see diagram below but note that packer is not to scale) Use the packer to force a potato down the 2" barrel to your measured distance so as not to push it all the way into the combustion chamber. The combustion chamber can be constructed from a short length of 4" high schedule PVC with a threaded removable cap at the end (you can use a "clean-out drain" if you can find the right size). The ignitor must be mounted into the combustion chamber by drilling a hole large enough to accommodate the ignitor, and epoxy glue/putty must be applied to seal the ignitor in (give the epoxy a minimum of 72hours or the manufacturers written specifications to reach full cure) and never fire the cannon with the ignitor pointed anywhere but at the ground to avoid injury should it ever come loose. Remove the large cap at the end of your chamber and spray your hairspray up into the chamber while it is facing the ground to allow any moisture to fall out before recapping and trapping the fumes (avoid spraying directly at your ignitor as it may cause the spark to fail from moisture). This gives someone a way to touch a spark to air mixed with a fuel source causing a near instant expansion of gases and force the lodged potato to launch out the barrel (very similar to a cylinder in a car engine). The effect is usually quite loud and should be very carefully tested on its first few rounds for amount of fuel needed and for impact. This can cause bodily harm and is NOT a toy.
The fuel sources that I have used in the past have been mainly Aqua-Net Hairspray or any other flammable inexpensive hairspray . I would not recommend anything more powerful as we did have a cannon explode on us after using carburetor cleaner. Experimenting with fuel sources can be highly dangerous and result in harm or death to the individual if proper precautions aren't taken. A rule of thumb to follow in testing this would be to always start with small amounts of whatever fuel you are using as a weaker explosion would merely send the potato out at a slow rate. Be warned about the distance that this thing will go, the one we built to this spec while I was up in Oregon didn't make it long enough to get the photos of it (my friend overfueled the gun and 'boom'.... he was extremely lucky to not have gotten hurt) sent potatoes flying well over a hundred yards when angled up into the air. Make sure you have the space to fire this without harming anything and treat it like a rifle, not a toy. Also remember to obey the law and check with your city's local laws and codes before constructing.
Please note the diagram below for an image of what your finished potato gun should resemble.