How to Grow Chrysanthemum Flowers

Why is chrysanthemum so popular?
One reason is that the blooms last so long when cut, another that it keeps the garden almost to year’s end. The real chrysanthemum fan likes it because it is under his control right from babyhood to maturity. A cycle of little attentions needed month by month through the whole year makes chrysanthemum culture a satisfying hobby.
There are many annual and perennial species (they include marguerite, pyrethrum, and oye oye daisy), but we are concerned here with Japanese chrysanthemum which has been so intensively developed to its present state of perfection.
Early flowering chrysanthemums make brilliant display from August to November and deserve a prominent position. The range of colors gives a variety of interest. Nearby borders against a wall can be developed entirely to outdoor chrysanthemums, and they will also be most effective if grown against a background of climbing shrubs. All varieties are suitable for cutting and decorative purposes, but the grower should aim for flowers of perfect form and good color, with long straight stems, and good lasting qualities when cut.
The modern chrysanthemum catalogue is almost overwhelming with its array of choice varieties, so that the beginner hardly knows where to start.

How much time should be estimated between the securing of the bud and actual flowering?
As a general rule, six weeks can be taken as an average, but there are certain very large flowering varieties which will take up to eight weeks.
Chrysanthemums Outdoors
Make sure that the ground is dug at least two spits deep and is well drained. If farmyard manure is not available, good results are obtained by digging in fish manure or bonemeal during winter and feeding the plants with chrysanthemum in the growing season. If nitrogen is applied in the form of soot, nitrate soda of sulphate of ammonia, see that it is balance with potash or phosphate. Plants can safely be left in a well drained soil, but heavy wet soils cause them to rot. In the latter case, the old stools should be lifted, cleaned and placed in frames in a frost proof place. The main stem should first be cut down by 4 in. from the ground.
Young growth will appear in the spring, and these shoots, which should be short jointed, can be taken as cuttings when 2-4 in. long. Make the cut just below a joint, and see that the central growth point has not been pinched out by birds. Cuttings should be inserted round the edges of pots, and it is an advantage to use this compost: 1 part granulated peat, 1 part silver sand, 2 parts sifted loam. A close atmosphere is needed to encourage rooting, and the frame must be kept closed until after rooting. Later, air can be admitted more freely and the lights removed towards the end of April.
Plant out in early May, in groups of five or six together, leaving 15 in. between. Where cut blooms are required, it is usual t plant in one or two rows, with 15 in. between plants and 18 in. between rows. Stopping and disbudding are dealt with over leaf. During the early part of the growing season, the soil must never be allowed to become hard and much hoeing will be necessary.

Stopping
This term signifies the removal of the central shoot tip in order to secure fine blooms in perfect condition or at a desired date, or in case of singles and decorative an increase in the number of shoots. If bushy plants are wanted it will be necessary to pinch out the tip when the plant is about 6 in. high.
Side shoots will appear in the leaf axils of the main stem and continue to grow with production of the first crown bud (the first bud that forms after the natural break). The number of ‘breaks’ or side growths will depend on how many side pairs of leaves are left on the main stem.
A second stopping in early summer, entails the removal of first crown bud on each lateral growth, or pinching out the tip of each side growth before the production of the first crown bud. This should postpone the flowering period and secure the second crown bud.

It is important to get the right first crown bud forming after the natural break. For sprays it is best to stop twice and then let the buds develop freely. Some varieties of Japanese and incurved chrysanthemums will break naturally without stopping; in this case the number of side shoots should be retained according to the number of flowers wanted. If there is no natural break, the growing point must be pinched.
There is no strict rule as to whether plants should be stopped or allowed to break naturally. The choice depends largely on grower’s experience, whether he is growing for exhibition or market, etc. flowering time may be early in August or not until late September, and it should be borne in mind that the first crown bud gives the largest flower and the second crown bud gives the deeper color.

Disbudding
Disbudding and the ‘taking’ or ‘securing’ of the central bud is an important operation in chrysanthemum culture from end of July until the second week of August. Only one bloom is wanted on each shoot, but often the apex of the shoot there is a central bud or buds clustered around it.
As soon as the plant is established, therefore, it is important to secure the crown bud by removing the side leaf axil shoots early, nipping them off with a penknife or the thumbnail, when they are no larger than 1/8 in. Special care must be taken to avoid damaging the peduncle or stalk bearing the central fist crown bud, as this is the foundation of the perfect bloom. Should the central bud have been blighted, disbud, and encourage the development of the one of the side buds.
After the break is induced by stopping the plants, some four or six or even as many as ten lateral growths may be produced. If exhibition blooms are wanted, not more than 3 breaks should be retained and the rest removed. However, in cutting these away remember that the laterals which break highest up on the plant and nearest natural break will be liable to flower first, but the breaks from the leaf axils lower will have longer stems.
For ordinary cut blooms, which are what mainly interest the beginner, an average of nine blooms can be taken. If the number is limited, better quality will be the reward.

Staking
Chrysanthemums need to be staked when they are about one foot high; small canes should be fixed, to be replaced later with one or three canes according to the height of the variety. Where the plants are grown in pots one of the stakes could be tied to a wire stretched between two posts. This prevents the Chrysanthemum from being blown over during gales.
The best tying material is raffia, and with each tie it should be passed once around the stake. Where chrysanthemums are allowed to make many shoots a strand of raffia can be tied to the canes, which are pushed in the form of a triangle into the sides of the pots, and can be passed round the plant to secure all the loose branches. Take care that the stake, when the large blooms are developing, does not damage the swelling buds. It should be cut off just underneath the blooms.
Green nightingale: a green house variety with green quilled petals, especially useful for flower arrangements under artificial lighting.
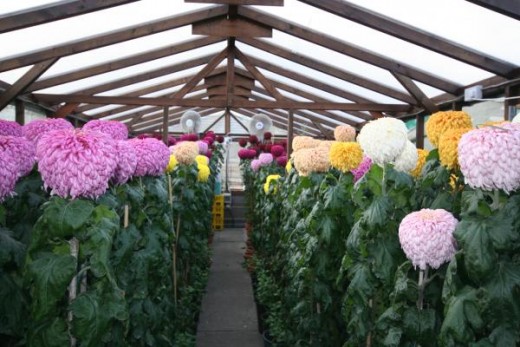
Chrysanthemums Indoors
After the plants have finished flowering they are cut down to within a few inches of the ground, and the pots are left in the cold greenhouseto encourage the production of new basal shoots. A small mulch of fine loam and leaf-mould will encourage the formation of strong shoots for cuttings. The compost for rooting cuttings is similar to that used for outdoor propagation, and the methods flowered are also similar.
Cuttings of Japanese types must be taken in December or January, and February or March are about right for striking the decoratives. December struck cuttings will be ready for potting on into 3 in. pots in February, using a compost of loam, leaf-mould, a little sand, mortar rubble and chrysanthemum fertilizer. Before the pots become full of roots, shift into 5 in. pots, disturbing the roots just as little as possible. Add a little more manure, but application should be more frequent as summer advances. The final shift will be about mid June into 8 in. pots, and the plants should then be stood outside in a sheltered position and staked.
From early in August the plants require feeding with weak liquid manure and soot water two or three times week, or else with liquid manure and sulphate of potash, but feeding must cease as soon as the flowers are three parts open. At the end of September the plants should be housed, with at least 4 in. space between pots. Overcrowding encourages mildew. It is important to syringe several times a day for a few weeks. Heat will not be required until early November, and then the temperature in the house should not exceed 50°F.

")
