How to Update A Boring Bathroom, Part Four: Replacing Old Faucets with New Waterfall Faucets

Bathroom Renovation
I've been renovating my ugly stock builder's bathroom for quite some time now. So far, I've repainted the cabinets, put handles and knobs on the drawers and doors, replaced the countertop, and now I'm ready for the biggy...replacing the faucets and sinks. My ugly chrome faucets will be going away, finally, and getting donated to the Habitat for Humanity store. So how do you choose new faucets for your bathroom? My choice had to do with color and the fact that I'm seriously loving chocolate brown and Caribbean blue right now. You may love satin nickel or the new version of antique brass. Whatever you do, make sure that renovations are an upgrade. You want to ADD value to your house, not subtract it. If that means you have to buy materials over time, as I have been doing, then that's what you should do. In the end, you'll have a more beautiful space and a more marketable home.

Waterfall Faucets
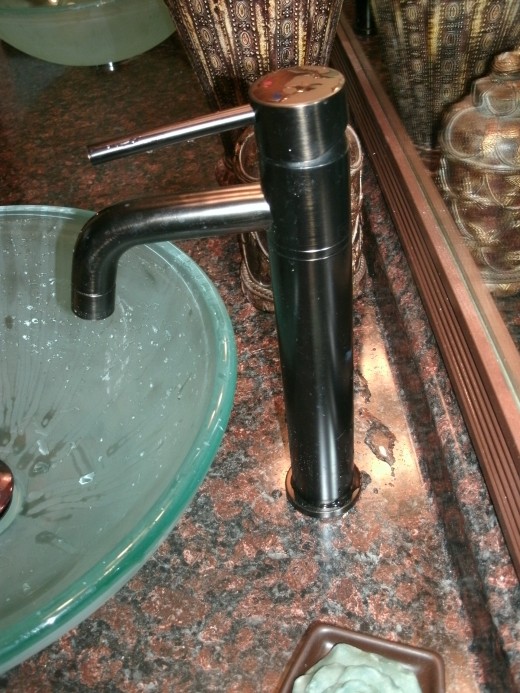
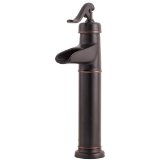
The object of my affection was a rustic bronze faucet which I loved so much that I had to do quite a bit of searching and waffling back and forth to get the one I wanted. But I found two, finally. The great thing about doing a renovation yourself is you can space your purchases out over time. For me, mine was at least two years in the making with buying faucets here, buying sinks there, etc., till I had everything together. The only problem was I ended up with almost no walk-in to my walk-in closet over time, because it was filled with stuff for the big, fat bathroom redo! One of the things I love about this faucet is when you drill the holes in your countertop for it, you only have to drill two holes, as opposed to three holes for a two handle faucet, one for the faucet and one for the drain.

Tools For Faucet Replacement
Here's your supply list for this project:
Adjustable wrench
Hole saw or drill with spiral drill bit
Bucket
Tape measure
Faucet of your choice
Masking tape
Pencil or pen
Pliers
Wrench
Your vessel sink to determine proper placement of the faucet
Sink drain
(2) supply lines (your faucet may come with these)
faucet mounting hardware (should also come with your faucet)

Deciding On the Faucet Placement
To figure out where your faucet and drain holes must be drilled, you need to have both the faucet and the vessel sink. My problem was doubled since I had a double sink vanity, so I needed TWO of everything! I placed the sinks on the counter and got them located where I thought they should be, just by guess-timating, and placed a piece of masking tape in the opening where the drain would go. I took the sinks off the counter and took my tape measure and measured the distance from the edge of the countertop to the center of the masking tape mark. I repeated that step for the other side. If they were not an even distance apart from the edge, I adjusted my tape mark until they were even. I put the sinks back up on the counter again and placed the drains behind them, trying to line up the spout of the faucet with the vessel sink drain hole. This is important, because the big drawback to vessel sinks is splash back from improper placement of the faucet. Also another thing to keep in mind when you are picking out your vessel sink and waterfall faucet is the higher the faucet, the deeper the bowl needs to be to avoid water splashing out of the bowl. I measured the distance from the backsplash and the edge of the counter to determine the correct positioning for the faucet and put a tape mark there as well.

Drilling The Holes
I used a very small drill bit for a starter hole for my faucet to give the point of the spiral bit something to rest in and make it easier to start the real hole in the right place. I used a drill with a spiral bit to drill the holes for the faucets, but remember when choosing your drill bit the hole for your faucet doesn't necessarily have to be the circumference of the base of your faucet. It just has to be big enough to accomodate the supply lines leading from the base of your faucet. My faucet came with two supply lines, but they were not long enough to reach the existing hot and cold supply valves under my sink, so I ended up having to buy some new longer ones. I drilled the holes very slowly and carefully for the faucets since I was actually going at this backward. When you're working with laminate, you generally drill from the underside up to eliminate ugly edges, but since I was working with vessel sinks and wanted to ensure they were in the right place in relation to the faucet, I drilled from the top. Once the hole was drilled, I sanded it a little with fine sandpaper just to make it a little smoother.
Connecting The Supply Lines
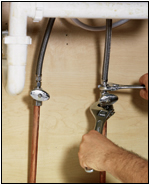
Your supply lines should be the newer flexible ones that have a build-in rubber gasket in the connector. If they're not, get thee to the home improvement store and buy some, because they are great and wonderful way to update your plumbing. So much easier to prevent leaks using them! The supply lines that came with my faucet were two short for the existing plumbing, so I had to go and buy two longer ones. They come in many different lengths, so if you have the same situation, don't panic. Your faucet will have a base with a rubber gasket in it. That goes ABOVE the sink. This is the part where you could use a friend. Have your friend hold the faucet up straight on TOP while UNDER the counter, you connect the faucet to the countertop with the connector bracket that should have come with your faucet. Some come with an easy screw-on bracket and others come with a bracket with a big nut. Either way, very simple to connect. Now screw your supply lines to the supply valves under the sink: left for hot, right for cold. Now you should be done and ready for your next step...installing those beautiful vessel sinks!