DIY Sealing Air Leaks in the Attic to Save Money All Year Round


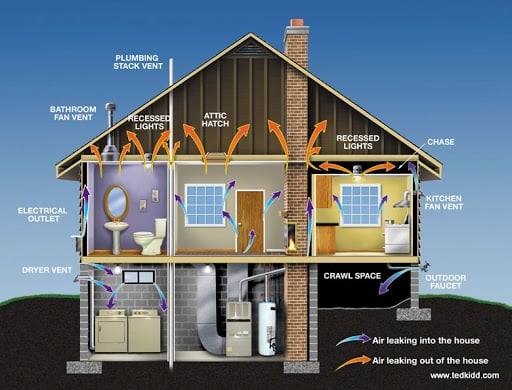
Every time you seal an air leak in your home it's like putting another dollar back in your wallet. That's not an exaggeration. Not only will you see benefits in lower heat and cooling costs, but you'll also create a more comfortable, durable and healthier environment in your home. This can reduce the number of repairs needed in the home and the number of respiratory illnesses that you and your family suffer. The attic is the first place to start, especially for savings in the winter. My personal experience was a 20 percent savings on my winter heating bill last year (over $100) and I only had a few minor leaks that needed to be patched. I saved even more money when I upgraded to the best quality home insulation I could find.
Before You Go Up
It is important that you have a really good idea of what you are going to find before you crawl up into your attic. Drawing up a quick floor plan will both keep you safe and help you identify the places that there are likely to be air leaks.
- Soffits above kitchen cabinets and bathroom vanities
- Slanted ceilings above stairways
- The main plumbing exhaust
- The furnace flue or chimney
Now it is time to create the optimum conditions for air leaks to occur. You do this by closing all of the windows and doors in the house except for one. In this one open window, place a bow fan facing so air is drawn in from outside. Make sure to tape cardboard around the fan to cover any large gaps between the fan and window casing that could allow air to escape. When the fan is turned on, it will create an area of high pressure in the house. This will push air through all the cracks in the house, including those in the attic. You are now ready to venture into the attic and find your leaks.
Pro Tip
If your attic has vermiculite insulation, a lightweight, flaky, grey mineral, don't do any work in the attic. Have the substance tested for asbestos. If it doesn't contain asbestos you may start up work again, if not, you'll have to have a professional asbestos removal performed.

Places to Look For Small Leaks
- Recessed can lights;
- Ceiling-mounted duct boots
- Bathroom exhaust fans
- Partition top plates and partition drywall
- Ceiling electrical boxes;
- Holes drilled in top plates for electrical cable.
Inspect the Attic
Before you go into the attic, make sure you have the following equipment with you:
- Dust mask
- Knee pads
- Safety glasses
- Work gloves
- Candle, incense or smoke pencil
- Marking paint
Insulation is often composed of cellulose, fiberglass or other friable fibers. These are easily sent airborne when they are jostled. Wearing a dust mask will prevent you from inhaling these irritants, and the safety glasses will prevent them from getting in your eyes. Work glove will prevent fiberglass from irritating your hands and if you've ever crawled around in an attic for any period of time, the knee pads are self explanatory.
Look for large open areas around the chimney, plumbing exhaust and any other pipes or structures in the attic. Metal chimneys require a 2-inch air space between the chimney and any framing to allow for expansion and contraction. This is the only area in the attic where there should be a gap of any kind.
After all large holes have been accounted for and marked with a dash of marking paint, light your candle, incense or smoke pencil. We'll assume you have a smoke pencil for this but the other two options will work in the same way.
- Move to any corner of your attic and use it as a starting point
- Slowly move the smoke pencil around and watch the smoke for air currents
- Take off a glove, wet your finger, and feel for the source of the leak
- Mark the leak source with marking paint
- Move along the perimeter of the attic checking for leaks from the base of the kneewall to the peak of the attic ceiling
- After completing the perimeter, check along each floor joist. If there is insulation over the joists, simply check over the top of it. (attic floors, especially those in houses over 100 years old, were often made of slats that expand and contract with the temperature and can be prone to leaks)
Once you have marked all of your points of leakage, it is time to determine how best to seal them. There are multiple ways to seal most air leaks, these are the ones suggested to me my friend, who is a LEED (Leadership in Energy & Environmental Design) certified builder.
Tools List
- Wooden planks
- Caulk gun
- High quality, latex-based caulk
- Caulk edger (or a wet finger)
- Utility knife w/extra blades
- Expanding spray foam sealant (fire rated)
- Weatherstripping
- Adjustable light source (snake light, clamp light, friend holding a flashlight)
- Unbacked fiberglass insulation
- 13 gallon plastic garbage bags
- Radiant foil insulation
- 14-in. wide aluminum flashing
You may not need all of the the tools in the tools list. You also might need to purchase plywood to cover holes larger than 6-inches in diameter. The list includes the tools that most homeowners will need to perform a full attic air sealing. The most important piece of equipment on the list is the wooden planks to walk on. Not only could you damage the ceiling areas beneath the attic, you could significantly injure yourself falling through.

Patch the Big Holes
The big gaps are easy to find, but not always as easily fixed. If the gap is more than 1/4 inch in width it can be considered a big hole. Openings up to 3 inches in width can be easily sealed with expanding foam insulation. The only caution here is that spray foam should not be used around chimney and flue areas. Spray foam is not rated for fire and presents a fire hazard when it is used in these hot zones.
For areas larger than 3 inches in diameter, foil-faced polyisocyanurate foam board should be used. It is very easy to cut and tape. The real beauty of this insulation is that after it is installed, it can be used in any part of the attic without ill effects.
Do not seal the area around a metal flue. It must be left at least 2 inches away from any lumber in the attic. Any closer and the heated metal of the flue may end up in contact with the wood and pose a fire hazard. That doesn't mean you can do some sealing in this area. The seams where metal pieces overlap can be sealed with high-temperature silicone caulk. In addition, brick chimneys can be sealed in the same way.
Seal Small Air Leaks
The hardest air leaks to find are the easiest ones to seal. And you have to seal them. A small leak can be just as bad as a large one because it will allow the same amount of air leakage over time. Here's how to seal the air leak tightly:
- Wipe the area to be sealed with a rag.
- Insert the caulk tube in the gun and secure it
- Cut the tip of the nozzle to the desired width.
- Squeeze out a line of caulk with constant pressure. Extend it the entire length of the crack.
- Use a caulk tool or a wet finger to spread the caulk and force it into the crack.
- If there are any holes in the caulking, apply more caulk to the area
Recessed lighting can cause all kinds of problems with air leakage, especially if it was installed before 2004. If you can't replace them with insulation contact rated fixtures, the next best thing is to create a cap with a rockwall covering as shown in this video by Dr Energy Saver. If you can replace the lights with insulation contact rated replacements, high-temperature silicone caulk can be used around the base of the cans to seal the can to the attic decking. Also consider using LED bulbs to prevent high temperature bulbs from accelerating heat transfer to the attic.
Another problem area is plumbing vent pipes. While they can be sealed with caulk, the expansion and contraction in these pipes often breaks even the best silicone after a few years. Instead, consider using a foam sealing tape that is specifically designed for use in areas like these.
One last thing to be aware of - electrical boxes are best sealed with caulk. Expanding foam should not be used to fill in the holes because the heat generated by the electric wires is enough to ignite the foam.
Attic Work Tips
- Start work before the sun comes up. Try to do it on an overcast day, if possible. Attic temperatures can quickly reach temperatures over 100 degrees.
- Don't spend more than 15 to 20 minutes in a hot attic at a time. Remember, as you are sealing the air leaks, you are also cutting down on air circulation. This will lower the available oxygen in the immediate average.
- Consider a lightweight disposable coverall, gloves and a hat to keep insulation from getting to your skin and causing irritation.
- Wear a dust mask or respirator to protect your lungs from inhaling insulation.
- Use wooden planks to kneel down on and hold your supplies while you are working.
- Bring an adjustable light source with you. Also have a flashlight for those areas the light can't get to.
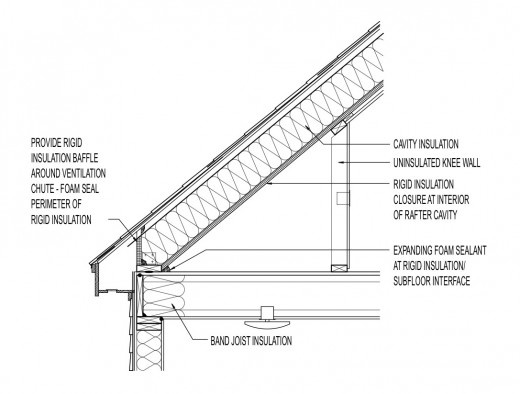
Check the Kneewall
A kneewall is a vertical wall erected on either side of a pitched attic to give more support to the roofing trusses. They are not present in all attics, but if you have them, they can be the source of some serious air leakage. The reason is that most kneewalls were not fitted with an attic side barrier that is necessary with fiberglass or cellulose insulation.
Some kneewalls are left uninsulated on purpose. Instead of insulating the kneewall, some builders choose to insulate the sloped roof above the attic all the way to the ridge. It’s possible that your builder decided to insulate the sloped roof assembly above the attic instead of the kneewall. This is good news for you. You shouldn't have found any major leaks if your attic was insulated this way.
An additional area of concern with kneewalls is that there is seldom a solid blocking between the joists under the kneewall. This creates huge air gaps that must be sealed individually. Accessing these areas is relatively easy, even if you have decking nailed to the joists. Remove the decking and install insulation by wrapping unbacked R-13 in 13 gallon garbage bags and stuffing it beneath the kneewall, between the joists. This will help weatherproof the insulation and create an air block. Cap each joist area with a polyisocyanurate board tacked in place with silicone caulk.
For a more detailed look at the ways you can handle insulating a kneewall, check out the kneewall insulation guide.
Pro Tip
Add a handle to the bottom side of the attic hatch so it can be pulled tightly down to seal the weatherstripping gasket.
Weatherstrip and Insulate the Attic Access Hatch
One of the major air leaks into most attics is a poorly sealed hatch. I was guilty of this particular faux pas. I had left a 2-foot by 2-foot hole in my insulation. The good news for me was that all I needed to do was weatherstrip the seal and put some rigid foam board on the back side of the hatch. Here's what I did, as suggested by my LEED friend.
The first step was to seal the trim around the attic hatch. This involved pulling down the existing trim and caulking the structural wood behind it. The gaps between the framing and the rough cut drywall often is larger than 1/4 inch and requires either expanding foam or foam tape. After you've sealed these gaps, reapply the trim and apply a bead of caulk on the inside and outside edges.
Next, the perimeter of the hatch needed to be sealed. A compression weatherstrip is a good choice because the weight of the hatch should keep it in place. You can also use a sealing gasket (like the one on your refrigerator door) for a more durable, tighter seal.
The next step is cutting rigid foam board for the back of the hatch. Cut the insulation leaving 1/2 inch of exposed hatch on each side. Using a foil backed polysio is recommended. Attach the foam board to the hatch with foam approved glue. Add layers of foam to the back until there is a 4 to 8 inch layer of insulation attached to the hatch.
If you have a pull down ladder to your attic, there are prefabricated foam or fabric enclosures or tents available. I recommend these over building your own coffin box.
Warning!
Any time you seal significant air leaks in your home it creates a potential for back drafting in your furnace. This can result in carbon monoxide being released into the home in potentially deadly levels. Use a carbon monoxide detector on each floor of the home to protect you family from exposure. Also have your furnace technician check the combustion fumes on your next service.