How to Build Your Own Indoor Climbing Wall!


Why Not Build Your Own Bouldering Wall?
I love climbing but live in the city so I tend to be an indoor climber mostly. After seeing climbing holds on sale I realized that I could have my very own climbing wall in my living room! How amazing would that be?! Guests would be blown away by the fact that they could literally climb the walls. When my husband annoys me I can say literally, Im climbing the walls he is being so annoying!
With my head spinning I attempted to think practically about this. The first thing to think about is the fact that I rent. I do hate my landlord feircly, I know we will never see our deposit as she is a very greedy lady who fixes nothing round here when it falls apart. I have no moral feeling for preserving this flat, my worry is that the walls just are not solid enough. I could see hanging from a hold and it ripping off the wall taking a chunk of wall with it.
The solution hubby came up with was to have a freestanding wall, we could even take it with us when/if we move. We have even found a few selling on ebay, tho out of our price range. To be honest for us this is a long term project as our flat is to small and money is tight, we are buying the holds in stages based on what we can afford, and we have plans on moving asap. Feel free to buy some below, you could even offer to buy em for me! :D
If you are like me and rent you may still have more options. You can always build your climbing wall in a shed in the back garden or if you have one your garage. With this in mind I shall assume that you are in a position to actually build yourself a personal climbing wall. You lucky so and so :P.
Crash Pads Keep You Safe Bouldering Indoors and Out
A few bits to get you started!

A Quick List of The Steps To Build Your Climbing Wall
- Plan where you want to build your climbing wall
- Create a Model so that you have a good idea of how much you are going to need. A 1' to 1" ratio will work well.
- Construct and mount your frame, assuming you are mounting to an already existing structure.
- Prepare your plywood to be mounted to the frame, measure and cut to fit the plywood exactly so it fits the frame well.
- Space out and drill holes for your t-nuts
- Then add your t-nuts (this will prevent you from damaging the t-nut or your tools when cutting.
- Get a friend to help you mount your plywood to the frame.
- Start adding holds and climb! You will start to develop your skill at setting routs.
The Nuts and Bolts to Build Your Climbing Wall
The first step to this is in the planning. The first step is why you are building a climbing wall? It may be that you are eager for the exercise, you wish to improve your climbing strength, maybe you have kids and feel it would be a great family activity (this would be so much cooler then buying a trampoline).
The next thing you need to think about once you have decided you really would love your own climbing/bouldering wall is to find a good location. Depending on how large/wide you wish your wall to be, if you want overhangs and want to practice bridging (a corner bit) or practice aerate climbing (going around a corner, kinda the opposite of bridging, corner sticking out) you will want to think about where you have access to the kind of space you will need. You may wish to turn a back garden shed into your climbing wall, with that you can have wicked hard overhangs! A garden shed would be great as you can lay the bottom with crash pads and climb both along the horizontal as well as the vertical.
So you have the perfect spot chosen, now you need to take your measurements. Get the height the length and the width available to you. A great tip is to build a scale model from poster board or construction paper. This is much better as drawing a hoped for design lacks the 3 dimensional detail and can be misleading when deciding how much plywood you will need. Whatever scale you use, be it imperial measurements or metric it doesn't matter as long as the model size is easy to work on and visualize.
If you decide to attach your climbing wall to an existing structure you will eliminate the need for some support braces and will be easier to plan and build but will lock you into that location, the other option is a freestanding wall, this will cost more and will prove more difficult to design. If you decide to go for this challenge you must consider balance, you don't want it to tip over!
When you have decided on your design and have bought your supplies you are ready to start building. As with any other building project you really should, measure twice and cut once! Maintaining accuracy in your cuts will allow your pieces of wood to fit together perfectly and anything less is not worth thinking about!
If you have no construction experience I would highly recommend you get a friend or family member to give you a hand. You may even want to take a course at a local community college and use this project as your project for the class. You may already realize this but your frame is load bearing and anything load bearing should be bolted not screwed or nailed. Nails can come loose with vibration and screws tend to snap.
As your frame is load bearing you want to construct it so that it will distribute the weight and strains of a climber (or a few). This is not a difficult thing to do and comes down to good spacing, not to much!
Your Frame Is Like The Bones Of Your Project
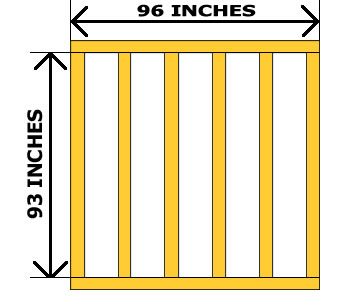

After you have constructed your frame its time to prepare the plywood for attaching to the wall. You will want to drill the holes that will be for the hand and foot holds before mounting it to the frame of your wall. I would suggest that you use a regular pattern of one t-nut every 8 inches in both directions. You want to mount the plywood before before actually putting the t-nuts in.
When mounting your plywood you will want help, at least 2 people are required for this as the sheets of wood will weigh a lot. A good rule of thumb is 1 screw every 8 inches. For pieces that need to be cut into special shapes be sure to carefully measure your lengths and angles before cutting, there is nothing worse then losing money and the hard work of drilling and hammering t-nuts because you gut a piece to short!
Now that your plywood has its t-nuts and has been mounted to its frame you are ready to put your hand holds in! There is no set way to do this. You may decide you want to move the holds around as you climb on your new wall, route setting is like an art. This really is the best part of having your own climbing wall!


