- HubPages»
- Technology»
- Computers & Software»
- Computer Science & Programming
Compiling Kalroth's cgminer on Ubuntu


Why We're Here
The number of people mining cryptocurrency has exploded since the advent of Bitcoin and its altcoin children (Litecoin, Dogecoin, and the rest) over the last several years. For folks interested in mining with an AMD GPU, one of the most popular pieces of software is cgminer. Unfortunately, the steps to get cgminer built from source and working on a standard Linux distribution can be a little murky at best. This article aims to show you how to do just that, starting with having only a plain vanilla Linux installation and ending up with working instance of cgminer.
While the main branch of cgminer removed support for GPU mining some time back, the project was forked by Martin "Kalroth" Danielsen, and many thanks go out to him for doing a great job of keeping it up to date. It's the kalroth version we'll be working with here.
But first, several caveats apply:
- I've done my best to provide complete and accurate instructions, but you take full responsibility for running any of these commands and their resulting effects on your mining rig.
- Assuming you're working with the same version numbers of the software I used, etc., you ought to be able to more or less copy and paste these instructions. I won't claim that the method shown here is the only way to get cgminer running, or even the minimal way. All I claim is that these steps worked for me when other cookbooks on the net I found didn't.
- You're responsible for understanding the security implications of what you're doing. For example, I issue an "xhost +" at one point, which I find an acceptable risk for my miner. If you're in an environment where you're worried about other folks connecting to your display, that may not be the right answer for you.
- If you're a Linux newbie or are otherwise daunted by the command line, there are alternatives you may wish to consider: BAMT provides a dedicated Linux mining environment that you can just install and run, and you may wish to think about using Windows as well.
Now that all that's out of the way, on to the good part!
Assumptions and General Information
This article assumes that
- You've got working hardware, including a reasonably modern AMD graphics card. (I first did this with a 6850, but I think the instructions will hold for anything in the R9 200, R7 200, HD 7000, HD 6000 and HD 5000 Series families.)
- You're starting with pristine install of Ubuntu. I wrote this using the 64-bit desktop version of 12.04.4 LTS. I installed from the DVD image to a USB drive (normal hard drives and SSDs are really overkill for miners), taking all defaults, no proprietary drivers, and not updating anything from network sources during the installation process.
- I did try this unsuccessfully with 13.10 as well. My experience with 13.10 has been spotty at best, so my advice is to stick with 12.04.4 for the moment, which is supported into 2017.
- You've got network connectivity (so plug in or set up your wifi and make sure you've got an address, can ping or browse outside your network, etc.)
- The examples in this article are based on a user named "someuser" and work from that user's home directory. Naturally you'll need to substitute the appropriate user name name software location for your own environment. (For example, if you save things in to ~/Downloads instead, you'll need to adjust accordingly.) Similarly, my examples reference specific version numbers of files... if you've downloaded a file with a different version number, change the names/numbers in the example to match.
- The example miner I use in this article runs in a headless configuration with all normal use being via a remote terminal. Some of the steps below (e.g., installing SSH and such) aren't strictly necessary if you're always going to be working on the console.
Finally, from here on out, I give examples of command lines. While I encourage you to read the entire article, my intention is for you to be able to just copy and paste everything that looks like the following code snippet verbatim, leaving you with a functional cgminer at the end of it all. Note that in some cases the lines are quite long, make sure you follow the scroll bars all the way over and grab the whole thing.
This is a sample command to copy and paste... some of the command lines are a bit long, like this example, so make sure you scroll all the way over and capture it all.
Prerequisites
Before we really begin in earnest, you'll need to download two pieces of software that will come into play later. I wish I could give you wget links or something like that, but the manufacturers like to shift filenames, change download servers, put things behind license agreements and generally make things hard to get in an automated fashion. So using a browser, go get these two things and stash them in a working directory.You can either do it with the browser on your miner, or on your usual PC and sftp them up to the miner later. (Which is what I did.) But remember, you want these to end up on the mining computer, so don't bother to unpack them on your local PC.
- First, the Intel SDK for OpenCL, from http://software.intel.com/en-us/vcsource/tools/opencl-sdk. The current version at the time I'm writing this is intel_sdk_for_ocl_applications_xe_2013_r3_sdk_3.2.1.16712_x64.tgz. This is the package that will allow cgminer to monitor temperatures, etc.
- Second, the AMD Display Library from http://developer.amd.com/tools-and-sdks/graphics-development/display-library-adl-sdk/. The current version at the time I'm writing this is ADL_SDK_6.0.zip. We'll need to extract some header files from this archive to use to compile cgminer later.
Away We Go
All right, after reading all the preliminaries, you should be in front of a newly installed Linux box. Log in as the user you created during the install (someuser in my example) and start off my running this this to make sure you've got the latest lists of packages and dependencies:
sudo apt-get update
Once that's done, you'll want to install an ssh server so you can connect remotely. Once this command completes, everything else I show in this article will be from a remote terminal ssh'd into the mining box. If you intend to do everything from the console then you can skip this step.
sudo apt-get install -y openssh-server
Now connect to your box with SSH. Since we want to use this server in a headless fashion and not have to log into the console if it reboots, you'll need to do a couple of things to set the server up to allow you to connect remotely and have things all set up and ready to go.
The AMD drivers are happiest when someone's logged into the server and the window manager is fully engaged, so we'll do that here by just setting the box to log a user in as soon as the boot finishes. To do that, you need to add the following two lines to /etc/lightdm/lightdm.conf using your favorite editor:
autologin-user=someuser
autologin-user-timeout=0
You can do it manually or, if you feel like living on the edge, running the following should do the trick:
echo -e "autologin-user=someuser\nautologin-user-timeout=0" | sudo tee -a /etc/lightdm/lightdm.conf
Next, you'll want to make your user account able to log in without requiring a password (so the auto-login you asked for in the earlier step can happen without intervention.) To do that, run this:
sudo usermod -a -G nopasswdlogin someuser
Next, you'll need to add the following to /etc/profile:
export GPU_MAX_ALLOC_PERCENT=100
export GPU_USE_SYNC_OBJECTS=1
export DISPLAY=:0
xhost +
Again, either use your favorite editor or copy and paste the following:
echo -e "export GPU_MAX_ALLOC_PERCENT=100\nexport GPU_USE_SYNC_OBJECTS=1\nexport DISPLAY=:0\nxhost +" | sudo tee -a /etc/profile
Optional: Pick a Specific Driver Version
Next, you'll need to identify what the latest video drivers are that you'll install in the next step. Run the following command and look for the highest driver revision (or whatever driver version you want to run.) At the time I'm writing this, the latest one is fglrx-experimental-13. You can use that one by just copying what I show below, or if not, make a note of the one you choose and replace it with your text.
apt-cache search fglrx
Preparing for Compilation
Now, you need to install the packages that will let you do the actual building. I've also thrown in the "screen" package that will allow you to leave cgminer running and then re-attach to the session if it ever disconnects. This is also the place to specify the video driver you identified in the immediately previous step.
sudo apt-get install -y \
screen \
git \
libncurses5-dev \
libcurl4-openssl-dev \
libudev-dev \
libtool \
automake \
opencl-headers \
debhelper \
dh-modaliases \
execstack \
rpm \
alien \
libnuma1 \
fglrx-experimental-13
That will run for a run for a while. Assuming no packages failed, it's time to configure the driver, then reboot to start using it:
sudo aticonfig --adapter=all --initial -f
sudo shutdown -r now
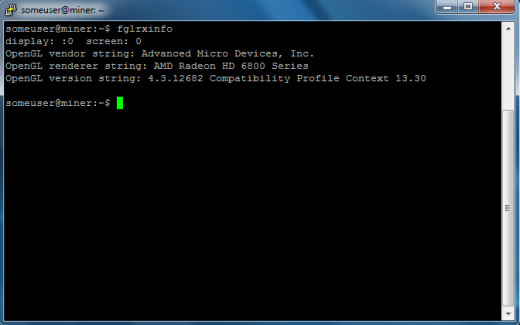
After the reboot, log back in. Run the fglrxinfo command:
fglrxinfo
The output should look something like this:
With all that out of the way, it's time to start building things using the two files you downloaded earlier, plus the cgminer files your're also about to get. As a reminder, these instructions assume they're all in someuser's home directory (which is where, after just logging in above, you should already be.)
First up is the Intel SDK for OpenCL. The distribution package contains RPMs, but since we're using Ubuntu you have to transform them into Debian packages and then install them. The following commands will do just that. There will be some warnings along the lines of "Warning: Skipping conversion of scripts..." that you can ignore.
Note that this step can take a while.
tar -zxvpf intel_sdk_for_ocl_applications_xe_2013_r3_sdk_3.2.1.16712_x64.tgz

cd intel_sdk*


for f in *rpm
do
fakeroot alien --to-deb $f
done

for f in *deb
do
sudo dpkg -i $f
done
Now that that's out of the way, download the latest source for cgminer:
cd ~someuser
git clone https://github.com/Kalroth/cgminer-3.7.2-kalroth
Now that cgminer is in the build directory, we need to extract the ADL SDK and grab some header files:
cd cgminer-3.7.2-kalroth/ADL_SDK
unzip -j ~/ADL_SDK_6.0.zip include/*.h
Now its time to configure cgminer:
cd ~/cgminer-3.7.2-kalroth
CFLAGS="-O2 -Wall -march=native" ./autogen.sh --enable-scrypt --enable-opencl --with-header-path=/opt/intel/opencl-1.2-3.2.1.16712/include
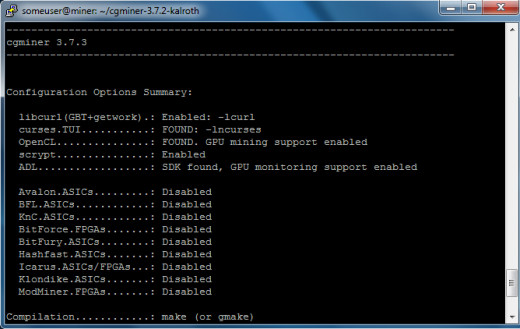
That last step will run the configuration for cgminer, and will result in several screen-fulls of output. Wait for that to end, and scroll up a bit to the final summary.
You should see the following lines, which tell you everything is successful. If you see "disabled" or "NOT FOUND" then something went wrong somewhere along the way.
Configuration Options Summary:
libcurl(GBT+getwork).: Enabled: -lcurl
curses.TUI...........: FOUND: -lncurses
OpenCL...............: FOUND. GPU mining support enabled
scrypt...............: Enabled
ADL..................: SDK found, GPU monitoring support enabled
The screen ought to look something like this:
If the output from configure looks good, all that's left is to actually compile the cgminer, which you can do simply by typing:
make
There will be some warnings along the way that you can ignore.
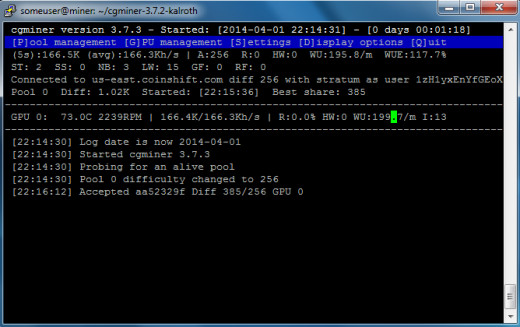
Once that's done, it's time to try running cgminer. A very simple command (which you should of course adjust to match your own pool, username, etc.) is below. The screen may seem to hang at first, but give it a good minute or two before you start second guessing things.
./cgminer --scrypt --no-submit-stale --no-client-reconnect --intensity 13 -o stratum+tcp://us-east.coinshift.com:3333 -u 1KAnH78wzmEb24psVn2VN3trvbWcHPpWEy -p xxx
If everything went well you'll see a cgminer screen with your video card(s) that looks something like this:
Final Touches
If you want to get a bit fancier, since we installed the screen package, you can use it to start a session that will persist across connections by something like:
screen -S myminer ./cgminer --scrypt --no-submit-stale --no-client-reconnect --intensity 13 -o stratum+tcp://us-east.coinshift.com:3333 -u 1KAnH78wzmEb24psVn2VN3trvbWcHPpWEy -p xxx
That will allow cgminer to continue running even if you close your ssh window. Then when you come back, you can issue a command like:
screen -r -d myminer
and pick up reading the output from where you left off. (If you'd like, you can also throw the cgminer command into an executable file (called, say, miner) and issue the screen command with screen -S miner ./miner, which is a much less unwieldy way to do things.)
Happy mining!
Related

The Roadrunner Bird - Interesting Facts and Information

The Benefits of Eating Raw Onions Every Day

Review of the Dell Inspiron 15 3000 Series With Ubuntu

Kulthi - Horse Gram - Nutrition Facts, Health Benefits and Uses

How to Create a Simple Gif Browser With Giphy® Api and Android Pagination Library


