- HubPages»
- Technology»
- Computers & Software»
- Operating Systems»
- Windows
How to Remove the 'Earlier Version of Windows' from the Windows 7 Boot Menu


This problem of earlier version of windows being shown in the windows 7 boot menu is quite common, and at the same time, annoying as well. In this article, I am going to highlight you two different methods to remove it.
It is quite common that we install multiple operating systems on our computers. Now a days, the trend may have somewhat lose its upward tendency, but when windows 7 was initially introduced, people were not yet ready to completely leave the Windows XP. Some minor technical issues and compatibility problems were also evident and reported in the Windows 7. However, with the gradual passage of time, things got improved and these issues were sorted out.
Given said that, when individuals installed multiple windows and later deleted the earlier version of windows – other than the Windows 7, there were many occasions that this problem arises in the boot menu. Because of which, you have to wait for about 30 seconds (until you hit the start button manually) before the Windows get started.
How to Remove the Earlier Version of Windows: Method No. 1
The first method may seem to be a bit technical one; however, it isn’t. You will have to put up some simple commands in the command prompt. All the steps have been mentioned as below.
1. Open the start menu and search the command prompt
2. Right click the command prompt and click ‘run as administrator’.
3. Once the command prompt is open, type the command ‘bcdedit’ and hit enter.
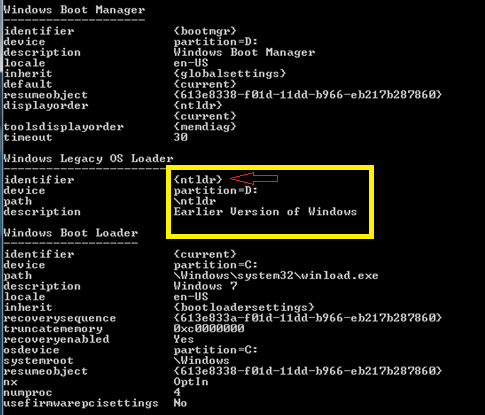
4. You will see a bunch of text coming up, search for the ‘Windows Legacy OS Loader’.
5. In that tab, you should be able to see {ntldr} – this is the thing that needs to be deleted.
6. In order to do that, type bcdedit /delete {ntldr} /f … There are spaces in between the command, which must be appropriately followed.
7. After that, you will see a message that “The Operation Completed Successfully”.
8. You need to restart your computer after that, and you will not see the Earlier Version of Windows option again in the Windows 7 Boot Menu.

How to Remove the Earlier Version of Windows: Method No. 2
On the other hand, you do not have to play with any commands in the command prompt. There is software called ‘Easy BCD’. This software gives you a complete control over your computer’s boot system. NeoSmart Technologies is responsible for making this multiple award-winning masterpiece.
1. Open the software
2. Go to the Edit Boot Menu. There will you see all your boot menu entries. (as shown in the picture)
3. You should see multiple boot entries there: Windows 7 and Earlier Version of Windows.
4. In the simple interface, you can easily modify all the related functions. You can delete the entry, rename it, change its timing etc.

Disclaimer:
Both these methods are safe and tested by myself. However, I do not take any responsibility for any possible or probably mishap, which may or may not occurred by the implementation of any of the above-mentioned methods.
Great Amazong Stuff

I know the frustration and annoyance this dual, and useless, boot entry can cause. Therefore, I wrote this guide to help you people. I will be glad to know if it helps you. Cheers!
Related Articles:
1. Do you know the Top 10 major differences between a Netbook and a Laptop? Read:


 in Windows 7")