- HubPages»
- Technology»
- Computers & Software»
- Operating Systems
Linux Guide: An Introduction to Grep Part 2

A Brief Introduction
This is the second part to my Introduction to grep, which is a very powerful command line tool used for searching files.
grep is incredibly useful and has a lot of different uses. For example, if you work with html a lot, you can use grep to quickly search all of your html files for a specific piece of code. If your web host lets you ssh into your web server, grep can be a very great tool for editing Wordpress themes or your website files.
While this command originated in Linux, there are several Windows ports available, which will let you use the grep command. Perhaps one of the most common is Cygwin, which can deliver a vast number of Linux tools, including grep, to your Windows Desktop.
This grep tutorial touches on some of more basic grep techniques. If you want to see a full list of all of the grep options, simply open up a terminal and type “man grep”
Technical Jargon Disclaimer
What follows contains a good deal of technical jargon, which might make little sense if you are not familiar with Linux or use a program like Cygwin.
This is the second part of my Introduction to Grep Guide, so if you have not already read it, you might want to check it out first, because some of the options used were explained in the previous how to.
Getting Started
Before we begin the grep tutorial, there are a couple of things that you need to do.
1. First lets make a folder on your desktop called greptest. You can do this by right clicking on your desktop and selecting “Create Folder.”
2. Create a file in the greptest directory called test.txt, you can use gedit or whatever your favorite text editor is.
Copy the following data into test.txt:
Line 1: aging
Line 2: medical managing
Line 3: medical lifting
Line 4: home lift
Line 5: safety stairlift
3. Open up your Linux terminal. If you are using Ubuntu, you can goto:
Applications → Accessories → Terminal
4. Change to the greptest directory ( cd Desktop/greptest )
5. Type "cp test.txt test1.txt" . This will copy the test.txt file into a new file named test1.txt. You will now have two identical files in the greptest directory. One is named test.txt the other is named test1.txt
Matching Only Complete Words
Often, you might want to search for a complete word, but by default grep searches for letter patterns within the word.
Use the -w option o search for only words that are on their own line or are separated by a non-word character, like a space.
Example:
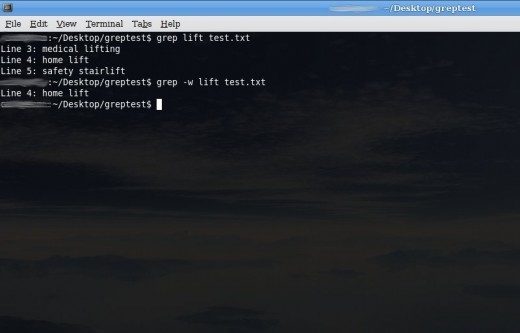
1. grep lift test.txt
Output:
Line 3: medical lifting
Line 4: home lift
Line 5: safety stairlift
*Note that it finds three lines with the word lift in it.*
2. grep -w lift test.txt
Output:
Line 4: home lift
*Note that this time it only finds one line with the word “lift” in it.*

Formatting the Output
To make the output a little easier to read, you can use the -T command, which adds a tab stop to the output.
We will use the * command, which in Linux is a wild card character, used to match any string. In the example below, we use test.* which matches any file that starts with “test.”
Example:
1. grep -w lift *
Output: See Image
*This can be a little hard to read, especially if you had a lot of matches.*
2. grep -T -w lift *
Output: See Image
By using the -T option, the output is formatted in a way that much easier to read.
Printing Only the Filename:
If you are searching a lot of files, you might simply want to know what files contain the search phrase, but do not need the other information.
To only show the filenames, we will use the -l option. We will also use the * operator again.
Example:
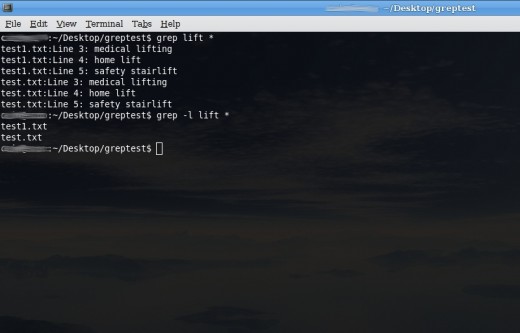
1. grep lift *
Output:
test1.txt:Line 3: medical lifting
test1.txt:Line 4: home lift
test1.txt:Line 5: safety stairlift
test.txt:Line 3: medical lifting
test.txt:Line 4: home lift
test.txt:Line 5: safety stairlift
This prints all of the lines in both files, which contain the word lift. If you were searching a lot of files, or files that used the word lift much more, this could easily become hard to read.
2. grep -l lift *
Output:
test1.txt
test.txt
*Note that this time, only the filenames are printed.*
Using Colors
grep can be very powerful, but if you are searching a lot of files or have a lot of results, the results can sometimes be hard to read.
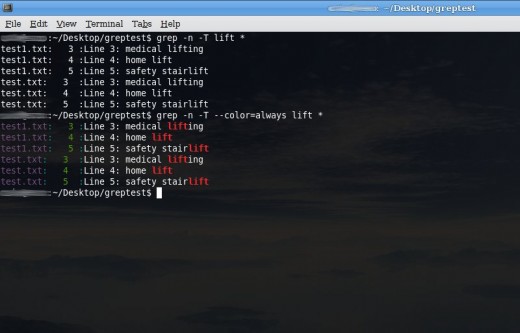
Grep allows you to use the color option to add colors to the output. While you can customize each color, for the purpose of this tutorial, we will use the --color=always command, which uses greps default color scheme.
Note that color is preceded with two dashes (--)
Example:
1. grep -n -T lift *
Output: See Image
2. grep -n -T --color=always lift *
Output: See Image
Finding Out More
This tutorial touches on but a few of the ways you can use grep. There are a great number of other options that you can use and you can combine many of the options that you have already learned as well. Once you learn how to use grep, you can apply it to a number of other similar Linux command line tools, such as awk.
In the next guide, regular expressions will be explained, which can greatly increase the power of grep.