Print Stand for a Cranky HP 6122

Printer Stand Assembly

Easy solution for problematic printer paper eject.
I can't get rid of my HP 6122. Practically none of the newer printers allow me to refill the cartridges with ink. Most of them have a chip that won't allow it. I tried one of those supposedly cheap-to-print Kodak printers and discovered that when it prints, it marks any page printed off against both the black and color printers whether you are printing in color or not. You can get a "replace color cartridge" message without printing a line of color. And you cannot print a black only page until you replace the color cartridge. My old HP printer on the other hands prints till it runs out of ink. And there's no chip so I can add more ink and use a single HP 45 or 78 cartridge half a doze times if I'm careful.
So I'm stuck with my faithful old HP 6122. Only problem is, it doesn't spit out the paper anymore. The end of each page catches on the printer cartridge carriage, crumples the paper and jams the next sheet behind it. I couldn't figure out how to fix it, so I experimented with tilting the printer to let gravity handle the ejection process and behold it works.
The wife, however wasn't very impressed with the wooden blocks and scrap lumber rig, so I drew up plans for a simple slanted printer tray. It works great. The ink in the cartridges even tilts toward the print heads, improving the flow of ink to the printer head. My prints are better than ever.
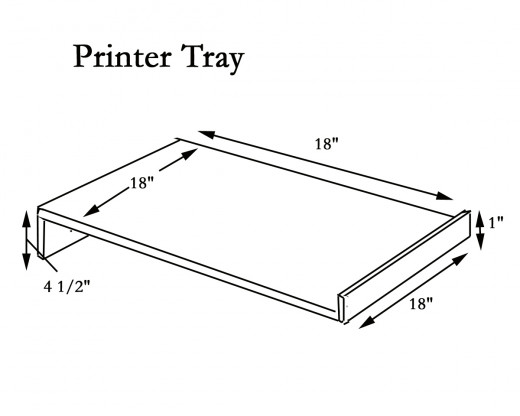
Here's what you need to make this rig:
Materials:
A: 3/4 x 4-1/2 x 18 inch pine or hardwood board
B: 1/2 x 1 x 18 inch pine or hardwood strip
C: 1/2 x 18 x 18 inch pine or hardwood board
Instructions:
Cut out the three pieces of wood as shown in the diagram..The angle cuts can be done on a table saw or with a circular saw if you have a steady hand. The upright piece needs to be vertical so the pressure on the back is straight down.
There are two ways to connect the pieces. You can glue them and tap in some fine finish nails or do as my brother-in-law did and screw them together with little screws. He predrilled the holes, glued the pieces and screwed them together.
Be sure to wipe any excess glue that gets squeezed out in case you want to stain and varnish the assembly.
The tray is 18 by 18 inches to accommodate the HP 6122. The toe-board keeps the printer from sliding down off the printer stand.
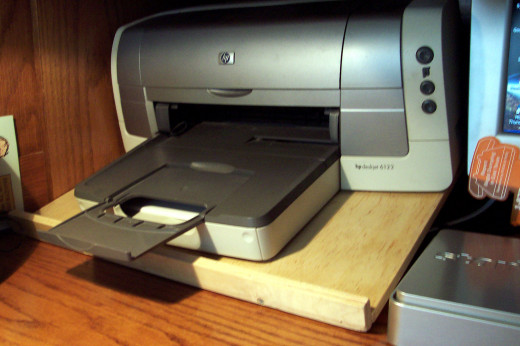
It works great and only takes about a half hour to cut out and assemble. My brother-in-law did a nice job making it out of scrap plywood he had in his wood bin. I haven't stained and varnished it to match my rolltop desk yet, but I plan to do it soon. Problem is, I have too much stuff to print, so it'll have to wait till we move probably. Which is why I had my printer propped up on blocks like a 37 Chevy for so long.
Tom King


 Vs Its Rival Printers")


