SharePoint 2010 List View Options: Using the OOB Preview Pane Style and improving in SharePoint Designer

In Microsoft SharePoint, it is very common to create a view to display content / data in a list or library. Anytime you create a list, a couple of views are created for you, but when you're ready to step up your game, you can create your own views to focus the user on what is most important. For example, one view may show tasks sorted by due date, another may show tasks grouped by the employee to whom it is assigned.
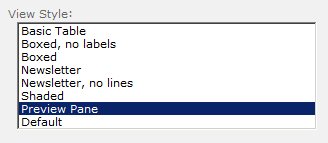
The topic for this hub is the use of the Style option, specifically the Preview Pane, that is provided out-of-the-box (OOB) with SharePoint. To find all of the Style options, create ,or edit, a view on any list, and then scroll down to the 'Style' heading. (It's on the left side, and it will be compressed.) Click on it to expand the options, and the choices are displayed. It will look like the picture above. Select the desired style option and then save the view. Play with each of them to see the benefits. Some are good, some aren't, but as usual, Beauty is in the eye of the beer holder.

________________________________________________________________
SharePoint Panes Us
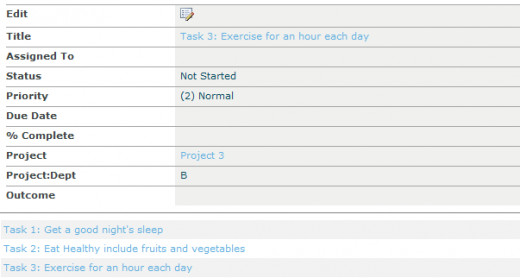
After you've finished playing with all the other choices, pick the Preview Pane option. With this, the view is split into two panes, with the summary list of items on the left, and the details of the columns on the right. Now, perhaps this is visually and functionaly perfect for you, maybe it isn't. Naturally, it isn't, or else there'd be nothing further to write about, and this article would be over. The real catalyst of this article was someone asking how to move the detail section, whichis currently on the right, to be BELOW the item list. After a little playing around, here is what I discovered.
First, in order to do this, you must have SharePoint Designer, and since this is about SharePoint 2010, the assumption is that you'll have SPD 2010 to go with it. (Hopefully you don't have SharePoint Codeviewonly-er 2013. Can you believe it?!) Anyway, open the view's page in SPD and edit it. To find it, click on All Pages, Lists, {Listname}, and then all the pages associated to that list should display. Click on the page name, then find the Edit Page link. (It's not as straightforward as this, so have a little patience when looking for it. Also, you may need to click the 'Advanced Mode' button on the Ribbon, which is on the Home tab.) Once the page is open in edit mode, scroll down to roughly line 109, and look for the following code:
109: </td>
110: <td valign="top">
111: <div id="preview1{generate-id()}" class="ms-ppright">
The code at 109 is closing the first < td>, a column, and starting the 2nd one at 110. (Which just means it will put it into another column, in case you're new to HTML.) To complete the objective of placing the detail section below the list section, then you can either delete lines 109 & 110, but I prefer to replace them with a < hr/> tag, (which will insert a thin solid line between the list section and the detail section.) as it gives a little better visual experience for the user.
Extra Credit
If you prefer to have the detail section above the listing, then the trick is to reverse the locations of the following DIVs:
< div class="ms-ppleft"> (The list) and
< divid="preview1{generate-id()}"class="ms-ppright"> (The detail), such that the latter displays before the former.
It's that easy, and you look like a pro!
Code Snippet to have the Detail above the Summary
<div id="previewpaneerror{$ViewCounter}"></div>
<table width="100%" cellspacing="0" cellpadding="0" border="0" style="" id="previewpanetable{$ViewCounter}" dir="{List/@Direction}">
<xsl:choose>
<xsl:when test="not($dvt_RowCount=0)">
<tr>
<td valign="top">
<div id="preview1{generate-id()}" class="ms-ppright">
<table class="ms-formtable" border="0" cellpadding="0" cellspacing="0" width="100%">
<xsl:for-each select="ViewFields/FieldRef[not(@Explicit='TRUE')]">
<tr>
<td nowrap="nowrap" valign="top" width="190px" class="ms-formlabel">
<nobr>
<xsl:value-of select="@DisplayName"/>
</nobr>
</td>
<td valign="top" class="ms-formbody" width="400px" id="n{position()}{$WPQ}">
<xsl:text disable-output-escaping="yes" ddwrt:nbsp-preserve="yes" xmlns:ddwrt="http://schemas.microsoft.com/WebParts/v2/DataView/runtime">&nbsp;</xsl:text>
</td>
</tr>
</xsl:for-each>
</table>
</div>
<hr />
<div class="ms-ppleft">
<table width="100%" cellspacing="0" cellpadding="0" border="0">
<xsl:apply-templates select="." mode="RenderView"/>
</table>
</div>


