DIY: Seo By Yoast For Wordpress...

Read Me For Best Seo By Yaost Settings...
I just built a blog the other day. And with the help of Seo By Yoast it has ranked so far at third on page 2 in 4 days.
I did a little keyword research and a little backlinking so far but in 4 days to be on the second page in that time shows how powerful this plugin is.
I'll Yoast To That....
There are many great free tools available for you to use to try to remedy all of these changes that google has made to there algorithm. The best one to use for on page optimization is Seo By Yoast. A wordpress plugin when used with the settings that I am going to share with you. Will help take your blog to the first pages of google searches.
Most people these days, with all of the changes that google is going through like penguin and panda. Really do not know which way to go. But there are a few things that have stayed consistent. Good writing and good on page seo still works, in some cases better then ever.
A few simple things that you will need to do to your blogs other than just seo. First is look at your content. Does it stand up to the test? What I mean by this is bloggers that just throw any old content out there, will need to do a lot of rewriting. I will list a few of the things that google is looking for in a blog these days.
- Content is King...
- Sound Seo Practices...
- Do not over optimize your blogs...
- Keep keyword density down to around 2%...
- External linking to authority sites...
- Inner linking between post and pages...
- Google loves pictures and video within your post and pages...
- Speed of your blogs loading ( Caching)...
- Simple streamline design...
- High PR relevant backlinks...
This is what the Wordpress By Yoast will look like once you have loaded it to your wordpress blog.
I am not go through the loading of a plugin here. There are many hubs and video's about that for you to learn from.
Seo By Yoast Dashboard Settings
Seo By Yoast Settings And Setup
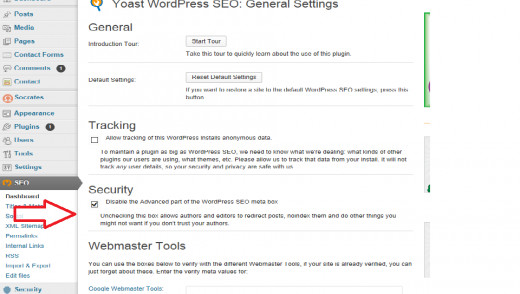
After you have loaded Seo by Yoast . And activated the plugin in your wprdpress. You will see a new icon on the left in your wordpress dashboard, that says Seo. Click on it and open the Dashboard, the picture above is what you will see.
All that you need to do here is enable the security box. But if you wish to add your webmaster tools, Bing webmaster or Alexa codes you can do that here, then go to the bottom and click the save settings,
Seo By Yoast Titles & Metas Settings
Titles&Metas Settings In Yoast
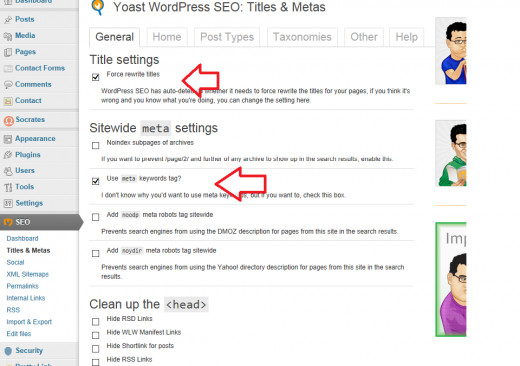
Next you will open the section in the dropdown named Titles & Metas. In this section under the Generals tab on the top of the page, you will enable the Force rewrite titles.
Then in the Sitewide meta stings section just below you will enable the Use meta keywords tags. Then go to the bottom of the page and click the save settings
Seo By Yoast Home Settings.
Home Settings For Yoast.
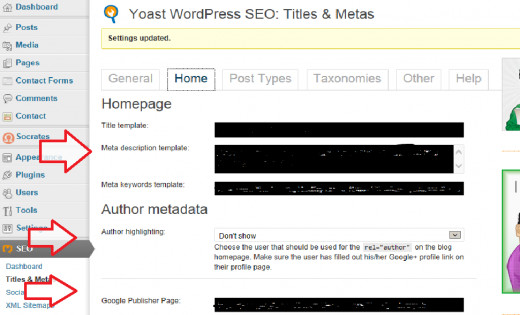
Sorry for the blackout the pic was clipped while I was working on a new customers blog settings. It willn't have the black in yours, this is just to protect his information.
Click the Home Tab in the Titles & Metas section of Yoast. Add your blogs Title in the Title template box.
Add your blogs meta description into the meta description template box. In the drop down under Author you can drop it down and have your Authors name attached to your search results. And in the next section you can add your Google+ URL to your profile so that your profile picture will show up next to your Search results.
Go to the bottom and click the save settings and move to the next tab Post types.
Editing Post Types In Yoast.

Post Type Settings In Yoast
The first thing you need to do is go all of the way to the right to the Help tab. Open it and you will copy this %%excerpt%%
Now go back to the post type tab and open it up. then paste the %%excerpt%% into the meta description template boxes. Under post, pages and media, as shown in the picture above.
Now go to the bottom and click the save settings in yoast . and move to the next tab Taxonomies.
Taxonomies Settings In Yoast.
Yoast Settings For Taxonomies.
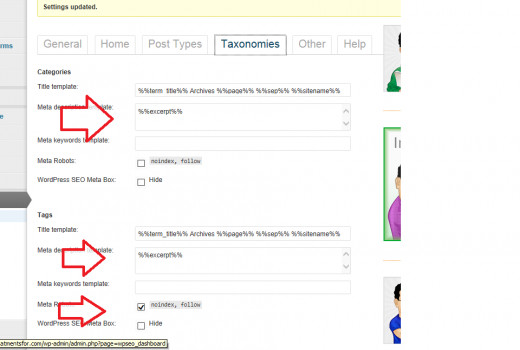
In the meta description boxes for catagories and tags add the %%excerpt%% that you had just added in the post types section.
And at the bottom enable the no index-follow in the tabs section of the page. Then go to the bottom and save your settings.
Other Tab In Yoast..

Seo By Yoast Other Tab..
In the next Seo By Yoast tab over marked other you will enable the no-index, follow check box in the section Date Archives.
Then save your settings at the bottom of the page.
Socializing With Yoast..
Social Settings For Yoast Plugin...
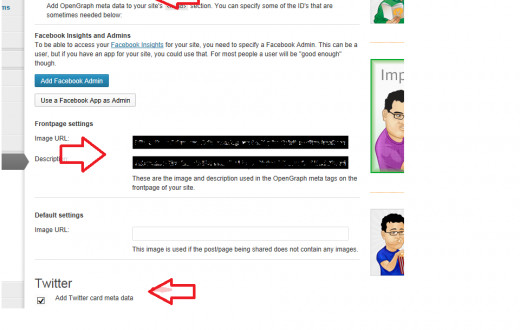
Move to the next option in your yoast plugin named social. Open this up and enable the add open graph meta data.
In the Frontpage settings section, Add the image URL for youe blogs main image. You can do this by going to your frontpage and right clicking on it then save image url or save image location it depends on which OS that you are using.
Now paste the URL into the box that ask for it, and add your blogs description. In the next section down you will see twitter enable this and add your twitter id or name just your name not the http://twitter.com/ just everything after the /.
Now save your settings and we will go to the next part down XML Sitemaps.
XML Sitemap In Yoast Wordpress Plugin...
XML Sitemap Within Yoast Wordpress Plugin...
First if you currently have a sitemap plugin you will need to disable it or delete it for it might cause a conflict.
All of your sitemap needs can be done right here within Seo By Yoast. And you will have easy access to it right from your dashboard.
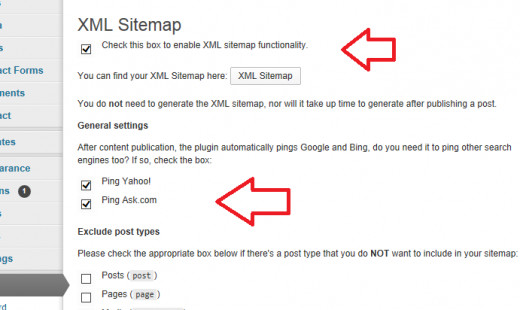
After you have disabled your old sitemap plugin, you will enable the box at the top that says check this box to enable XML sitemap functionality.
In General settings check the Ping Yahoo and Ping Ask. com boxes. And at the bottom you will see the number 1000 in the Entries per page section change it to a number like I use 500 it doesn't matter but unless you are having a blog that is massive you will want to use a lower number. Then click the box that says you can find your sitemap here to make sure that it setsup for you.
Then save your settings and That's It. all of the rest of the settings will be taken care of just fine in the default.
I have just given you what I am paid very well to do for my customers for free. I hope that it works as good for you as it does for all of my customers.
Please take a second to take the little poll that I have setup just below so that I have an idea if this hub was helpful. Thank you...


