How to use GIMP Layer Mask


What is GIMP and Layer Masks
GIMP is open source software that is used for image editing and its masking tool can be used in many ways. There are two types of GIMP masks, the layer mask and selection channel masks. Both are non-destructive to the original image; unlike using the eraser tool which removes pixels permanently a mask only hides parts of an image.
This gives you much more flexibility and creative power. This tutorial is intended to help beginners learn how to use the GIMP layer mask tool. In this tutorial the focus will be on using layer mask to remove a photo background.
This program is considered by many, myself included, to be the best alternative to Photoshop because it has similar capabilities, filters and there are a lot of plug-ins available.
Photo with b.g. Removed - Two layers showing the difference between Non-Destructive Layer Mask and Destructive b.g. Removal

What are Image Masks
To keep things simple, think of how a face mask hides your entire face and only exposes your eyes, nose and mouth. When you remove the mask your face is still there, right. Well, the concept is the same when using GIMP masks.
The first thing you need to understand is a mask created in GIMP always consist of two colors; black and white. The black will cover and hide areas of your image and whatever is painted white will reveal what is under that area of a mask.
Learning how to use the masking tool and quick mask tool is easy, and it will help you edit photos more precisely. Once you understand how mask work and how to use masks effectively I'm confident that you will agree that GIMP masks are extremely useful.

How to Add a GIMP Layer Mask to Remove Photo Background
Go to <File><Open> when the browser opens find the image you want to use. In the Layers dialog you should see the image, next, duplicate the layer/image (Shft+Ctrl+D).
Now you should have two layers with the same image, now hide the bottom layer. This is easy to do, in the layers dialog hide the bottom/original image by clicking its eye icon.
Great, now left click on the top image layer to make it active again. (GIMP layers turn blue when active) Okay, you are now ready to add a layer mask follow the steps outlined below.
Add a Layer Mask using GIMP Layers Dialog

4 Steps to Add a Layer Mask
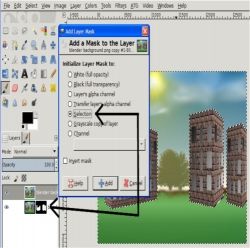
1. Pop-up menu appears after r-clicking the image layer, "Add Layer Mask" is highlighted
2. Add layer mask pop-up box, "White (full opacity) is checked and highlighted
3. To the right of the image icon in the layers dialog you see a white, active layer mask
4. The b.g. of the image was painted with black to mask it out; the layer mask is now B&W.
Note that the image layer has not changed, but the canvas shows the image with the b.g. removed. This is a non-destructive b.g. removal. Open an image and give this method a try to get a feel for how it works.
Use a Paintbrush to Create the Layer Mask

GIMP Masking Tool Tip

Paint on the Layer Mask to Remove Photo B.G.
Note: If you do not see the grey transparent area when painting black that means the photo you are using does not have an Alpha channel. You can add it by R-Clicking the layer and selecting Add Alpha Channel.
1. Select the (L-Click) paintbrush from the toolbox
2. Make sure Black is the Foreground color and White is the Background color as shown
3. L-Click on the Mask Image it will have a white border when active (as shown in image)
4. Now on the work canvas start painting over the photo where you want to remove the b.g.
Learn More About Photo Editing Software and Layers

Learn How to Convert a Selection to a Layer Mask
There are several ways to use layer mask in GIMP
With this masking tool method you want to select the area you wish to hide/remove before converting a selection to a mask. You can use any selection tools you choose.
1. Select the areas/objects you want to keep
(In the image shown I selected the buildings using the rectangle select tool and the fuzzy select tool)
2. Invert Selection - Ctrl + I (the letter i)
3. R-Click Layer, Check "Selection" from pop-up
4. A new mask layer is created
Tip: When you make a selection you will see marching ants (moving dotted line) around what you have selected. BUT After inverting a selection you will see marching ants around your object AND the edge of the canvas. This means everything except for the original selection is selected. Give this a try to see how it works!

GIMP Quick Mask Button


How to Use the GIMP Quick Mask
The Quick Mask Button is Located in the Bottom Left Corner of the Canvas
What is a Quick Mask
This method masks/hides your entire image with a semi-transparent color that represents the mask. This represents the masked or hidden area, but it allows you to see through to the image.
How to Edit a Quick Mask
To use a quick mask you first click on its icon to enable and create the quick mask. The icon will become outlined in red; by default it's greyed out.
With a quick mask on you use a paint brush to paint over all the areas in the photo that you want to unmask or reveal.
Note: We learned that a mask is always black and white and the black hides or mask things and because the light-red overlay represents the mask; we must use "White" to paint and reveal areas.
Because we are using a quick mask as you paint over areas in the image that you want to unmask/reveal you will not see white you will see the image under the mask.
How to Change a Quick Mask into a Selection
When you are done painting click the "Quick Mask" button again. The area you painted over with white will become a selection, i.e. it will have marching ants around it. And the quick mask light-red overlay color will disappear.
How to Change a Selection into a Layer Mask
You can convert any selection into a layer mask. To add a layer mask R-Click the layer and check "selection" from the pop-up box. A new layer mask is created.
Get Help Learning How to Use GIMP Software
Layer Mask Are Flexible
GIMP layer masks are great for removing a photo's background, but layer mask can be used for much more. Masks can be edited, saved and used over and over. They can be saved to a channel, and a mask can be copied and pasted. Graphic designers rely on and use layer mask as well as bezier paths because both are invaluable tools.
How to Disable a Layer Mask
A layer mask can be temporarily disabled by R-Clicking its layer and selecting "Disable Layer Mask" when you do this the layer mask will have a red outline around it so you can easily see that it has been disabled.
What is the Difference Between a Layer Mask and a Channel Mask
A layer mask is connected to image and layer it is on, and a channel mask or selection mask is independent.
In Conclusion:
Remember that a layer mask will always be black and white; you can't paint with other colors on a mask. However, you can add filters and effects to layer masks e.g., masks can be blurred, you can use a gradient on a mask to blend two photos and more.
Try adding a layer mask using the techniques explained here to remove a photo's background; practice will help you get a feel for how layer mask work. Keep in mind, these are some basic uses of layer mask to help you get started.
© 2012 Valentina Cabral


