- HubPages»
- Technology»
- Consumer Electronics & Personal Gadgets»
- Portable Electronics
Why I Love My Nikon Coolpix Camera

My Nikon Coolpix S8200 Digital Camera Meets Most of My Photography Needs
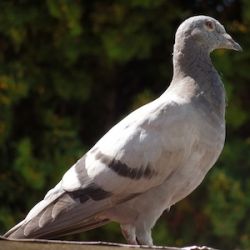
I enjoy nature photography, and that often means that I want to zoom in on my subjects, such as this visiting pigeon on my shed roof. My Coolpix helps me get those shots of birds in the sky, in the water, or on the beach, which I would not be able to capture without the optical zoom lens. It helps me to focus on a branch high in a tree where a bird might be perching.
Having this camera has multiplied the photo opportunities I can take advantage of. Although I still haven't mastered all its features, I have enjoyed experimenting with its different scene settings. For example, I love taking sunsets, and there is a setting for that. There is also a setting for dusk and dawn. Most of my nature walks begin In late afternoon and end shortly after sunset, so I use these settings all the time.
I also like to take a lot of video on my nature walks. This camera will take one half hour of video, and I can also zero in on moving wildlife from a distance. With this camera in my fanny pack, I'm ready for any photo opportunity that comes my way. I try to remember to take it everywhere I go. Whenever I've left it home because I think I won't need it, I've regretted it. It does no harm if I have it and don't need it, but it seems when I don't have it, I miss unanticipated opportunities, like a flock of wild turkeys practically in front of me. Luckily, when I went hunting for them the next night in the same place, they had come back, too.
All photographs in this hub were taken with my Nikon Coolpix S8200 unless otherwise noted. Copyright, 2012, all rights reserved.
My Older Canon PowerShot Could No Longer Meet My Needs
Until the time I bought my Coolpix S8200, I'd been fairly content with my Canon PowerShot A1100 IS. I think I used it from 2009 until late November 2011, when I bought my first Coolpix, the S8200. The Canon Powershot was 12.1 megapixels with a 4x optical zoom. It was adequate for taking photos to illustrate my lenses and blogs and for photographing book covers too big for my scanner. I also created hundreds of Zazzle products from its images. But when I started photographing wildlife, or trying to, I longed for a longer zoom lens. After searching Costco, I decided the Coolpix S8200 would best meet my needs in the price range I could afford.
Features of the Coolpix Which Met My Expanded Needs
I needed a small camera I could easily carry in my fanny pack or photo vest pocket when on my photo walks or while attending events I wanted to photograph. It had to have a powerful optical zoom. The Coolpix S8200 is 16.1 megapixels with a 14X zoom. It has a 3.0 LCD display and takes full HD movies. There were only a couple of things I liked better about my older Canon PowerShot . It still had a viewfinder, which the Coolpix lacks, and it used AA batteries. The Coolpix only has a rechargeable battery. I don't like being captive to my battery life, and that means for long photo shoots, I have to have another camera with me as well -- especially if I'm also shooting video. So if I'm attending an event where I need to shoot a lot of video, such as of several speakers, I take my Flip along, which uses AA batteries and can shoot over 90 minutes of video. The Coolpix only shoots half an hour of video per charge. But the Coolpix takes much better videos than the Flip, which you shall see. I'm getting used to not having a viewfinder now, but I still always carry another camera to make sure I can't stop shooting when my battery gives out.
You can shoot in auto mode, as I usually do, or with special effects, or in continuous shooting mode. You can also use a scene auto selector. On that setting the camera decides which is the optimum shooting mode as you frame the picture. I haven't played with that too much yet. Some specific scenes can be chosen from the dial at the top of the camera. Those include night landscape and backlighting. You can also choose "pet portrait," which focuses on the face of a dog or cat. I was going to try it out on a neighbor's cat tonight. I used the zoom to shoot the cat in auto mode, since the cat was about 30 feet from me. As I was turning the dial to "pet portrait," the cat's owner came home and the cat moved out of sight. Here's how the cat turned out. I was not trying to compose a picture -- just shoot the cat. The somewhat blurred rosemary in the foreground was right in front of the camera. I thought I was aiming over it. There was an entire lawn between the rosemary in the front and the cat behind. Had the cat not moved, I would have discovered how well the "pet portrait" setting focused in on the face.
Features of My Nikon Coolpix S8200 - It does a lot more than my older Canon PowerShot A1100 IS

Other Coolpix S8200 Settings
My Coolpix has a lot of settings if I want to leave the automatic shooting mode. In the past, I've tended to add some of the special effects, such as HIGH CONTRAST MONOCHROME, or NOSTALGIC SEPIA, in a photo editor. You can also choose SOFT, HIGH KEY, LOW KEY, or SELECTIVE COLOR. I'm not experienced enough as a photographer to even understand these last settings, let alone know when to use them, but the Coolpix can add all these effects in the camera. I played with some of these effects in a capsule below in some pictures I took of my husband tonight as he was reading his paper. I did not use a flash for any of those pictures. Keep in mind, I've never played with these settings before, but wanted to do it before writing this. I've just never been motivated to use them before, since I normally like my pictures as realistic as possible.
In the capsule below this, I played with two settings as I walked through the park at dusk a couple of months ago -- the sunset setting and the dusk/dawn setting on the SCENE menu (which is different than the scene settings on the dial.) Scenes you can select from are close-up, food, museum, fireworks show, black and white copy, portrait, landscape, sports, night portrait, party/indoor, beach, snow, sunset, and dawn/dusk. I guess I could have used some of these, but I didn't even realize I had them. I seemed to do just fine in auto mode for most pictures I wanted to take.
My picture quality is better with the Coolpix than it was with the old PowerShot. That makes it much better for shooting images I want to use to make Zazzle products. I shot this picture with the old PowerShot in 2010.
Recently I photographed the same oak tree about the same time of night on the auto setting with the Coolpix. It's the picture you see below. I should also note that since I do a lot of my shooting at dusk or sunset, I leave my flash turned off by default. I only turn it on when I shoot indoors or when I need it for a reason.
Shot with the Coolpix S8200

Playing with the Sunset Setting - A couple have the dusk setting
Click thumbnail to view full-size


Photographing the Sunset Colors

Playing with Coolpix S8200 Settings
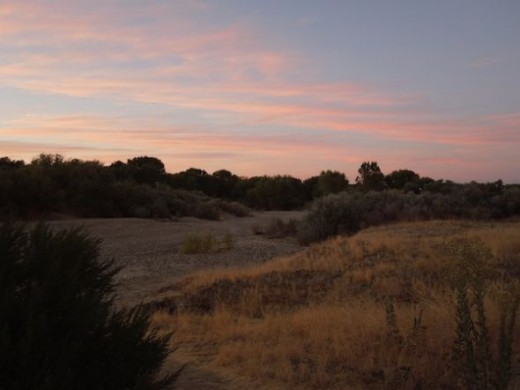
In the capsule below, I took three series of shots. The first in each series was shot on the auto setting. The second in each series was the dusk/dawn setting, and for the third I used the sunset setting. You can see there there are subtle differences between the auto and sunset settings, with the dusk/dawn setting having a lot more blue and purple tones. I did not use a flash with any of these settings.
The photo above of the bird was shot on auto setting, and I don't think I had time to zoom in on it.
Comparing Settings with Three Scenes in a Park - Auto, Dusk/Dawn, and Sunset
Click thumbnail to view full-size


If you were choosing a setting to shoot a sunset with this camera, which one would you choose at this time of night?
Using the Zoom Part 1 - The Freeway from the Park

Contrasting Zoom Photos
Most of the pictures in this lens were taken at Lawrence Moore Park in Paso Robles at dusk on September 16, 2012. The park is entered from a street, on the other side of which is a housing tract. See the map below to really visualize this scene. Across the river there is a freeway. I was turned toward the freeway about the distance of three blocks when I shot these pictures to illustrate the zoom.
I shot the first picture, the one above, on the auto setting. Where the path in the picture begins to curve, look away toward the right and up, and you'll barely see the freeway in the distance. Below you will see the freeway clearly, at full zoom. Because it was dusk, the shutter speed was slower, and that's probably why the car is blurry in the zoom. It was zooming by at freeway speed. The zoom picture below has more light, even though it was also shot on auto. You will also notice that the fence appears much closer than it is to the freeway in the zoom picture. The fence is on my side of the river, and the freeway is on the other side of the river. The actual distance between them is about a block.
Lawrence Moore Park - Where I shot most of these pictures on September 16, 2012
For this to be useful, you will need to do the following, since Google didn't save my setting. This should be on combination map and satellite. I think that setting did save. Close the directions box. Then click the down arrow twice, zoom in once, up arrow twice , zoom twice, down arrow again twice, zoom again twice, up arrow twice, zoom three times, down arrow once more, and zoom once more. Now you see the park I walked while taking the pictures.
I entered the park from Riverbank Lane onto River Walk. I turned left at the trees down the path you see to the left of River Walk. About halfway down that path I stopped to take the sunset shots over the trees you see just above the path on the map. Then I turned to face the riverbed and the freeway, which are to the left of the map. From where I was standing, the freeway was about two blocks, across the riverbed.
I continued down the path all the way to where it curves toward the riverbed. I stopped and faced left (up on the map) to take the pictures of the brush in the riverbed.

Using the Zoom Part 2 - The brush in the river
Using the Zoom for Nature Photography
In this section, we see a more common use of the zoom in nature photography. The picture above was taken in auto setting, close to the riverbed looking left (or up) on the map you see above. The picture below was also set on auto, but was at full zoom. You can see how much larger and more detailed the green and darker shrubs in the riverbed are in the zoomed picture. The perspective is still a bit off, since the river is much wider than you would assume from the picture taken with the zoom.
Obtaining a Nikon S8200 Camera
This camera is no longer made. You can still find it, though, at Amazon. There are still some new ones available, and some cheaper used ones. This page will show you the Nikon S8200 cameras currently available. Of course, if you click through, you may find a camera you like even better.
Closeups with the Coolpix S8200 - I'm still learning better ways to do this.

Playing with the Macro Setting
Although there is a macro setting on my Coolpix, I haven't learned yet how to make the most of it. That's probably because I have to read the manual (except for the very basics) on my computer. The User's Guide that came with the camera basically tells me where the controls are and how to set up and use the camera and access its menus. I only go to the Reference manuel (on DVD) when I absolutely have to. For most of my closeups, I simply get closer to the subject or use the zoom. I cannot really remember what I did to get the picture below, which was shot just after the picture above, which I know was on auto and no zoom.
Cottonwood Tree in Wind
This is a still picture of this cottonwood tree on auto setting, no flash, at dusk. I took this after shooting the video clip below.
Playing with Special Effects - At least the ones I understand
Click thumbnail to view full-size


Using my Nikon Coolpix S8200 Indoors - I only use a flash sometimes.
Click thumbnail to view full-size


Trees in the Wind Just after Sunset - Hear the wind?
This is a still picture I took before taking the video of the same picture.
More Photos Using the Zoom
This was taken on a walk in the late afternoon along a back road. The creek ran along beside the road, but it was impossible to get close to it. First I would have had to enter private property by getting across a wicked barbed wire fence. Then I would have had to walk through a "forest" of poison oak. It's so much easier to use the zoom lens by moving a small switch on the camera.
Be sure to check out this camera to see if it has the features you need. This camera is no longer made. You can still find it, though, at Amazon. There are still some new ones available, and some cheaper used ones. This page will show you the Nikon S8200 cameras currently available. Of course, if you click through, you may find a camera you like even better.
Read how others have reviewed this on Amazon. They have used features I have not used. The ability of this camera to capture indoor pictures without a flash is one of my favorite features that others mentioned. I did not use a flash in any of the pictures where my husband was reading (demonstration of special effects.) I even forgot to mention the self-timer because I've never used it. Photography is my hobby, with which I make a few dollars from Zazzle. Naturally, the pictures provided by the manufacturer on the Amazon site will show you better than I the full capabilities of this camera. It's a mighty tool in a small package.
Don't Forget to Comment
This is where you can talk to me.
And while you're here, I just wanted you to see that barbed wire fence and the poison oak I mentioned in my other shot of this creek I took with my Coolpix S8200 zoom.
Related

Nikon Coolpix L840: Is This the Best Budget Used Digital Camera?

Detailed Review of the Nikon D850 Full Frame Dslr Camera

How To Photograph Race Horses

How to Take Photographs of the Moon

How to Control a Nikon D200 Camera and Preview Pictures Full Screen with a Mac Computer Using Sofortbild and Tethering


