- HubPages»
- Pets and Animals»
- Farm Animals & Livestock»
- Hens & Roosters
DIY: How To Incubate Your Own Chicken Eggs (Home Made Incubator )


First Things First
- If you are new to having chickens there is one very important thing that you are going to need to know. NO, you can not incubate and hatch store bought eggs! Some of you might laugh, but I have been asked this question several times since I have had chickens. Be prepared, you will most likely be asked this question to, if you haven't been asked already.
- You cannot have a successful hatch if you have already refrigerated your eggs. If you do not have many hens laying eggs don't worry, you can save eggs at room temperature for up to 2 weeks prior to your incubation set time.
- Incubating your own eggs in any incubator for that matter, does take time. With a home made incubator (that is going to save you money) is going to take a little more effort, time and patience. You will also need to be a little organized, meaning you can keep track of times and days really well.
- You can only hatch baby chicks by incubation if the eggs are fertile. Meaning, you have a rooster. If you do not have a rooster, you can find a lot of farm fresh eggs locally I am sure. We have a lot of local farm fresh eggs here. You can ask before purchase if they are fertile eggs and possibly even which chicken had laid the eggs.
What You Will Need
- Cooler (size depends on how many eggs you are hatching.)
- Metal Grate (that fits the coolers interior per size you have chosen.)
- Miniature Fan (I used a USB one)
- Duct Tape
- Drill ( Something to drill holes through the sides to help ventilation.)
- Thermometer ( One that says humidity and temp.)
- Bowl
- Sponge
- Water
- Small piece of aluminum foil
- A little piece of wood (nothing special)
- A calendar with the current month (to help with days and times.)
- Nonslip Mat (I think that's what it is called) a piece of fabric, or paper towels.
- Standard 60 watt household light bulb.
- Old lamp that you do not mind taking apart for the inside parts. (Thrift stores is the way to go if you do not have one)
- Piece of clear plastic/Glass - Only if you want the front open view like mine, but not necessary to make the incubator.
Egg Incubation Facts
- Incubating chicken eggs takes 21 days. (Give or take a few days)
- Eggs need to be rotated 3 times a day. (Morning, Afternoon, Evening)
- Eggs should be rotated around the same time each and every day. (Give or take an hour or so)
- Eggs should be rotated the same way each time you rotated them. (If you always rotate to the left, keep rotating to the left. Same with rotating to the right.)
- Humidity is to stay is to be maintained between 50% and 65% for the first 18 days.
- Temperature is to be maintained between 99 and 102 degrees Fahrenheit.
- Temperature, humidity and rotation of the eggs are the key to a successful hatch.
- DO NOT TOUCH THE CHICKEN EGGS THE LAST 3 DAYS OF INCUBATION!
Home Made Incubator


Making Your Incubator
If you already have that old cooler that your not using anymore, you can go ahead and start preparation for your little eggs.
- Drill holes in the sides for ventilation purposes. Do Not Drill Holes Really Close To The Bottom, That is where water is going to be stored. (We drilled approximately 8 in each side.)
- Place about 2 cups of warm water in the very bottom of the cooler. (Depending on the size of cooler you are using.)
- *If you have a cutting tool* You can cut out a circle big enough for the light to be inserted into the side of the cooler. If Not it is not a big deal, you can insert your light 2 different ways.
- Place a piece of wood inside the cooler (in the water) to help with the humidity, and to help hold up your metal grate.
- Place your metal grate on top of the wood and make sure it is stable enough to hold your precious little eggs.
- You can use a nonslip mat (as I did, pictured above) to go over the metal grate. You can also use an airy fabric if you have one, or even paper towels. NOTE: If you use paper towels you are going to have to change them frequently as they rip and tear during rotation of the eggs.
- Insert the light which you can do one of two different ways. Cut a hole in the side (As I have done pictured above) or you can dangle the light (between the lid and the top of the cooler.) Place a piece of foil around the neck of the light to keep it from potentially burning/melting the side of the cooler. You might have to fiddle with it to help keep the light in place. REMEMBER: (You will be opening the lid 3 times a day for rotation of the eggs.) Get Creative!
- Find a good place to put your thermometer/Humidity gauge. You do not want to set it to close to the light, but not to far away from it either. You want to make sure you get a good "Overall" reading.
- You can use duct tape to help secure the light cord into place. NOTE: Do not place tape to close to the light or it will melt!
- If you have installed the front viewing window (as I have pictured above) you can use the duct tape to help secure the window in place and cover up the access space between the cooler and the window. You want to cover it to help keep the heat and moister in the cooler. ( You already drilled holes for ventilation, you do not need more.)
- Place the small bowl into the cooler on top of the grate (where your eggs will also be)and fill with water. NOTE: You are going to be placing the bowl a little close to the light, not to close though. I would say anywhere from 3 to 6 inches away from the light or so.
- Cut up the sponge and place the pieces inside the bowl that is already filled with water.NOTE: The sponge is to help with humidity levels, you may need to add more or less sponge.
- Use your duct tape to secure in place the calender of your choice to the top of the cooler lid. (I used a print out template I got online.)
Congratulations! You have now successfully made your own incubator. You should be very proud of yourself, now comes the waiting game.
Before You Insert Your Eggs Of Choice
After making your incubator you are going to have to monitor the temperature and humidity levels for at least 24 hours before you put your little eggs inside.
- You want to make sure that you are keeping your humidity level stable between 50% and 65%, give or take a few degrees in the beginning and you will be fine.
- Temperature is extremely important- During the first 24 hours while monitoring your incubator, you have to make sure you are not having major fluctuations in temperature. The proper temperature for incubating chicken eggs is between 99 degrees and 102 degrees Fahrenheit. Some have stated that 99.5 degrees works best.
- If you are having problems keeping your temperature under 102 degrees Fahrenheit you can insert the fan to help circulate the air. Leave the fan running for 12 hours and see if it is helping to keep the temperature maintained between 99 degrees and 102 degrees. NOTE: You may not need the fan all the time, but you might if you can't keep the temperature stable between 99 and 102 degrees.
Once you have monitored your incubator for 24 hours and everything seems to be stable you can go ahead and insert all of the chicken eggs you want to incubate.
IMPORTANT NOTE: You do not want to insert eggs at different time periods during incubation. Incubation takes 21 days no matter how many or how little eggs you have. DO NOT RUSH THE HATCH!
Placement Of Eggs

Pictured Above
In this photo you can see how I have my eggs set up inside of the incubator. The bowl with the water and sponge on one side, while the temp/humidity gauge is on the other side, opposite of the light and the bowl.
You can incubate eggs that are different sizes and different breeds of chicken at the same time. Pictured above I have full size chicken eggs incubating at the same time as the miniature bantam eggs.
The eggs need to be laid on their side with the bottom (bigger part of the egg) facing slightly higher than the top (skinny part of the egg.) Reasoning for this is because as the baby chick grows inside of the egg it is going to need more room to grow.
Importance of Egg Rotation
All eggs within the incubator need to be rotated a quarter turn 3 times a day!
(Picture the egg has 3 sides.) The reason for egg rotation is very simple, but of the utmost importance. When a mother hen lays on her eggs she rotates them herself, meanwhile we think she is just being picky trying to get comfortable.
Try to get a schedule going and get the kids involved if you have any. My kids loved rotating and looking at the eggs.I would rotate my eggs before going to work in the morning and put a number "1" on the calender for that day. My kids would rotate the eggs again in the afternoon around 2:00 o'clock, then they would write a number "2" on the calender for the day. Before heading to bed we would rotated the eggs one last time and write a "3" on the calender for the day.
There are many different ways to help keep track of rotation, the example I have given was just the easiest way for the kids and I to remember and it worked out great.
Important: Incubation Times & Temps
21 days is the standard time for incubating chicken eggs, but however you are only supposed to rotate the eggs for the first 18 days. The last 3 days are crucial to having a successful hatch. DO NOT ROTATE THE EGGS THE LAST 3 DAYS OF INCUBATION!
- Temperature for the first 18 days is between 99 degrees and 102 degrees Fahrenheit.
- Humidity for the first 18 days to be set and maintained at 50% to 65%.
The last 3 days are slightly different however.
- Temperature for the last 3 days of incubation needs to be slightly cooler and set at or between 98 degrees and 101 degrees Fahrenheit.
- HUMIDITY for the last 3 days is crucial and needs to be set higher at, at least 65% or above.
- DO NOT TOUCH THE CHICKEN EGGS DURING THE LAST 3 DAYS OF INCUBATION!
If the humidity is set to low the baby chicks might not be able to crack through the shell come hatch time and it could end in the death of the baby chicks.
Candle Your Incubated Eggs

Pictured Above
In the photo above you can see that I have candled a chicken egg during the incubation period. By candling you can see which eggs are starting to take shape and which ones are not. At This time you can decide whether to toss out the ones that are not, or let them be a little longer.
My next article is on candling chicken eggs. How, when and why. You will find that link below for more information on candling your chicken eggs.
How To Candle Fertilized Chicken Eggs
- DIY: How To Candle Your Own Fertilized Chicken Eggs
Every chicken parent likes to know when they are "expecting" right? Follow these simple instructions and you can see for yourself, just how many baby chicks are growing inside their little eggs.
Hatching Day!


DO NOT HELP THEM HATCH!
No matter what you do or how bad you might feel, do not help the baby chicks hatch!
I know it might look sad, and you are going to hear a lot of little chirping and cheeping coming from the incubator, but it is very important you let them hatch naturally on their own. By pulling the egg off of the chick you could damage the umbilical cord causing the chick to bleed to death.
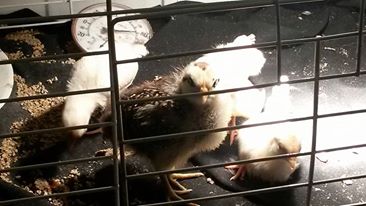
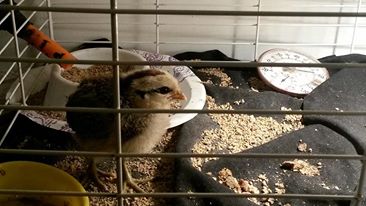
Hatched Chicks, Now What?
Once your chicks have hatched, leave them in the incubator until their wings are completely dry and they start to fluff out. You can add a little bit of the starter feed (in a small lid of a coffee container or a lid of any sort that has a small lip on it.)
You can also ad a water container to the incubator for the chicks to drink out of while you are waiting for their wings to dry out. NOTE: Put marbles in their drinking cup for the first little while of their life to keep them from potentially getting in the bowl and drowning.
Once they are all dried out and look like little fluff balls you can take them out of the incubator and put them in a separate cage or even a box will work. NOTE: You will need a second light for the 2nd cage to help keep the chicks warm. (Unless you are done with the incubator, than you can use that one.)
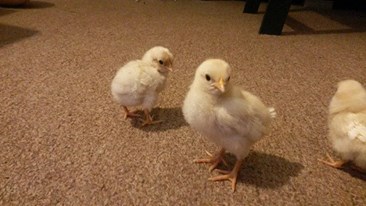
End result equals some cute fury looking little chicks that you hatched all by yourself! What is more rewarding than that?
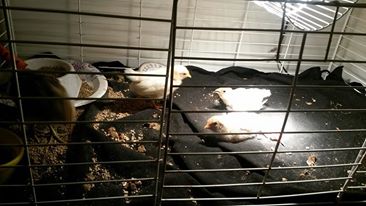
3 Bantam Chicks

Let Me Know How I am Doing
Was This Article Helpful?
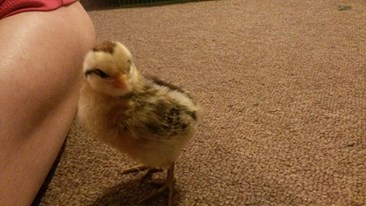
Full Size Chick Hatched With Bantams

Popcorn and I
Click thumbnail to view full-size


Don't Forget To Follow Me @
- Mary Vivier - YouTube
You will find new videos on my YouTube channel consistently about our new transition moving out of the city onto a sailboat with our family. - Sail Away With Me
(by Mrs.Vivier) My daily/weekly blog where I share my latest stories and adventures!


? A Transylvanian Naked Neck Chicken")
