How To Trim Your Dog - Fur and Claws

What Do You Think?
Should you attempt grooming your own dog?
Why NOT Do It Yourself?
There are plenty of professional dog groomers available just about everywhere, but do you really need their services so often or can you learn to do some of the trimming of your pooch on your own? The technique for caring for your dog's fur and nails is relatively easy to learn and your pet will not mind if you practice on them. The more you practice the more skilled you will become and eventually you will be capable of doing professional style dog grooming yourself and your dog will love you for it. To get started is very economical and all you need is a few tools.
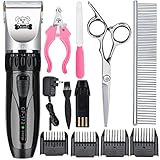
For the price of a few trims at the professional dog groomers you can buy all the supplies that you will ever need for grooming your own dog. A good dog fur clipper will set you back a few dollars, but if you trim your dog's fur yourself three times rather than going to the professionals the clippers will like have paid for themselves. The dog nail clippers that you will also need are not expensive at all. You do not need to buy the most inexpensive pair, but try to get a pair with some quality so that they have the very important nail depth guide and are fairly durable. A good sharp pair of scissors will be necessary as well, but those you likely already have. Once you have the tools you need you will be ready to start the trimming process so get your pooch and lets give this a try!
How To Trim Your Dog - Fur and Claws
Save Money and Get Your Dog Clippers Here!
Getting Started
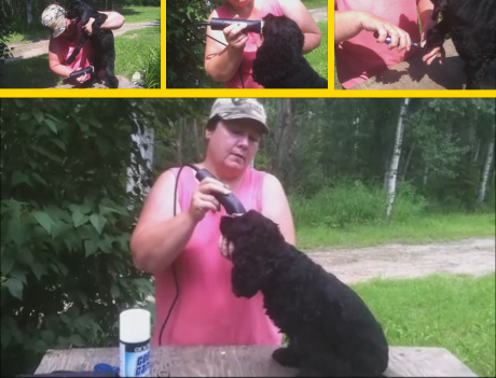
The first thing you will need to do is set up a makeshift table if you do not already have a suitable place to work from. Make sure your table is a good height for you to work comfortably from because the job requires a great deal of physical movement which will tire your back muscles if you have to stoop over. If your pooch is small then you will like want to put them up on the table along with all your tools. But if your dog is too large to put on the table then just set your tools on the table and kneel down to work on your dog on the ground.
Once your table is set up and your tools are set out easy to access if your dog is small enough put him or her up on the table. If your dog is not comfortable with being up on the table and getting trimmed you may want to have someone help hold your pooch. After a few grooming sessions your dog will likely learn to settle down while they are being trimmed and could even come to enjoy the grooming sessions. Once the dog is up on the table you are ready to begin.
Trim Around The Toes and Pads

Fur Between The Toes

Trimming Around The Toes
Clippers are not very good at getting at the fur that grows between and around the toes and pads, therefore, I like to take my scissors when first beginning the grooming task and trim the long fur of the feet. All the long fur on the feet if left untrimmed will cover the pads of the feet and your dog will have very little traction. This can be dangerous, causing your dog to slip on smooth surfaces and they could hurt themselves easily. Try to cut the fur between the toes and pads as close to the skin as possible, but BE CAUTIOUS not to get so close that you nick the skin. If this happens your dog may begin to associate the grooming experience with pain and they will likely never be completely comfortable in future grooming sessions. It is much better to leave the fur a little long rather than attempt to get too close and injure your pet.
Find a GOOD book on Dog Grooming Here!

Trimming Your Dog's Nails

Nail Depth Gage

Cutting The Claws
Hopefully you have found a pair of claw clippers that have a depth gage, because without a guide it is very difficult to cut the nail without going TOO DEEP which can cut the dog's toe. If you have a set of nail trimmers with a depth gage you can simply adjust the gage to the required depth determined by the nail growth. Your dog may have different length nails so set your clipper gage to the maximum depth of the shortest nail and then proceed with the cutting of them all. This technique will leave the some of the nails a little longer, but better a bit long rather than a bit TOO SHORT. Each time you trim your dog's claws you will have to check the gage again to make absolutely certain that it is correctly adjusted to the length of the shortest claw.
Trimming The Fur

Get a GOOD DEAL on Dog Nail Clippers Here!

Time To Trim The Fur
Most dog's have very thick fur and the clippers have to work extremely hard to cut though it all. For this reason cheap clippers generally do not stand up very well; their cutting edge dullens really quickly or the motor often burns out. I am using clippers that are in the mid price range and they seem to have held up well over the past two years, but I maintain them well also. Make certain to put a few drops of oil on the cutting bar every time before you start the grooming task especially after they have been stored away for a while. Often the cutting bar will get HOT from the friction created by cutting the thick fur. If the cutting bar gets TOO HOT you will need to stop trimming your dog before you burn them. Take a break and let your clippers cool and then add a few more drops of oil before proceeding again.
Clipper Spray

There is a spray on the market that when sprayed on the cutting bar cools it and lubricates it at the same time. Using the spray frequently on the cutting edge as you are cutting your dog's fur will help keep the cutting bar cool because it helps lessen the extreme friction created by the thick mat of fur. You can likely find the clipper spray wherever you get your pet grooming supplies.
Clipper Angles

When beginning to trim your dog it is a good idea to start from one point. I like to make the starting point on the head because it just makes sense to me to start at the muzzle and work my way down the dog's back and then down to the feet. I find the task much easier using the snout as a reference rather than jumping around to various part of the body. I like to shave the muzzle completely removing any beard and any mutton chops and then I move to the top of the head and down the neck and then to the ears. The ears are fairly easy if you support them with your free hand on the back side of the ear and then flip the ear over to shave the under side or move you free hand to support the opposite side of the ear that is too rigid to flip. Then I shave from the top of the back down each side over the ribcage and down the outer side of each leg and then over the rump and around and under the tail.
More Trimming Angles

Then I shave the tail which again is easy enough if you raise it up with your free hand. After I have done the tail I finish the rump and do the inside of the back legs. Finally, I stand the dog up on their rear legs and supporting their body with my free arm over the top of their back and under their front shoulders I have a good comfortable hold on them. This position allows me to shave the dog's belly and inside of their legs. After that is all shaven I let the dog sit in a natural position and I shave the top of their feet. At this point I check the dog over and catch any areas that I may have missed, making sure that the entire cut appear to be even.
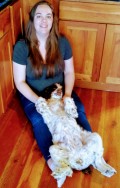
The Mess

Clean Up The Mess
My Cocker Spaniel Libby gets shaved at least three times per year especially during the hot summer months. Shaving her down keeps her cooler and she sure appreciates that. As you can see from the amount of fur that I have removed from her that she would be extremely overheated in 30C degree temperatures. If dogs get too hot they could easily succum to heat exhaustion or even worse heat stroke which can be fatal. It is much safer to keep your dog shaven in the hot temperatures so that they will be comfortable.
Questions and Comments?
I welcome all your questions and comments as well as any suggestions or ideas of your own. Please contact me through any of my links with any input that you desire to contribute. I enjoy hearing from everyone.
Thank you
How To Pam
Related

Lessons From a Groomer: What Grooming Tools Do I Need at Home For a Short Haired Dog?

Maintenance Mode: Desensitizing Your Dog to General Care

Lessons From a Groomer: Explaining Types of Brushes & Combs, and How to Set Up Your Workstation

6 Dog Grooming Advertising Ideas

How to Trim Your Cat’s Claws – Easy Method


 Off Your Dog")