- HubPages»
- Pets and Animals»
- Cats & Cat Breeds»
- Cat Health
How to Test Your Diabetic Cat's Glucose

Do you have a diabetic cat in your household? If so, you know what a responsibility and commitment caring for one can be. My cat, Stanley, was diagnosed with diabetes two years ago, and, fortunately, with diligent glucose testing and diet maintenance, he no longer requires insulin. I do, however, check his glucose at least once a month to make sure his numbers are normal. Below are my steps and tips for testing a cat's glucose. This may seem overwhelming and difficult at first, but don't give up! It took me multiples attempts to get it right.
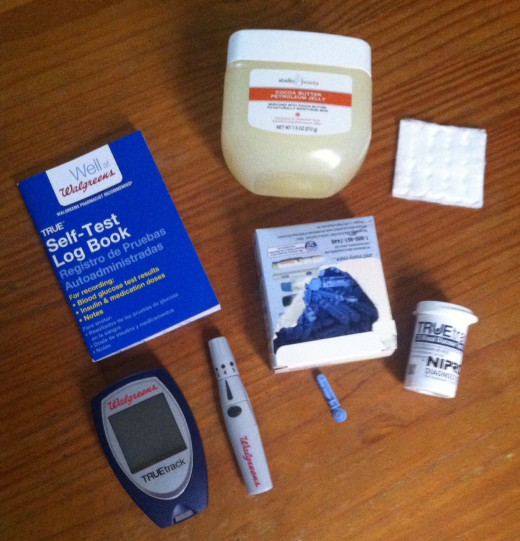
The tools of the trade
There are glucose testing supplies specifically for pets, but I have found the human kits work well and are less expensive. I buy my supplies from Walgreens in the diabetes section, but you can find them in any pharmacy. I like the True Track brand at Walgreens.
What you'll need:
- Lancets
- Lancet pen
- Blood glucose test strips
- Glucometer
- Self-test log booklet
- Vaseline
- Cotton
You can buy some of these items together in a kit that includes the glucometer, the log booklet, a few lancets and the lancet pen. You will have to buy the test strips separately. Your glucometer and test strips must be the same brand.
Preparing the lancet pen
- Remove the cap on the lancet pen. Insert a lancet and push the top of it down. You'll hear a click when it locks into place.
- Twist off the lancet's blue top to reveal the pricker.
- Grab the base of the lancet pen and pull up. You should hear a clicking sound.
Your lancet pen is ready to go, so you can set that aside. As you can see from the picture, I have left the cap off the lancet pen. You may choose to put the cap back on once the lancet is secured, but I find it easier to leave it off.


Preparing the glucometer
If this is your first time using the glucometer, you will need to insert the code chip into the side. This chip comes with your test strips, and the number on it should match the code number on the strip container. You can see my code is 4488. Once you put that chip in the meter, you are ready for testing.
Note - Keep the test strips in their container until you are ready to place one in the meter. Make sure you close the container lid after you take one out, as exposure to air can ruin them. Store the test strips in a cool, dry place. I keep mine in the medicine cabinet in my bathroom.


Taking the sample
Now that you've got your supplies ready, you'll need to take the sample from your cat. I usually sit on the floor with my cat between my legs and his back to me. Be calm and confident because your cat can sense when you are tense and he will react similarly.
I take the sample from the back of his right ear because I am right-handed and find that side easier to draw from. You can also take the sample from the inside of the ear. There is a vein that runs along the side of the ear, which you can see in the picture below.
Rub a little vaseline on the top part of his ear where you plan to prick. The vaseline will help the blood congeal into a droplet. You may also want to massage the ear a little, which will warm the area and get blood flowing.


When you are ready to prick, insert a test strip into the glucometer. Once you've done this, you only have about a minute to collect your blood sample, so it's time to get pricking!

Hold the ear taut with your non dominant hand. Hold the lancet pen in your dominant hand, and bring it to the ear. Put the lancet right on the ear (make sure your fingers are out of the way) and push the button on the pen. You'll hear a click as the lancet strikes the ear. Put the lancet pen down and wait for the blood drop to form.
You may not see blood right away, so try gently rubbing the surrounding area. You will eventually see a droplet forming. Once a decent sized droplet has formed, immediately bring the glucometer to the ear and dip the end of the strip into the blood.
If the meter accepts your sample, it will begin a countdown (5, 4, 3, 2, 1) before displaying the glucose reading. Record your reading in the log booklet and throw away the test strip and the lancet. You cannot reuse either. Use the cotton to gently blot your cat's ear.

The dreaded error message
If the sample did not take, you will receive an error message similar to the one in the picture. There are a few reasons the glucometer rejected the sample, including:
- the sample may have been too small
- the meter may have timed out by the time you get a sample onto the strip
- the sample is not "fresh" enough, meaning that it was exposed to the air for too long before being collected onto the strip
- you double dipped, meaning you dipped the strip into the drop twice to collect more blood
Don't fret - all of these things have happened to me many times. The first time I tried to test Stanley's glucose, it took several attempts before the meter finally accepted a sample.

Practice makes purrfect
Just remember to keep trying and to remain calm throughout. You may have to go through the process several times before you get it right, which means your cat (and possibly you!) will be getting pricked repeatedly. Once you've learned how to do this, you and your cat will both find the process quick, easy and painless. My cat now comes to me when he hears the click of the lancet sliding into place, and he sits patiently during the whole process.
Tips
- Act like you know what you're doing, even if you don't! Your cat will feel comforted by your confidence.
- Stay calm if you have to repeat the process multiple times. Take a break if needed.
- Talk to your cat and pet him as much as possible. Make him feel comfortable.
- Try not to prick your cat in the same place he's already been pricked. Choose another spot along the vein or try the other ear.
- Give him a reward after the experience such as a treat or some food.
Additional resources
- Managing Feline Diabetes
Cat Clinic of Cobb Managing Feline Diabetes Feline Animal Hospital 2440 Sandy Plains Road Marietta GA 30066 - Feline diabetes mellitus: About glucose curves
Help evaluate the effectiveness of insulin therapy for feline diabetes mellitus by completing and interpreting a glucose curve. - High Blood Sugar in Cats | petMD
The term hyperglycemia refers to higher than normal levels of glucose in the blood. Learn more about high blood sugar in cats here.
How to test glucose levels
Additional Resources
- Guidelines to BG Interpretation
- Feline diabetes mellitus: About glucose curves
Help evaluate the effectiveness of insulin therapy for feline diabetes mellitus by completing and interpreting a glucose curve. - High Blood Sugar in Cats | petMD
The term hyperglycemia refers to higher than normal levels of glucose in the blood. Learn more about high blood sugar in cats here.
")


