8 Basics That Every Photographer Must Learn!

This is a guide towards understanding your camera (D-SLR in this case)
There are so many guides on the internet that will help you understand how your DSLR (digital single-lens reflex camera) can work but the bottomline is that it should work the way you want it to work. Here are some guidelines with which one can start to understand how it all works, the science behind it all.

-
Start by setting your Camera to Manual
This helps you be in control, letting you change any setting you want, such as ISO,Shutter Speed, Focal point etc.
The only way to master and hone your photography skills is to experiment, experiment a LOT with how various settings work and how you can get the perfect pictures. It might take some time but your patience will be rewarded.
2. Understand the environment and tweak the settings to perfection to obtain the best picture, which captures all the colours and different objects in the frame.
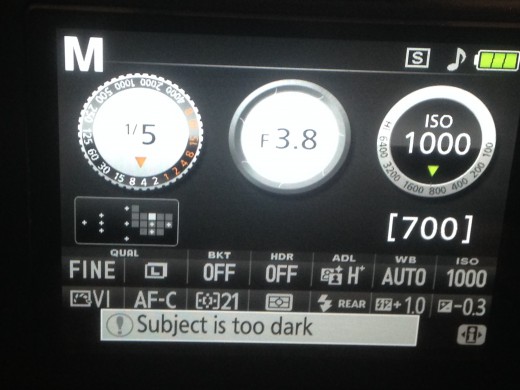
In this particular camera in my guide (A Nikon D5200), the settings are shown on the screen as such. The numbers shown on the picture are as follows , left to right.
- The Shutter Speed. (The Speed with which the shutter closes, which means light enters the lens only for that much amount of time, the value is in seconds. In the picture, the number is 1/5 which means the lens was open only for one-fifth of a second)
- The F-Stop value or the Aperture. (Nowadays, most cameras allow the aperture to be adjusted by a third of a stop or half a stop, but "a stop" is either halving the size of the aperture (so f/2.8 to f/4) or doubling it (so f/5.6 to f/4). An f-stop is a mechanism for setting the aperture of the lens, or how wide it is opening to let in the light.)
- The ISO. (ISO measures the sensitivity of the image sensor. The same principles apply as in film photography – the lower the number the less sensitive your camera is to light and the finer the grain.)
Let's see how well you understood the concept!
3. Knowing how to set the shutter speed just right for the scene.
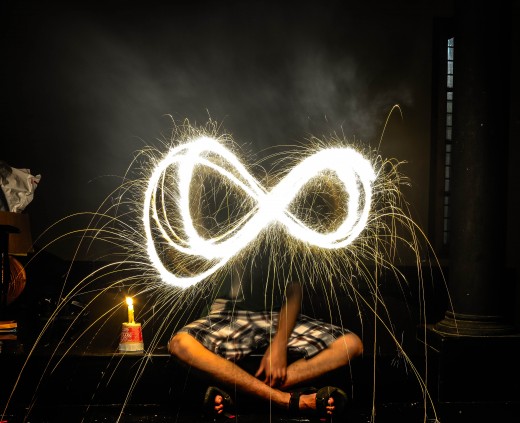
This picture shows the small firework we have in India (Just a sparkler) It was Diwali when I took this picture.
In order to make effects like these, with the lights in your frame, there has to be a huge contrast with one part of the frame compared to the rest. Here, the firework dominates the frame with it's light. There would be a problem if the firework's light filled the lens and the image would be whited out. but we also have to let the person draw the character while we take the picture. Hence we have to lower the ISO (So the image is generally dark and the image is not very sensitive) Next we need to keep the lens open for enough time to make the character (To draw the infinity symbol) Which generally took around 4 seconds. The ISO was set to 100.

If you look closely you will see that the cat's tail has blurred out while the rest of the frame looks still. Since the cat's tail was moving pretty fast, the camera's lens didn't close quick enough to process it as a still part of the image. If you guessed correctly it was the Shutter Speed that went wrong. It was a few milliseconds slower than required. If it was 1/6' Then the correct speed required would have been a faster 1/50'.


I hope you understood how shutter speed works. Generally speaking if the subject is moving. then your shutter speed has to be faster in order to capture it as a still object.
The problem with this, is that when the shutter closes too fast. There won't be enough time for light to enter the lens. This is a problem since it will make your picture too dark!
But this shouldn't be a problem because we have 2 more settings to tweak with!! :D
In the picture, notice how it is a fast-paced or active scene, and the shutter speed was fast enough to capture this as a still picture and yet it gave enough time to keep it bright and bring out the other aspects of the scene. The ISO was set pretty high in order to compensate for the darkness caused by the fast shutter speed.
4. Knowing how to set the F-Stop value or Aperture just right.

The same picture can be more or less brighter and vibrant depending on how we set the aperture. There is also the Depth of Field that needs to be discussed, it basically involves the use of the right aperture to obtain more clarity of the background and the rest of the picture.

5. Knowing how to set the ISO just right!


In the above pictures, both of the night sky. I had to use extremely slow shutter speeds, upto 30 seconds and very high ISO. This will give you the required result, even though it might ruin your image by making it very grainy (ISO is a double edged sword) It will help you brighten the image but it will make your image grainy instead.
6. Knowing how to set the focus points in a particular frame.

There are 2 ways to focus on a particular part of the image, one is to bring it to the center of the viewfinder and focus it, and then move your camera away to make the frame as per your requirement but not refocusing the camera will make it remain focused on the first point.
The second way to do this is by using the focus points which lets you control which part of the frame needs to be focused you can do this in almost every DSLR. But the number of focus points may vary between different cameras.
7. Knowing how to frame a picture
There are many ways to take a picture but an important factor of it is, where your subject is within your picture.
It can be in the center, a little to the right, a little to the left... lets now learn a rule which will help you get better framing techniques.


As you’re taking an image you would have done this in your mind through your viewfinder or in the LCD display that you use to frame your shot. With this grid in mind the ‘rule of thirds’ now identifies four important parts of the image that you should consider placing points of interest in as you frame your image. Not only this – but it also gives you four ‘lines’ that are also useful positions for elements in your photo.
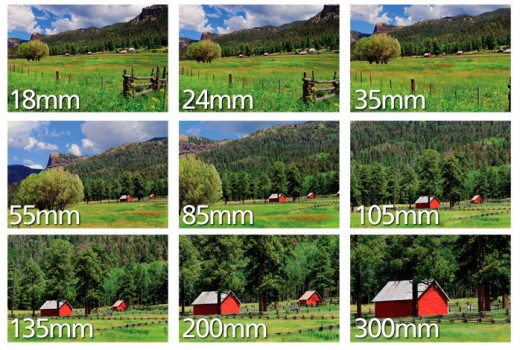
8. Getting the right lens for your camera.
It just isn't possible to get any picture with just one lens. You might need a telephoto lens to get pictures of the moon or maybe something else for just the occasion, you never know. Lenses that have a greater range of focal lengths tend to be quite expensive.
If you're getting lens which has zoom, then it has a variety of focal lengths. eg. 18-105mm or 70-300mm. It basically gives you an idea about the capacity of zoom with that lens.
Which brand do you think is better for DSLRs?
I own a Nikon D5200, I think that both brands have equally good cameras in different ranges, from Starter to Semi-Pro to Pro, but people prefer Nikon from Starters to Mid-Range, but Pros prefer Canon. I've lived mostly in India and took a lot of pictures there. Hopefully I can help more people learn photography in a basic or even advanced way. For any details feel free to leave a comment below and follow me if you like the content I post. I'm relatively new here but enjoy writing. Hope I helped you learn something new! Details on the camera I'm using can be seen below but it seems it's been discontinued and the reason is that there is an updated and yet almost same model out there which is the Nikon D5300. Almost all Cameras come with the kit-lens, I would suggest getting at least an 18-105mm lens instead of the usual 18-55 as you won't get frustrated very quickly about it. For a semi-pro product, the Nikon D5200 does a pretty amazing job. See for yourself.


