- HubPages»
- Arts and Design»
- Graphic Art & Design»
- Design Software
Adobe Photoshop: How to Create Your Own Action

Adobe Photoshop is a leader in world of photo editing software, and as I personally know, can take years to learn fully. It is an incredibly powerful piece of software that can deliver amazing products that are strikingly close to a real darkroom. Although there are times that users may seem to go overboard with special effects, each option has a legitimate reason for being included in the software.
Adobe has worked diligently to create powerful software, and they have also kept in mind that a professional, when good at their job, will be doing the job repeatedly. For example, photographs for a newspaper are primarily black and white unless they were lucky enough to fall on an available color flat. So each photo that comes in to the art department will need to be changed to black and white, have the black saturation reduced and the entire photo lightened so that it reproduces correctly on newsprint. One photo may seem ok to do all by hand, but what if you are correcting 100 photos a day for 10 newspapers? This is where an action comes in handy, and it is very simple to create. I will be creating an action for the example I just gave, but as you will see, it is very simple to get creative and create your own actions for your own projects.
First, select the image the best suits the majority of the images that you need to make the corrections. For example, do not choose a photo that is over exposed, if you normally get properly exposed image on a regular basis.

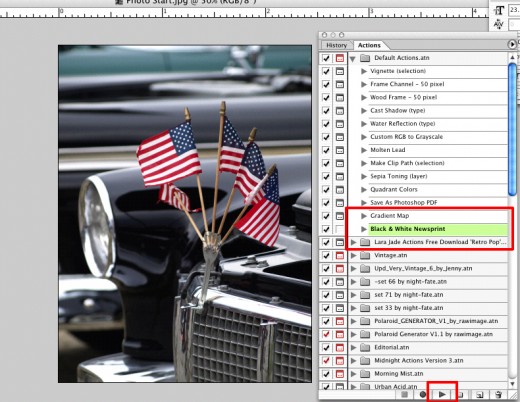
Go to “window” -> “actions” and your actions tool bar will appear. You may already have a few actions loaded in that came with the software package, and if you have downloaded and used actions before, your previous loaded actions will also appear in this screen. On the bottom right of the action tool bar, select the option to create a new action. Be sure that when you do this you are not already within an existing action folder. You do not want to create a new action within another action.

Be sure to give your action a relevant name, as you will find moving forward that you will most likely be creating, loading and using more actions. I have named this “black and white newsprint”. When you are done with naming, you will notice that instead of the regular “ok” you normally see, you have the option to “record”. What this means is that once you select record, the software will then keep track of your actions, meaning if you rotate an image, it will be recorded.
Once recording, go to “image” -> “mode” -> “grayscale”, which will delete the color saturation in your image and make it black and white. Now remember, this is recording, so this step will now be included in your action when used later.
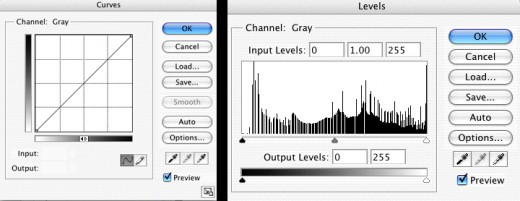
From here, you can edit your curves and your levels to adjust the photo to work for the project at hand. Now the reason I have said to pick an image that best suits the majority of your photos is because after you run your action, you can still edit your photograph. By making it a generic action, the workload on the photo editor has been cut in half, and time has been used more efficiently. Once you have completed how you want the image to look select the stop button located on the bottom of the actions tool bar. It will be linear to the “new action” button you used earlier and in the shape of a square.
Now close the image and reopen the original in the software. From there highlight the new action that you created, mine being “black & white newsprint”, and select the play button on the actions list. This is next to the “stop” button you used earlier, and in the shape of a triangle pointing right. You will see that the image will be corrected to look just how you had just manipulated it earlier.

Actions are great for photographers, especially wedding and event photographers. I set up my actions for each event because lighting is normally so different. Although I may shoot two weddings and I could use a “wedding” action, one could be indoor lighting and one could be outdoor lighting. Be sure to set up your actions according to what best suits you, and have fun.
There are several websites that offer free action downloads to try, which is a great way to get accustomed to the possibilities are exist. You can learn a lot by looking at other artist’s work, as well as their techniques and tools. If used correction, actions in Adobe Photoshop can prove to be both useful as well as efficient.


