Create Beautiful Text on Timber Background in Photoshop
In this tutorial I am going to show you all the steps I have taken to create beautiful glossy text with layer styles, Soft Stripes Gradient, brushes, Custom Shape and Timber Texture.
I have created my text in Adobe Photoshop CS6, the font used is the default Fixedsys, both brushes applied on the background are default Crosshatch 2 and Soft Round Brush and the splash-like background effect is achieved with Grime 7 Custom Shape which can be replaced with any splash brush or created with Pen Tool.
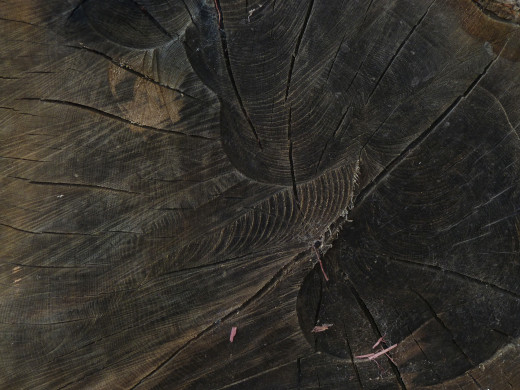
The Timber Texture added to the background is my own photo and unrestricted stock. It is not necessary to inform me if you decide to use it for your own works.
This is a preview of the final result:

STEP 1
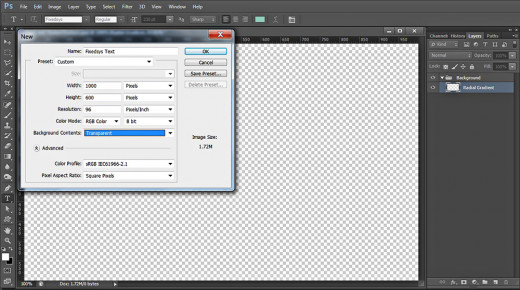
First and foremost you should organise well your work so create a new folder where you will keep your text effect .psd file, the texture you are going to download and the outcome saved in .jpg format. After that open Adobe Photoshop and create a new .psd file (File, New) of 1000 Pixels Width and 600 Pixels Height. Name the document Fixedsys Text for example, after the font we are going to use. Set the Resolution to 96 Pixels/Inch, choose RGB Color for Color Mode and select Transparent for Background Contents.
Those of you who need to print the text, should set Resolution to 300 Pixels/Inch and choose CMYK from Color Mode drop down menu.
Rename Layer 1 to Radial Gradient and click on the Folder Icon (Layer, Group Layers) at the bottom of Layers panel to place the layer in a group. Rename the Group 1 that you'll get to Background.
Create Stunning Background with Gradient, Custom Shape, Brushes and Texture
In Steps 2-13 we have to prepare attractive Background for our glowing Text.
Firstly we are going to colorize the canvas with Radial Gradient. After that we'll have to draw one of the default custom shapes which Photoshop offers and apply Woven Flat Texture to it.
We also need to make a few scratches with Crosshatch Brush and add awesome Timber Texture. As a final touch, we'll make a few dabs with Soft Brush to add more colors.
STEP 2
In this step we are going to fill our first layer with Gradient. Firstly set the Foreground Color to #8bcfba and Background Color to #272526. Take Gradient Tool (hot key G), then navigate to the Options bar and choose Foreground to Background Gradient. Select also the Radial Type of Gradient icon then drag from the middle to a chosen corner of the canvas to colorize it.

STEP 3
In this step we are going to add awesome splash-like shape to our background.
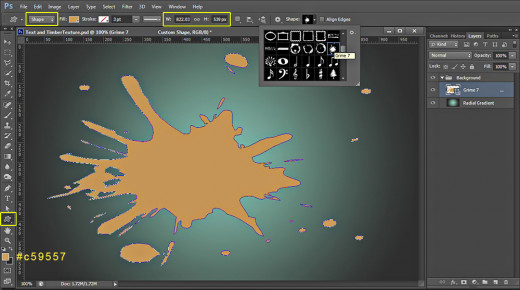
Create a New Layer on top of Background group and name it Grime 7. Set the Foreground Color to #c59557
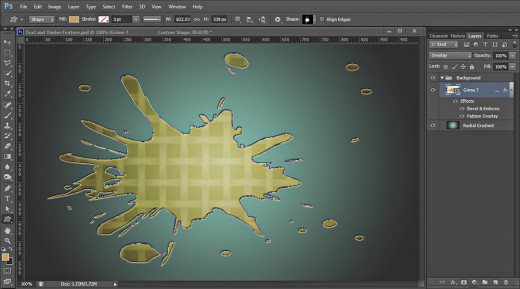
Now take Custom Shape Tool, in the Options bar select Shape from Pick Tool Mode drop down menu and find Grime 7 from the Custom Shape Picker. Draw the shape as you see on my screenshot below. If you like to follow precisely my step, you can set in the Options Bar the Width of the Shape to 822px and its Height to 539px.
STEP 4
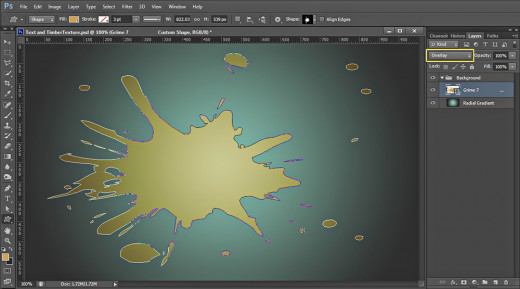
Change Blend Mode of Grime 7 layer to Overlay.
STEP 5
In this and the next step we are going to add two Blending Options to Grime 7 layer in order to give it a better look.
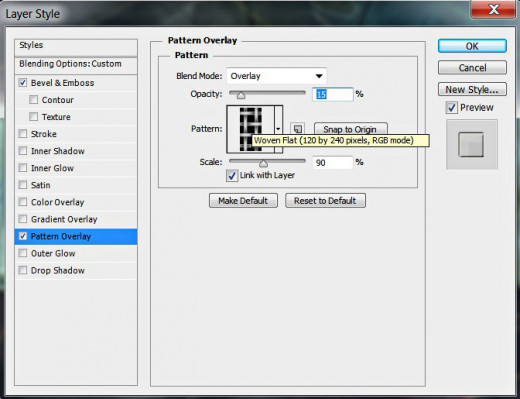
Now go to Layer, Layer Style, Blending Options or just double click on Grime 7 layer's thumbnail to activate Layer Style dialog box. Check firstly Pattern Overlay and insert the following settings:
Blend Mode: Overlay
Opacity: 15%
Pattern: Woven Flat (120 by 240 pixels, RGB mode)
Scale: 90%
Link with Layer: checked.
Keep Layer Style box opened as we have more work to do in it in the coming step.
STEP 6
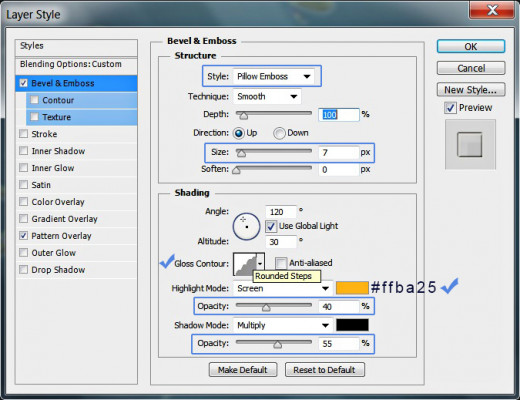
In order to give cool relief to our splash shape, check Bevel and Emboss Layer Style and modify six of its settings:
Style: Pillow Emboss
Size: 7px
Gloss Contour: Rounded Steps
Color for Highlight: #ffba25
Color for Highlight Opacity: 40%
Color of Shadow Opacity: 55%.
This is how our background will look so far. We'll continue the work on it in the next eight steps.
STEP 7
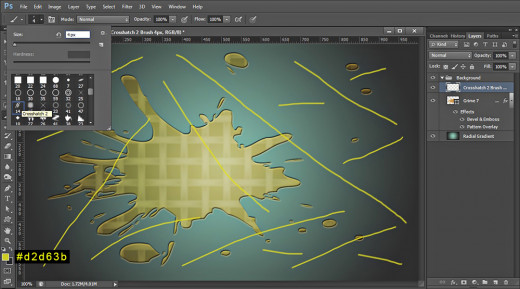
Change your Foreground to #d2d63b and Create a New Layer on top of Background group. Name it Crosshatch 2 Brush then select Brush Tool and find the same Brush in the Brush Preset Picker. Change its Size to 4px and start making random lines on your canvas. Use the screenshot below for a reference.
STEP 8
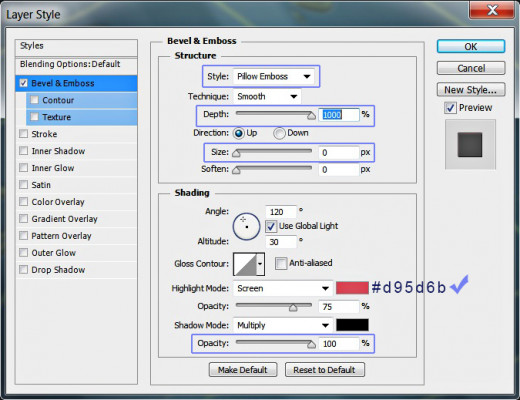
We are going to add now subtle 3D effect to the lines we created in the previous step so double click on Crosshatch 2 Brush layer's thumbnail and select Bevel and Emboss in Layer Style dialog box. Set its Style to Pillow Emboss, increase Depth to 1000% and lower Size to 0px. After that change Color for Highlight to #d95d6b and set Color of Shadow Opacity to 100%. Leave all other settings as given by default.
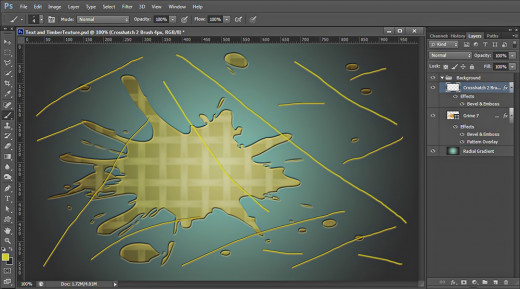
This is how your background will look after adding the brush lines. It's not very attractive yet but in the next steps you'll see the magical effect of the texture overlay.
STEP 9
Click on this Timber Texture to open it in high res in a separate window, right click on it and choose Save As to place it in your folder.
STEP 10
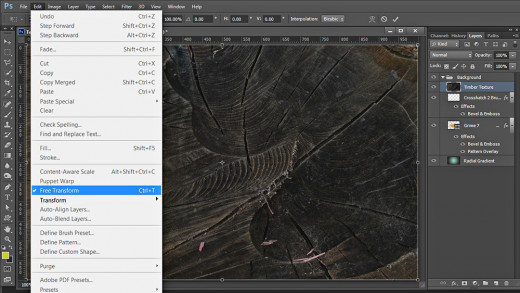
Create a New Layer on top of Background group and call it Timber Texture. In order to place the Timber Texture downloaded in Step 9 in this layer, open it in Adobe Photoshop, press Ctrl+A then Ctrl+C to select and copy it, go back to Fixedsys Text .psd file and press Ctrl+V to paste the Texture (Timber Texture layer should be highlighted).
You see that the pasted Texture is bigger than your canvas. Go to Edit, Free Transform and move the nodes until it covers the canvas and don't forget to press Enter to apply the Transformation.
STEP 11
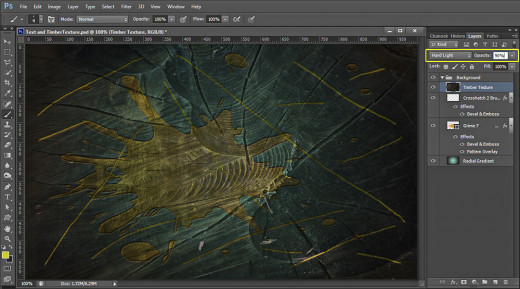
Change the Blend Mode of Timber Texture layer to Hard Light and lower the Opacity to 90%.
Our background starts to get really cool. We have to add one more layer to give it nice color shades.
STEP 12
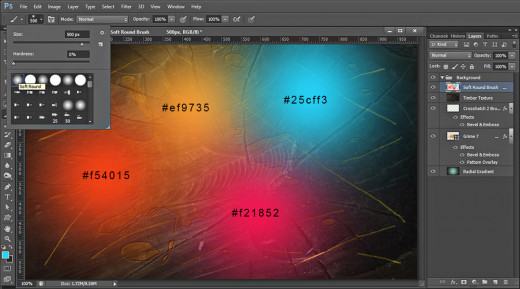
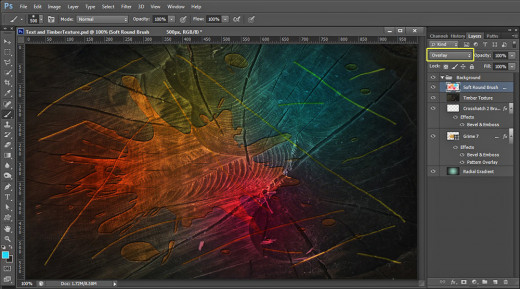
Create again a New Layer on top of Background group and name it Soft Round Brush.
Grab Brush Tool and select Soft Round Brush from the Brush Preset Picker. Set its Size to 500 pixels and make four dabs on the canvas using different colors. I have chosen the following colors: #ef9735, #f54015, #25cff3 and #f21852.
STEP 13
Change the Blend Mode of Soft Round Brush layer to Overlay. With this we completed our work work on the background.
Type the Text and Add Golden Stroke
In Steps 14-26 we are going to use default Fixedsys Font for our Text, then we'll reduce the Text layer Fill to 0% and add golden Gradient Stroke. After rasterizing the Stroke we are going to add more layer styles and additional Soft Stripes Gradient by using contracted selection.
STEP 14
We have to start with the most important part of our tut now- the creation of our glossy text.
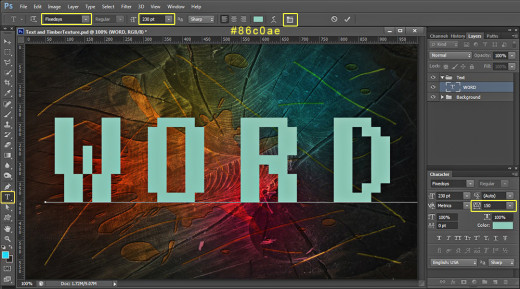
Take Horizontal Type Tool and choose Fixedsys Font. Set the Font Size to 230pt and the Text Color to #86c0ae. Type Word (or any other four-lettered word) using capital letters, then highlight your text and click on Toggle Character and Paragraph Panels icon. Set the Tracking to 150px. We need this bigger tracking to avoid overlapping of the letters after applying Stroke Layer Style.
Now move Word Text layer on top of Layers pane and press Ctrl+G to put it in a group. Call the group Text.
STEP 15
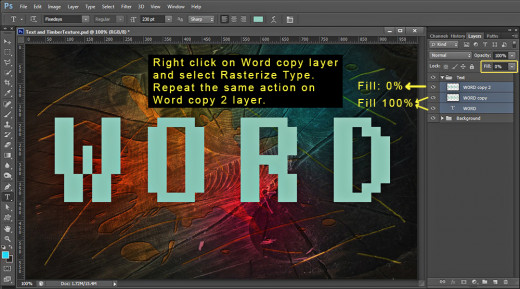
With Word Text layer selected, press Ctrl+J twice to duplicate the layer (Layer, Duplicate Layer). Reduce the Fill Opacity of Word copy 2 layer to 0%. Don't change the Fill of the other two layers for now.
We need now to Rasterize both Word copy and Word copy 2 Text layers. So firstly right click on Word copy layer and select Rasterize Type from the fly-our menu. Repeat the same on Word copy 2 layer.
STEP 16
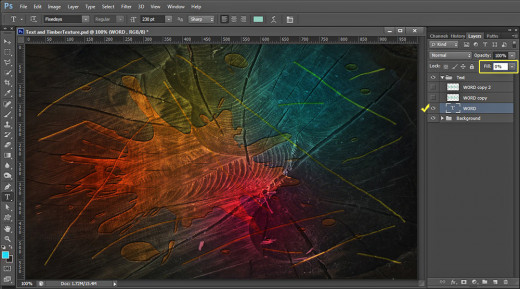
Now switch off both Word copy and Word copy 2 layers- only click on the eye symbol to the left of the respective layer, then select the original Word Text layer and lower its Fill Opacity to 0%. The Text will disappear but no bother, you'll see it again in the next step.
STEP 17
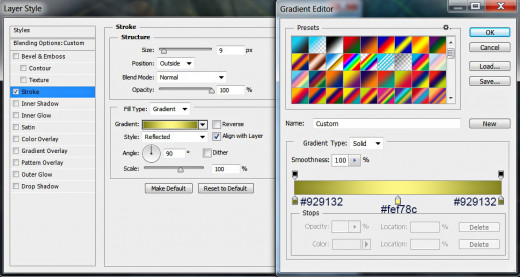
Right click on Word Text layer and select Blending Options. Check Stroke in Layer Style dialog box and insert the following settings:
Size: 9px
Position: Outside
Blend Mode: Normal
Opacity: 100%
Fill Type: Gradient
First Color Stop (Location 0%): #929132
Second Color Stop (Location 50%): #fef78c
Third Color Stop (Location 100%): #929132
Reverse: unchecked
Style: Reflected type of gradient
Align with Layer: checked
Angle: 90 degrees
Dither: not checked
Scale: 100%.
Press OK button to apply the Stroke and to close the dialog box. We will add later more Blending Options to this layer.
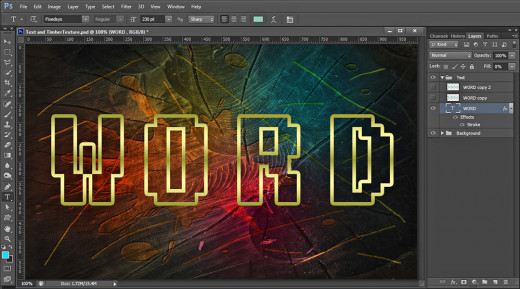
This is how your Text will look after being stroked with the golden shaded Gradient:
STEP 18
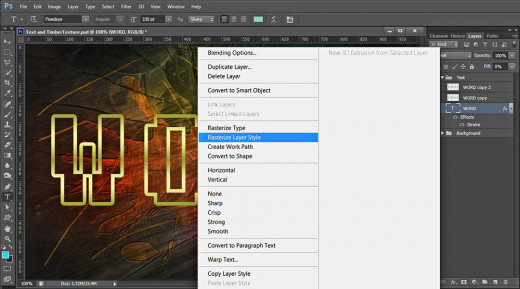
Right click on the Word Text layer and select Rasterize Layer Style.
STEP 19
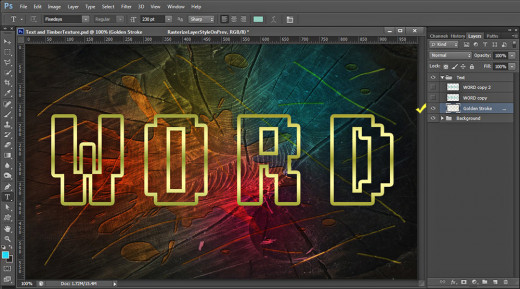
Now double click on Word layer's name to change it. Type Golden Stroke. In the coming three steps we are going to add more layer styles to this layer.
STEP 20
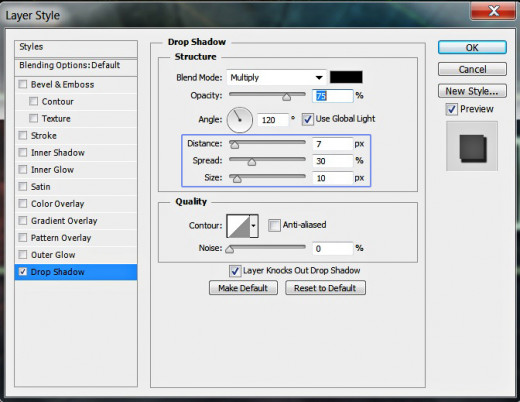
Double click on Golden Stroke layer's thumbnail to activate Layer Style dialog box. Firstly select Drop Shadow and change only three of its settings. Set Distance to 7px, Spread to 30% and Size to 10px.
Still don't close Layer Style box.
STEP 21
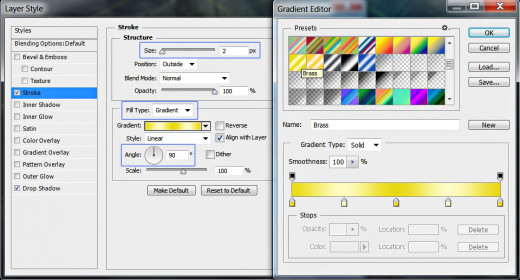
The next Layer Style to be added to Golden Stroke layer is Stroke. Change its Size to 2px, select Gradient from Fill Type drop down menu, choose Brass Gradient from the Gradient Picker and set its Angle to 90 degrees.
STEP 22
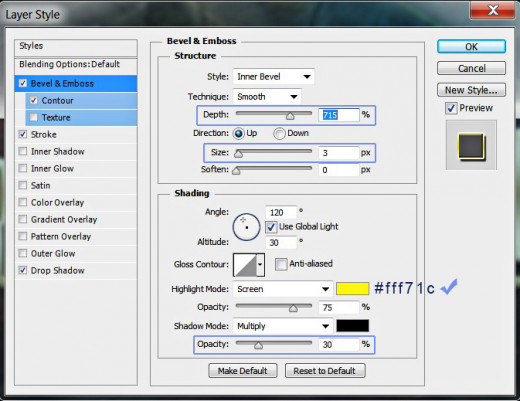
The last Layer Styles which we are going to apply to Golden Stroke layer are Bevel and Emboss and Contour. Firstly modify the Bevel and Emboss settings. Change its Depth to 715%, Size to 3px, select #fff71c for Color for Highlight and reduce Color of Shadow Opacity to 30%.
Now only tick Contour Layer Style and don't change its default settings.
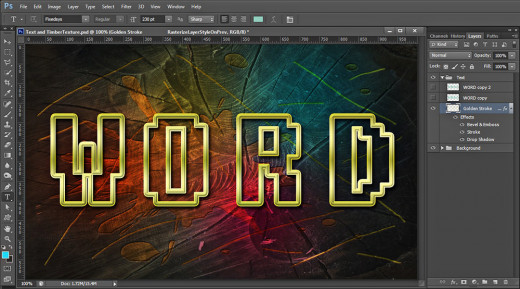
This is how our Text will look so far:
STEP 23
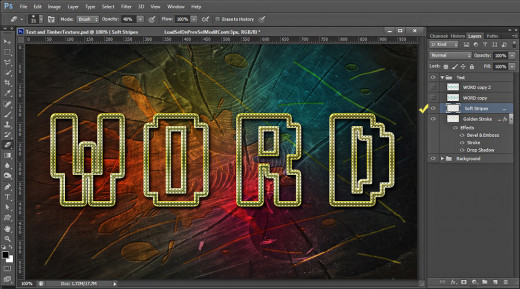
Create a New Layer above Golden Stroke layer and name it Soft Stripes, after the Gradient we are going to apply later. Keep Soft Stripes layer highlighted then hold down Ctrl and click on Golden Stroke layer's thumbnail to Load Selection.
STEP 24
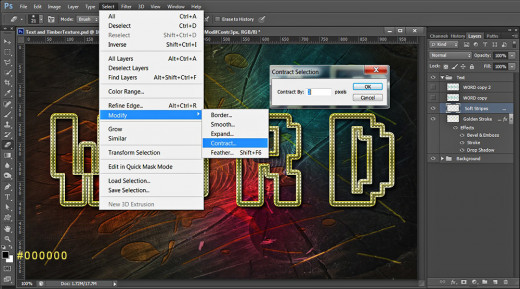
Navigate to the Menu bar then choose Select, Modify, Contract and Contract the Selection by 3px.
Press D key to get black Foreground Color.
STEP 25
With Soft Stripes layer selected, go to Edit, Fill, Foreground color to fill the contracted selection with black.
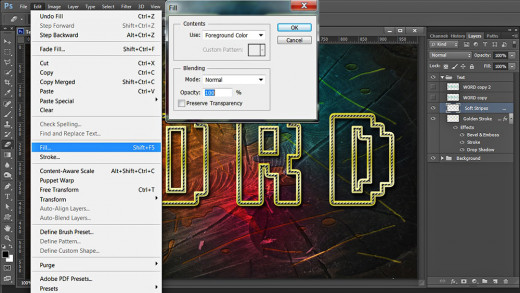
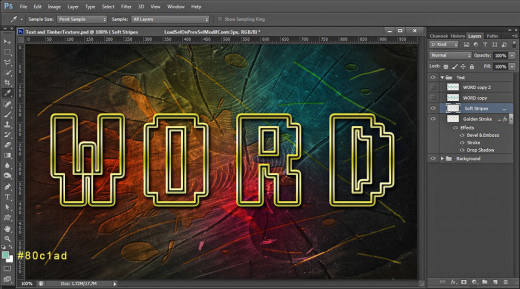
Below is the outcome of filling the selection with black. Press Ctrl+D to deselect.
Change the Foreground Color to #80c1ad. This is very important because the color of the Gradient we are going to apply in the next step depends on the chosen Foreground Color.
STEP 26
Now double click on Soft Stripes layer's thumbnail to call Layer Style dialog box. Check Gradient Overlay, set the Gradient Angle to 90 degrees and Scale to 85%, then find Soft Stripes Gradient in the Gradient Picker.
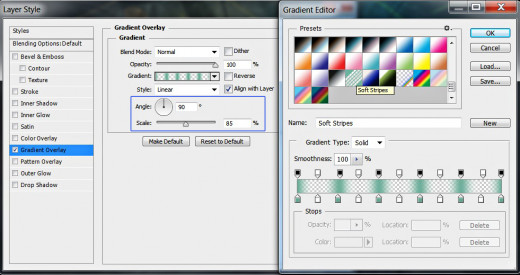
This is how the Text will look after adding bluish Soft Stripes Gradient to it:
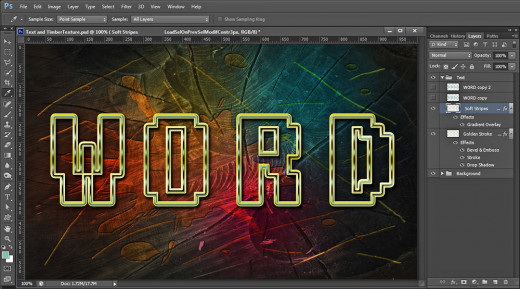
Apply Layer Styles to Both Duplicated Text Layers
From Step 27 till the end of this tut we are going to switch back both duplicated Text layers and will apply a few Blending Options to each of them. We are going to add Woven Wide Texture, Bevel and Emboss and Contour to create cool relief and 3D Effect.
STEP 27
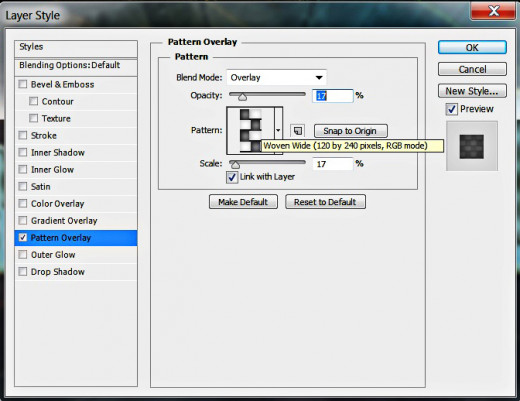
Select Word copy layer, switch it on, double click on its thumbnail and check Pattern Overlay Layer Style. Insert the following settings:
Blend Mode: Overlay
Opacity: 17%
Pattern: Woven Wide (120 by 240 pixels, RGB mode)
Scale: 17%
Link with Layer: checked.
Keep Layer Style dialog box opened because we have to add another five Blending Options.
STEP 28
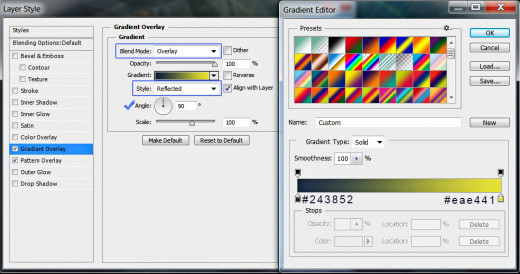
The second Layer Style to be applied on Word copy layer is Gradient Overlay. Change its Blend Mode to Overlay, choose Reflected from Style drop down menu, set Angle to 90 degrees then change the First Color Stop (Location 0%) to #243852 and the Second Color Stop (Location 100%) to #eae441.
STEP 29
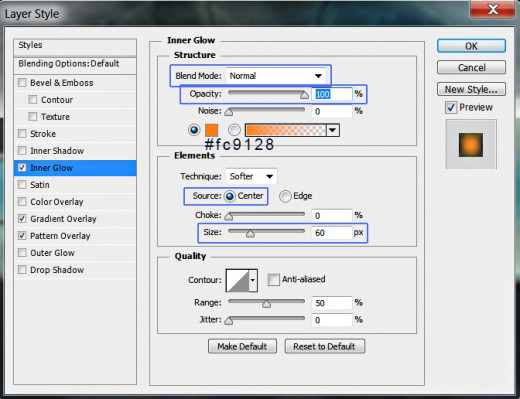
Now check Inner Glow in Layer Style box. Change its Blend Mode to Normal, increase Opacity to 100% and change the Color of Glow to #fc9128. Choose Center for Source and set the Size to 60px.
STEP 30
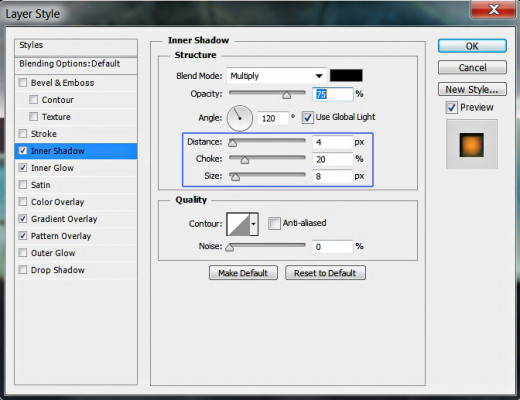
The next Layer Style to be added to Word copy layer is Inner Shadow. Change Distance to 4px, Choke to 20% and Size to 8px.
STEP 31
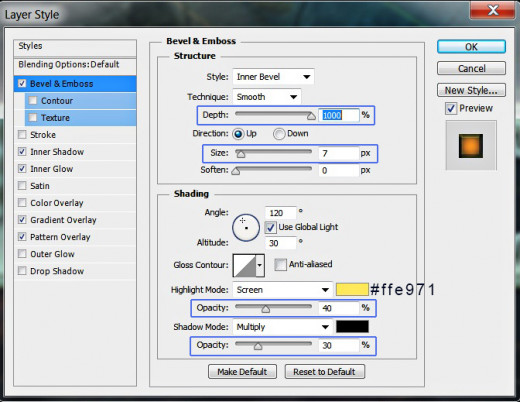
Now check Bevel and Emboss to create 3D effect. Increase its Depth to 1000%, Size to 7px and choose #ffe971 for Color for Highlight. Lower Color for Highlight Opacity to 40% and Color of Shadow Opacity to 30%.
STEP 32
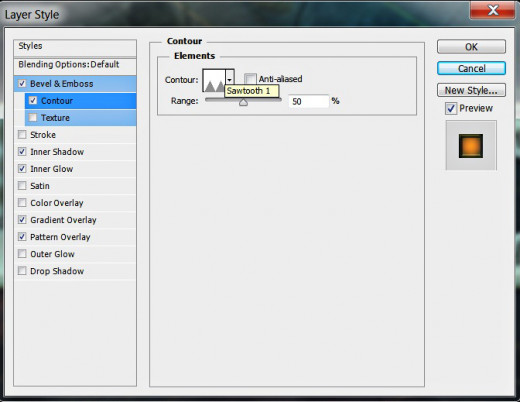
The last Layer Style to be added to Word copy layer is Contour. Select Sawtooth 1 from the Contour picker and don't change the other two settings.
This should be the result on your canvas after the work on Word copy layer have been done:
STEP 33
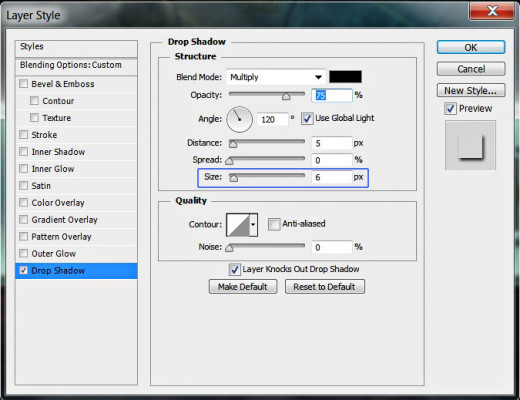
Now we are going to add Blending Options to Word copy 2 layer. Switch it on, double click on its layer's thumbnail and firstly select Drop Shadow Layer Style. Only slightly increase the Size to 6px and leave all other settings as given by default.
STEP 34
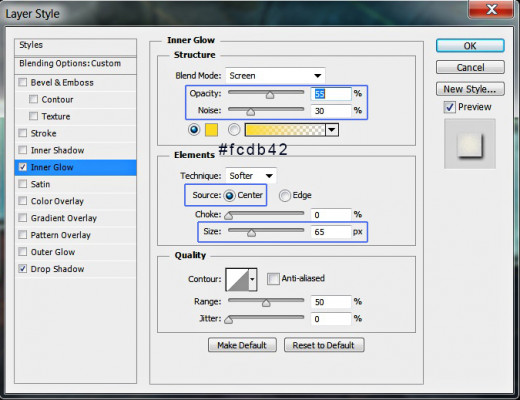
The second Layer Style we have to apply on Word copy 2 layer is Inner Glow. Lower its Opacity to 55% and increase Noise to 30%. Choose #fcdb42 for Color of Glow, check Center for Source and set the Size to 65px.
STEP 35
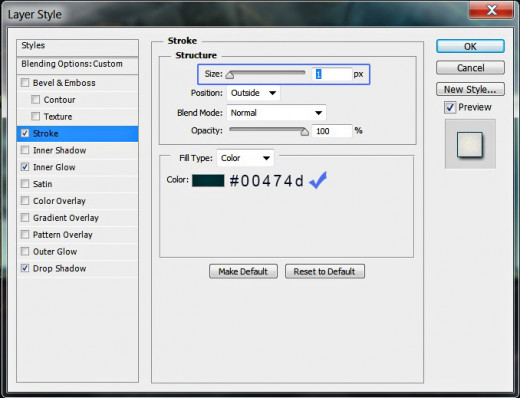
Now we are going to add dark thin Stroke to Word copy 2 layer. For the purpose check Stroke Layer Style, lower the Size to 1px and change the Color of Stroke to #00474d.
STEP 36
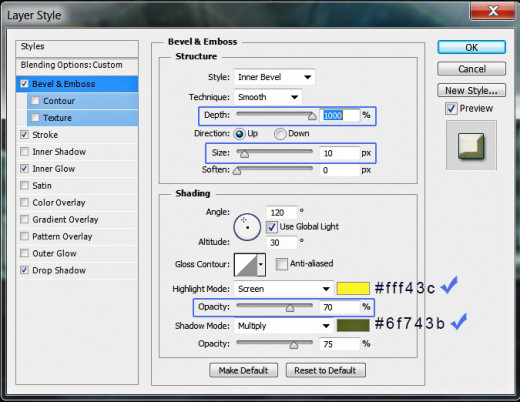
Let us apply Bevel and Emboss to increase the 3D effect on our Text. Change Depth to 1000% and Size to 10px. Choose yellow for Color for Highlight- #fff43c and slightly lower its Opacity to 70%. Change also the Color of Shadow to #6f743b.
STEP 37
The last Layer Style to be applied is Contour. Only tick it in Layer Style box and leave the default settings.

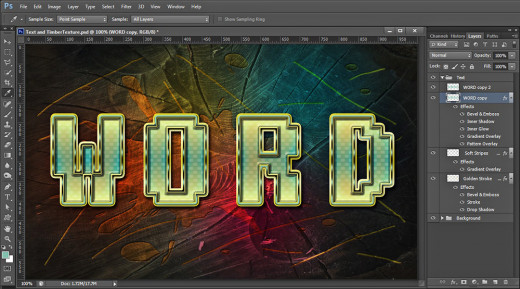
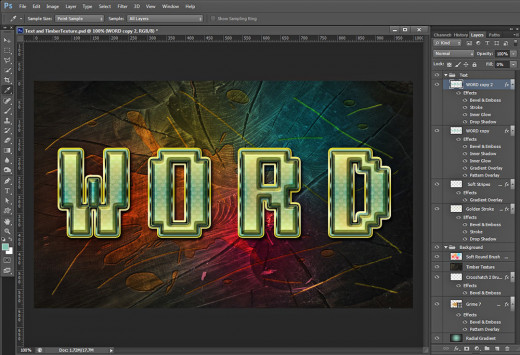
On the screenshot below you can see the final result I have on my canvas. Compare also your Layers panel with mine. If you have followed all my steps correctly you should get the following groups and layers in your Layers pane:
-
Background group which consists of these five layers: Radial gradient, Grime 7, Crosshatch 2 Brush, Timber texture and Soft Round Brush and
-
Text group with these four layers in it: Golden Stroke, Soft Stripes, Word copy and Word copy 2.
STEP 38
This is our glossy Fixedsys Text saved in .jpg format.
Thank you very much for reading my tutorial. I hope you find it useful. If you have any questions or critiques, you are welcome to leave a comment. :)


