Airbrushing with the Badger Anthem 155: A Beginner's First Impressions

Using the Badger Anthem 155

How it all started
I've enjoyed model kit-building for years. I'd quit for a long time, but started back up about a year ago. During our last anniversary, Monique decided to give it a go. She sent me to town, and given the choices available, chose a Revell Dracula kit. We spent 8 hours together building models for our anniversary. Ever since then, she's built movie monster kits. I prefer comic book figures. Building models has become a relaxing and enjoyable past-time for us.
Just a beginner's first thoughts
Recently, my parents gave me an airbrush kit for my birthday. It was a Badger 250, cans of compressed air, and paint jars. I've never used an airbrush before, but this inspired me to give it a shot. I can't do anything in moderation, so I ordered an upgraded airbrush, the Badger Anthem 155. Plus an air compressor.
This isn't strictly a review of airbrushes or compressors. I lack the experience to truly judge them. Neither is this any kind of tutorial. Rather, it's a total beginner's first impressions. If you've been thinking about getting an airbrush, but weren't sure if it was for you... this might help you decide.
My Badger Anthem 155

Not all standard parts are made for other standard parts
I chose the Badger Anthem because it has a reputation as a can-do airbrush, great for beginners, easy to maintain, very forgiving, and dual-action control.
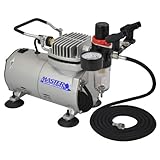
The compressor was kind of a requirement. Cans of air run around $13 each, and don't last long. I chose a model TC 20 Mini Air Compressor. It was $65, came with a free airbrush (which Monique has co-opted), and now we have an unlimited source of air. When the compressor and airbrush arrived, surprise surprise, the hose and fittings weren't compatible. Oh, the compressor worked perfectly with the included airbrush, but not so much with the Badger Anthem 155.
My first painting

Start with a little practice
A little research, a quick order at Amazon… then a few more days went by waiting for the extra fittings to come. They arrived yesterday. Let me just say it didn't take very long to get everything hooked up and start playing. Working at a newspaper, I have easy access to 'end rolls', the leftover bits of unused paper rolls. They're about 2 feet wide, and made a perfect practice sheet taped up to a wall. Looking through my paints, there was an oversized bottle with lots and lots of red acrylic. So, all of my practicing was done in red. Red streaks, red squiggles, red splatters, circles, lines, hearts... Not very imaginative, but cheap.
Things you don't think about at first
The first thing to catch my attention... fingers cramped quickly. Wow. That's going to take some getting used to. It helped a little to use the other hand to steady my grip. I play piano, and type for hours each day. Kind of surprised me that my hand cramped. With practice, it will surely improve.
Next thing: This is messy. Learning to control the spray pressure will probably help that. But the most useful thing to know is, yes, the bottle can fall off of the airbrush if it's not firmly attached. Changing color, cleaning the airbrush, mixing paints, everything seems determined to get paint on my hands and pretty much every place I didn't want it to be.
Far faster than hand-brushing the base coat

My Sun and my Moon
Back to the base. Covered thoroughly in black (the base, not me!), paint nicely dry, it's ready for the next colors. I'm pretty comfortable dry-brushing and doing washes with a brush. Using an airbrush to accomplish these techniques is not the same. Overall, it turned out pretty good for a first try. Went with dark gray for the stones, and lighter gray for the highlights. The gradations are super-smooth. I truly thought there was enough contrast to give it a good dry-brush effect, but after the paint dried, the gradations are still too subtle.
Also, it's going to take a whole new mindset to keep the 'apparent light source' consistent. I'm all happy, airbrushing Cap's base on my new rotating stand, without a thought to how crazy the shading's going to look. So of course, the shading looks like there's about 27 suns and a couple of moons shining down. Going to try again, but keeping my desired lighting in mind.
Always on the go

My Traveling Air Compressor
The air compressor can push up to 57 psi, but most videos and websites I've read say to set it lower. Some say 35 pounds, some say 20. In my extremely brief experience, it seems easiest to control the airbrush between 10 and 15 pounds. When first turning the compressor on, it ran for a second, and shut off. Over and over. No, it wasn't broken. It was maintaining the pre-set pressure.
When actually spraying with the airbrush, the compressor provides a very steady output. Runs quietly, but vibrates a lot. As a matter of fact, the compressor travels. I placed it on the table, and it worked it's way across, pushing other things out of the way and off the table. For now I have the air compressor wedged in place, but it may have to go on the floor in the long term.
Just Minutes to Mastery...
My first real use for the Anthem 155? Painting the base color onto Captain America's stand. It was very fast, easy, and convenient. Put the stand on a rotating display, spin it around, and next thing you know, that sucker's coated with black paint.. Smooth. Even. Over-sprayed. About a foot beyond where I meant for it to go. That's useful to know.
So about this time, Monique stuck her head in the room and asked if I "Have it all figured out now?" I'm covered in paint, there's spilled paint all around me, and my practice spray is... enthusiastic but unguided. Yep. I got it covered. A friend of mine said "I bet you looked like a kid with fingerpaints." That seems about right.
I can't wait for Monique to start airbrushing. I want to observe when she does... but from several feet away. :^)
Acrylics watered down with... water
With the actual paints, I'm using whatever craft acrylics I can find. Most of my paint comes from Michaels' Craft Store. Probably watered it down too much when I mixed the paint for the airbrush. Everybody says "Make it the consistency of milk." Think I'll try to make it slightly thicker next time. Also, several people recommend using Windex to thin your paint down. Last night, I just used water. But it might be worth trying some Windex. Maybe it'll help keep the paint going smoothly through the nozzle.
Hand-eye Coordination? I'm in trouble!
I'm having trouble with fine control. This is kind of like walking and chewing gum at the same time. Some people have it... some don't. I'm constantly forgetting to push the control down at the same time as pull it back. Or if I remember those, and actually get the correct pressure, I forget to move my hand, and wind up spraying a big blob of paint in one spot.
Guess it's going to take practice. Went back to it the second day, and feel much better about the results. I'm beginning to like the shading, though Monique thinks the lighter gray makes it look blue-ish. My bigger concern is the occasional spatter. Being new to airbrushing, I'm not sure what's causing that. Guessing the paint is too thick, or maybe drying in the nozzle?
air compressors

Even the experts don't always airbrush
I have to remember... the airbrush is just another tool in my bag of tricks. Watched a video recently: Phil Lister's Model Crafter Series, the episode on building the Ghost of CastleMare. In it, he said the model was so well built, he used almost no airbrushing at all. Just dry-brushing and washes.
If one of the foremost model-builders in the world says you don't always have to airbrush, well I think that's pretty much written in stone.
Maybe I need to practice some more
After playing with it a couple of hours last night and again tonight, I must say it's both easier and harder than I expected. Easier, because even a beginner like me can do smooth base coats. With a brush, sometimes my base coat can be a bit thick. Starts obscuring fine details. The airbrush lets me do a fabulous job, no brush strokes, far quicker than I could with a brush.
Harder, because to do it right requires a lot of practice and training (which I DID expect), and a huge amount of preparation, planning, and work during the painting. Mixing colors, constantly cleaning the brush, trying to get it right. Plus for detail work, you have to mask off parts you want to protect, which looks to be a big pain.
Captain America: A Work in Progress

Starting over again
In short, easy to jump in and blow paint out of the airbrush. Not so easy if you want to actually be good with it. I'm pretty good with a brush… but using an airbrush feels a lot like starting all over again. It's going to take a lot of time and work to get where I want to be.
Guess I'd better go practice!


