Babydoll Dress Sewing Instructions

An Easy-to-Sew Project Perfect for a Child's First Sewing Project
Sewing a baby doll (or stuffed animal) dress does not have to be difficult. There are plenty of patterns you can buy, but if you are in a hurry and need to whip up a quick dress, shopping for a pattern may not be an option. Buying baby doll dresses can be expensive, so making them will both save you money plus guarantee a custom dress! As an added benefit, this project is an easy one for your young crafters. Get them to help pick the fabric, cut it out, and even stitch together this quick, simple baby doll or stuffed animal dress.
Easy to sew baby doll dress

Easy Pillow Case Baby Doll Dress
The name implies that this dress must be made from a pillowcase. As you can imagine, finding pillow cases in baby doll size might be a chore. So you will make your own "pillow case" using the same principle.
Step 1: Measure
- Measure the baby doll shoulder-to-shoulder. For our example, we will say this measurement is 8 inches. Triple this measurement to know how wide to make your "pillow case." Our example will be 24 inches wide.
- Measure the baby doll from shoulder to the area of the leg that you want the dress to cover. Our length measurement will be 8 inches. Add 1 inch to allow for casing and a small hem. Our example will be 9 inches long.
Step 2: Make Your Cuts
- Cut one rectangle from your selected fabric using the measurements you determined by measuring Mine was 9 inches tall x 24 inches wide.
- Fold the fabric in half, printed sides facing.
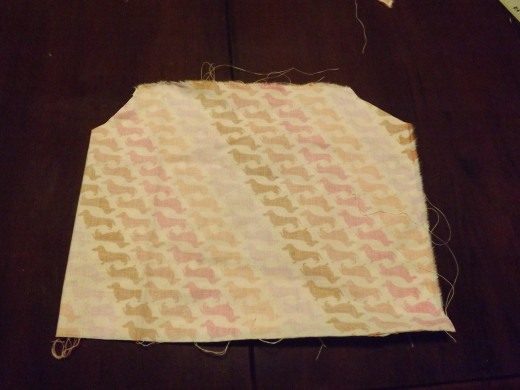
- With pieces still together, fold them in half. Trim the top corners only to create arm holes. (Refer to photos) Unfold and flatten out any crease that remains.
Cutting arm holes

Sewing the Arm Holes
- Hem each of the arm holes by turning the edge of fabric toward the unprinted side. Fold in 1/8-inch, then fold again for another 1/8-inch. Stitch in place.
- Place the fabric pieces together again, right sides facing. Sew up each side from the bottom to the armhole. (Since you folded your fabric, you will only need to sew one side seam.)

Make the Casing
- Turn the top of both the front and back of the dress under 1/8 inch and finger press to crease. Fold it back again another 3/8 inch and pin in place on each piece of fabric. Create the casing by sewing each piece of fabric near the folded edge along the first 1/8 inch fold. Your casing is between the folded top edge and the seam.
- Turn the bottom of the dress under 1/8 inch, then another 1/8 inch to hem. Sew in place.
Add the Ribbon Ties
- Pin a safety pin to one end of ribbon. Use the pin to guide the ribbon through one side of the casing. Repeat with the second ribbon on the back side.
- Tie the front to back ribbon on each shoulder to complete the dress.
Adding the Ribbon


Helpful Hints
- Once you have fitted the dress onto the baby doll, knot the ribbons and trim off any excess ribbon that is in the way.
- If machine hemming the arm holes seems too tedious, do the work by hand. It's a small project and won't take long.
- Add trims like lace or rick rack to dress up the baby doll dress.
- If you have scraps of ribbon left, make matching hair barrettes by hot gluing ribbon onto simple hair clips.
- If you are new to sewing, use 100% cotton fabrics for the first few dresses you make. It is a sturdier cloth than most synthetic ones and can withstand stitches needing to be removed and re-stitched if needed. Fabrics like taffeta or polyester are slippery and difficult to sew for many beginners.


