- HubPages»
- Arts and Design»
- Crafts & Handiwork»
- Textiles
Beautiful Blocks: An Easy To Knit Baby Blanket
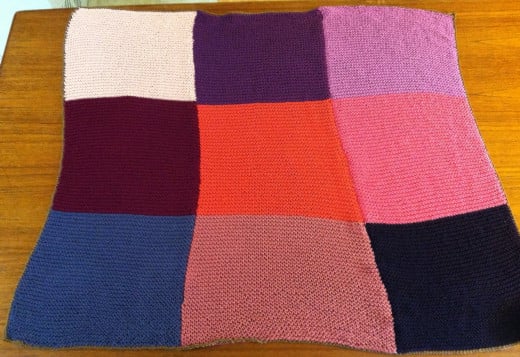
Baby blankets can make really good beginning knitting projects. They are small enough to actually complete but attractive enough and large enough to feel you have accomplished something. Additionally, you get the fun of having a unique gift to give a friend. People really appreciate being given something made specifically for their child, and it is a lovely and loving way to welcome a new baby to this world.
One simple blanket pattern is to make a blanket out of large, solid colored blocks that are sewn together. I recently created a blanket like this for a friend’s new baby and it was a really fun project to complete. (If you don’t already know how to knit I suggest checking out the site http://www.knittinghelp.com/videos/learn-to-knit for a good tutorial and for definitions of the knitting terms I will use. And I encourage you to learn - it is a fun and relaxing hobby!)
I chose to work with KnitPicks yarn Comfy in a worsted weight. Comfy has about thirty different color options and is a soft blend of cotton and acrylic that is pleasant to knit with and soft on the skin. It is also machine washable, which is a very important consideration whenever you are knitting something for a child. If you want it to be used (and why bother making it if you don’t want it to be used?) then it has to be washable. For this blanket I chose a color palette of pinks and purples. I usually don’t make a blanket that is so gender specific but my friend knew she was going to have a girl and it was also close to Valentine’s day, which put me in a pink kind of mood.
Easy Blocks
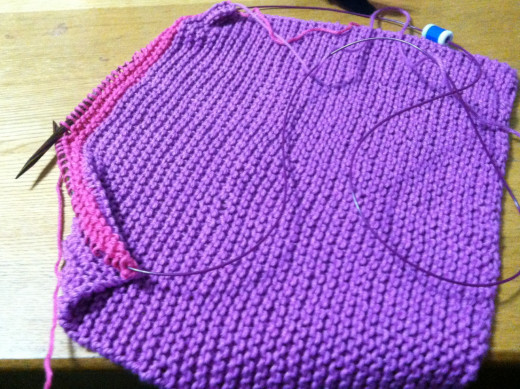
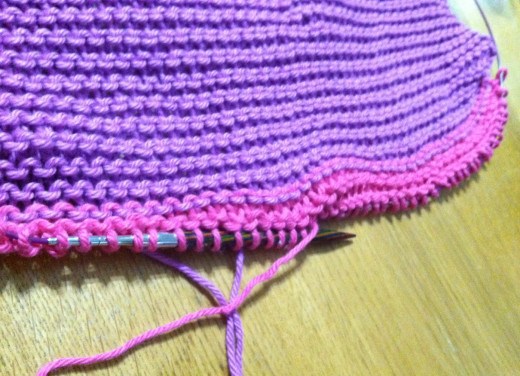
For this blanket I cast on fifty stitches on U.S. size 9 circular needles and knit in garter stitch (knitting every row) until I ran out of that color of yarn. That ended up being about seventy rows. I like garter stitch for baby blanket projects because it makes a very stretchy, textured fabric that seems cozy to me. If you like a sleeker fabric there is no reason you couldn’t knit in stockinette stitch (knitting one row, purling the next) but if you do the blocks will be taller, so you may want to just knit until you have a nice square. When I ran out of the first color yarn I joined the second color and kept on knitting another 70 rows. When I joined the two colors I created a “right side” and a “wrong side” to the fabric. The “right side” is the side where the color joins appear smooth and even; the wrong side the different colors give a train track appearance. This is important because when you finish with the second color you will want to join the third color starting with a “right side” row to keep the color joins nice and smooth. As you might expect, I knit another 70 rows with the third color, and then I bound off my stitches.
Finishing Your Project
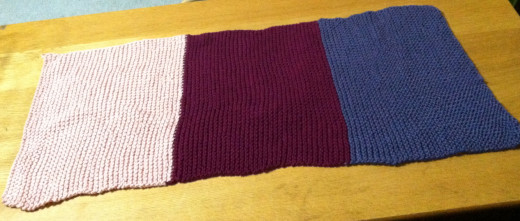
This gave me a strip of fabric one block by three blocks, about 12 inches by 36 inches in size. I then created two more strips of fabric, using six more colors, in the same way. When I had three strips completed I set them down side by side with the wrong sides facing up and stitched them together. I strongly suggest using large T pins, found in most fabric stores, to pin the fabric before sewing it. This will ensure you get your edges and corners nicely lined up and save you time when you realize that the blocks aren’t lining up evenly and you have to undo it and start over. (Trust me - I learned this one the hard way). I also recommend that you put something mildly interesting on television or listen to a good radio program while you do the sewing. You will need to keep your eyes on the sewing work but it is pretty dull to do, so something to keep your mind occupied is helpful. I usually watch re-runs of Gilmore Girls, a favorite TV show with entertaining dialogue that keeps me amused.
If you like you can choose to be done at this step, but I like to put a border on a blanket because it gives it a tighter, more finished look. A simple border I used on this blanket is a single crochet border in a nice contrasting color. I chose a soft brown that I thought complimented the pinks and purples of the blanket. The single crochet makes a firmer edge to the blanket that adds definition and pulls the whole piece together. There are other ways to add a border (knitted borders and double crochet are two that I have also used in the past) so this step can be whatever appeals to you. Some people are purists and say you shouldn't mix knitting and crocheting but to that I say - it's your project! Do whatever seems fun to you!
This is also a nice blanket to do as a group project, if you have several friends who knit or who are willing to learn. You can each knit a block (or more than one block, depending on how many people are knitting) and then work together on the sewing. You can also knit each block and border it individually before sewing the blocks together, which creates a more quilted look to the project since each block is outlined. If you want to make a blanket for an adult you can increase the number of blocks and rows; a 4 block by 4 stripe pattern makes a nice size afghan. With the number of variations in color, border styles and finishing this one blanket pattern can offer many, many hours of entertaining knitting.

