- HubPages»
- Arts and Design»
- Photography»
- Photography Instruction & How-Tos
Beginners Guide to Photography No.6


Other bits and Pieces.
Drive Mode- You will normally be able to set your camera to:
- Single Shot - Takes the photos one at a time, as your release the shutter
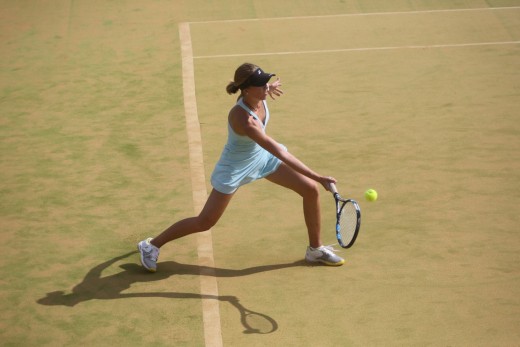
- Multiburst - Either low or high. Here the camera will take pictures in a burst at a number of frames per second, as long as you have your finger on the button. This can be particularly useful in sports photography, for example by using this option to take a picture of a tennis player, you can then select the best shot showing ball and racquet.
In this menu, there will be the options for time delayed shooting.
The two second delay, is perfect for when you are taking a shot on a tripod, particularly in lower light, and you want to avoid the camera moving. In this mode you simply press the shutter release, then move your hand away and the camera will take the picture two seconds later.
The ten second delay, is great for the good old fashioned 'selfie' where you run around the front of the camera after pressing the button!
Flash
Unless you have a separate flash gun, then the use of flash with your camera can be quite limited in that you cannot alter the source nor the power of the flash in any significant way. Yes, there is a system for altering the exposure (flash exp. comp.) which will tone down the flash, if you find it too strong on your subject or where you can slightly increase the power. But the other techniques for the use of flash are only really appropriate for those who are using an external flash gun and are relatively complex so I will not be covering those on this course.
However, in bright sunlight, you get strong contrast with the sunlit sections of the photograph glaringly bright and the shadows really dark.
An good technique and one that is really easy, is to use your flash to provide some fill in light, so that you light the subject. You will also find that when using this technique the background retains its exposure, really making the subject zing.
Just set the camera to P and make sure you pop your flash on (I taught this technique to a 'new' photographer at a holiday resort abroad, he thought I was brilliant particularly as his sales went through the roof!)


One added benefit for using a flash in sunlight is that you get a 'catch-light' in the eyes (this is a small reflection of light visible in the eyes on a photograph and really gives life to the subject.
A couple of things to remember about using flash:
- Your flash has a limited range, so if you are at your local large football stadium, forget it.
- Direct flash is a harsh light and will caste harsh shadows (you will see professional photographers try different ways of softening the light source from their flash guns, using diffusers, soft boxes (white screens in front of the flash or bouncing the flash off of a wall or ceiling). I will not say at this stage which is best, only that you should be aware of the limitations of using flash.

")
When you are using flash, then, if the light source is close to the lens, then you can get a reflection from the back of the eye. This reflection will be red and appropriately enough is called 'red-eye'. To eliminate this the camera will fire a small light at the subject, causing the pupils to dilate and stop this reflection. This feature is called 'Red-eye' and is a simple on/off feature in the menu of your camera.
Image Stabilization Normally you will have an on/off button on the side of the lens on your camera, but it may be contained in the menu (have a look at your manual).
What this function does is that, to a certain degree, it eliminates camera shake. This is particularly relevant when you are taking a photograph using the zoom to get in closer or in lowlight situations when you are taking at a slower speed.
Photo manipulation This is such a complex area, I am not going to address this subject here, however,
I would always ask you to remember that the best way to get great photographs is to take great photographs -there is an old English saying that you cannot make a silk purse out os a sow's ear! -
Conclusion
For this Beginners course, I feel that I have covered the essentials aspects of using your camera and how it works. There are, of course, so many aspects to photography, such a course could never cover them all. Remember there are degree courses in photography!
My aim in writing this course has hopefully been to enable people to enjoy using their cameras and to take some good photographs, that they will cherish for years to come.
If you have specific areas of concern and would like me to address them, then please leave a comment and I will try to reply.
The next stage in this course is the 'arty' bit relating to composition.
© 2017 Dave Proctor


 Size Film Negatives on a Canoscan 8800f Scanner -Made Easy")