- HubPages»
- Arts and Design»
- Crafts & Handiwork»
- Textiles
Beginning to Crochet

I love being able to make my own things. It just feels so much more rewarding and satisfying when you can say that you made something, whether it be something you can wear, or something you can use to decorate your home. I recently picked up crocheting as I saw a couple of my friends and the various things they made for themselves. Granted, they are considered "experts" now, but every expert has to start off as a beginner at one point or another. In this blog, I will go through the basics on how to get started with crocheting and some simple projects to start with.
What you will need to start crocheting
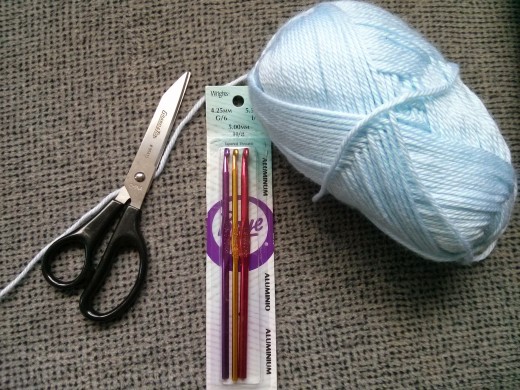
Of course, to crochet, you need a few things to even get you started off. This includes:
- Crochet Hook - Crochet hooks come in different sizes. I've picked up a packet of 3 crochet hooks (G, H, I) to get myself started off. Generally, when you purchase yarn, it will tell you the recommended hook size to use with the yarn of choice. The thicker the yarn, more than likely the thicker the hook you will need to use as well.
- Yarn - This is where you can have some fun. There are so many yarn colours and sizes and textures to choose from. Decide what you want to make and what type of yarn might be best for it. As a beginner though, I would more than likely just choose a regular acrylic yarn to practice on as it tends to be cheaper. You can pick up yarn at dedicated yarn stores or also at a local craft store like Micheal's.
- Scissors - You will need these to cut off the yarn once you are done crocheting your pieces
Getting Started with Crocheting
There are a few basic stitches you should learn in order to make any basic item (e.g; scarf). If you master the below, you will be able to begin your own crochet project! Note you will notice some abbreviations below. In crochet patterns, they typically abbreviate most stitches so that they do not need to repeat the entire word throughout the pattern. I've linked to a few different videos I have found online that I find useful and easy to follow. I would advise you to try the different stitches below on your yarn while watching the videos just to practice (and not necessarily feel the need to make anything right away). Just get the understanding of how each stitch is formed and keep practicing them until you have it figured out. If the videos are going too fast, I typically pause the video after each step taken during the video so I can make sure I am following along correctly at the same time.
- Slipknot - You need a slip knot to begin any crochet pattern. It is essentially a knot that is formed on the crochet hook to begin your pattern!
- Chain stitch - This is also important for crocheting, as after you have created your slip knot, all patterns typically call for the chain stitch
- Slip stitch - abbreviation: sl st. This is the smallest crochet stitch.
- Single crochet - abbreviation: sc. This is the next smallest crochet stitch.
- Half Double crochet - abbreviation: hdc.
- Double crochet - abbreviation: dc. Very similar to the hdc but don't get it mixed up with it!
Some Beginner Projects
Now that you have mastered the various stitches above, try out some of the projects below that I have also tried out and can attest to their "beginnerness!" Once you make these, you will definitely feel a sense of accomplishment.
- Bow tie - I made this into a hair clip/hair tie by attaching either a hair clip or hair tie to it but you can also use this to attach to perhaps a hat (future advanced project) or headband (easy beginner project)
- Headband with flower - Hair Accessory - I find all these hair accessories very cute and had no problems putting this one together. One note of advise though, if you had the same troubles as me when going through the tutorial, is that you will notice the "big flower" has 2 additional sc's vs. the smaller flower. I did NOT notice this and ended up with two flowers very similar in size!


")


")