- HubPages»
- Arts and Design»
- Drawing»
- Drawing Tutorials
How to Sketch a Car in Perspective
Dear friends,
it is always hard to start sketching cars in perspective. For this reason, I made this video tutorial, and also the above illustrations to show the right steps to make for drawing correctly a car in 3/4 front perspective. It is an easy way to start sketching cars in perspective.
Of course we have several different types of perspectives more complex and interesting to explore, but for now, let's make this easy exercise to learn from basics.
We start drawing a car in Side View, later we transform it into a 3/4 front view. In this case, both vanishing points are pointing to the infinite. For this reason, perspective lines do not converge but stay horizontal.
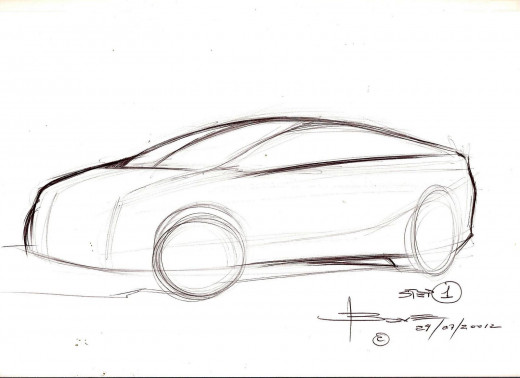
Tutorial Step 1
I made a very quick car sketch tutorial for a 3/4 front perspective, the car has front wheels a bit turning for a more dynamic composition. It is not a design or creative proposal, it is just a fast simple tutorial for you.
The Linework is important because we can check proportions and also perspective, sketch with light lines gives us the opportunity to make corrections. On Step 2 we will use the right lines and, at the end, our eyes will see only the right outline. Sketch light first!
Check how I placed the front ellipses almost a 90° with minor axis rotated up to give the feeling the front wheels are turning a bit. The rear wheel has the minor axis that goes to left V.P. respecting perspective rules.
Before going to Step 2 let's just add the cast shadow, this way it is a car and not a flying object!
Step 2
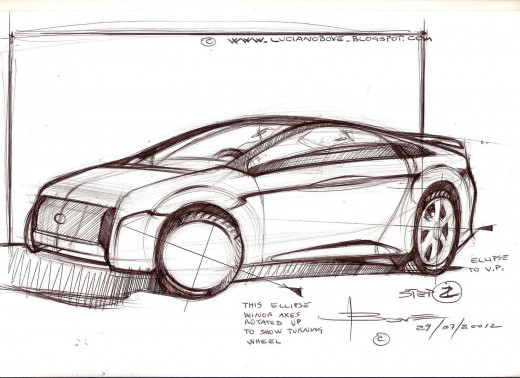
Step 1 was to understand proportions and perspective basically where we are! Now we realize Step 2 just adding quality details and a little of car design details like side sections, the front face, wheels details and tires details where light is supposed to hit them.
Linework gets a bit heavy to give life to our quick car sketch, so lines get shaded using the pen (a black Bic). We add lines to show side reflections and on the windshield and side glasses, too.
We add also a reinforced background outline to "frame" our car and overall composition on the page.
Conclusion
So here we are with our tutorial, a 3/4 front view car sketch done with a black ballpoint pen, checking the right perspective, the good line quality, some details for a better realism, reflection lines on body car and glass area for more realism and shape volume reading, a background to push our car sketch better and also create a sort of focal point for a better reading of our drawing.
Now it is up to you to try. Please copy those steps at home and do it many times.
It is only with a lot of exercises that you will soon master your car sketches and illustrations.
Thank you!
© 2012 Luciano Bove

