Make Chain Mail Jewelry

Easy Chain Mail Jewelry Pattern
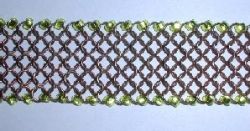
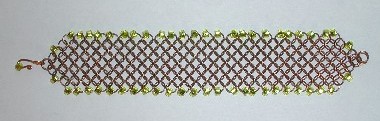
Have you ever wanted to make your own chain mail jewelry? Here's an easy project to get you started. This is an updated take on the classic European 4-in-1 chain mail pattern. The beads are optional, but they add distinction. Once you are comfortable with the basic pattern, try varying your wire and ring size for dramatic changes in the appearance of the mail. The bracelet shown in the tutorial is about 2" wide, but you have complete control over your finished dimensions so that you can make a bracelet, anklet, necklace, or even belt of any width and length you choose.
Chain Mail Jewelry Overview
This is an easy, easy project and a great way to decide whether or not you enjoy making chain mail or jump ring jewelry. The European 4-in-1 pattern is the chain mail pattern many people learn first. All you need are rings, beads, and pliers.
People who make mail for a living use speedy techniques, which tend to involve making strips of mail and then joining them. Although you will probably work with mail strips as you gain experience (and speed), this tutorial makes the mail from one end to the other. I did this because the rings are relatively small (so it's harder to line up a pattern to join sections) and because I like to add beads as I go (you could open the edge rings and add them all at the end if you prefer).
Materials for this Chain Mail Jewelry Project
Jump Rings or Wire
This are round ring that are cut so that you can twist them open and closed. This pattern requires only one size of ring. The look of the piece will be determined by the gauge of wire and size of the rings. You can buy rings or make your own. I prefer 18 or 20 gauge wire for jewelry. You could use 22 gauge as long as your rings are very small. If you are looking for a more authentic mail look, try using larger 16-gauge steel rings. I used dead soft wire to make my own rings, which are about 5-mm internal diameter.
Beads Optional, but really adds flair.
I used size 5 Miyuki triangles. Use whatever you want, but be sure the beads will fit on the rings! As your wire thickness increases, your bead options decrease.
Flatnose or Chainnose Pliers
Preferably two pairs. You are going to open and close a lot of rings!
Clasp
Chain Mail Jewelry Tools and More
I've started a list of tools and other materials that you may need for making chain mail jewelry. Feel free to add to the list and of course vote up/down.
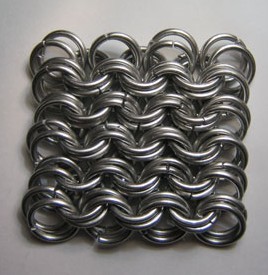
Double the Rings for King's Mail
One variation on this project is to double the number of rings used in every step, which changes the pattern from a European 4-in-1 weave to a European 8-in-2 weave, which is also known as King's Mail. This is a sturdier, more substantial chain.
Photo of King's Mail: Adamthebastard, Wikipedia Commons
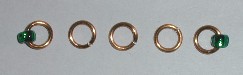
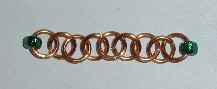
Chain Mail Jewelry Step 1:
You can easily vary the width of the pattern by altering the number of rings used to start (or by using different sized rings). I have 5 closed rings lined up in a row. I opened the end rings and put beads on them before closing them again. This is the first row of rings.
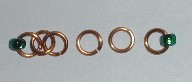
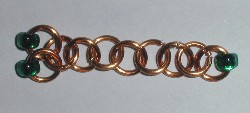
Chain Mail Jewelry Step 2:
Open 4 rings (um.... save yourself some time and have them all open from this point). Run an open ring through the first two rings of row 1 and close the ring.
Chain Mail Jewelry Step 3:
Use another ring to join the 2nd and 3rd ring of row 1. Use another ring to join the 3rd & 4rd ring of row 1. Use another ring to join the 4th and 5th ring of row 1. (Note: you could have simply joined 9 rings together to make a chain, with beads on the the outer rings). Now smooth the rings out as shown. I like to tack the first, third, and fifth beads of row 1 down onto a piece of cardboard with pins in order to keep the rows smooth and even. At this point, you have two rows of rings consisting of 5 rings and 4 rings. If you are new to making jump ring jewelry, it may take some practice before you can easily distinguish separate rows of rings. If you have your rings nicely lined up, you will see that rows consist of alternate rings.
Chain Mail Jewelry Video Instructions
Here's a video that shows how to make more chain mail (or chain maille... it's the same thing) jewelry.
Chain Mail Jewelry Step 4:
Add a bead onto an open ring and attach it to ring 1 of row 2 (if it all looks like one long row to you, ring 1 of row 2 is the second ring in the row... did that make sense?). Close this ring and push it to the side of the work.

Chain Mail Jewelry Step 5:
Use an open ring to join rings 1 and 2 of row 2. Use an open ring to join rings 2 and 3 of row 2. Continue to the end of the row. The last ring to be added will have a bead and will only join to ring 4 of the row. Smooth the rings out as shown. You have alternating rows of 5 rings (end rings have beads) and 4 rings. The pattern continues in this manner until the piece is your desired length. The only 'trick' to making the pattern is to make sure your rings are smoothed out before starting a new row.
Learn How to Make More Chain Mail Jewelry
There are many different styles of chain mail jewelry. You can find patterns for both men and women. Chain mail jewelry can be understated and elegant or bold and brash. Making your own jewelry is a great way to express you creativity and personality.
Chain Mail Jewelry Step 6:
You can attach a clasp at any point(s) of the strip of mail. However, I like to taper the mail at the ends (which could be done starting the piece just as easily). To taper the strip, reduce the number of rings in a row. From a row of 4 rings, add only 3 rings (bead on rings 1 and 3), then 2 rings, then a single ring with a clasp.
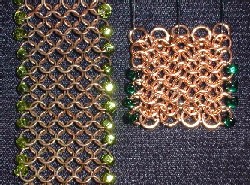
Chain Mail Jewelry Step 7:
Here's an example of how changing the gauge of the wire affects the appearance of the weave. The piece on the left was made with 20 gauge copper, while the piece on the right uses 18 gauge wire. In both cases, the rings are about 5-mm. Also, this shows how raw copper changes over time. See how bright and shiny the new mail is? You can keep that appearance by either using coated wire to begin with or by dipping your finished jewelry in a sealant, like Future floor coating. The copper will 'green' your skin as it makes a transition from bright to oxidized, but once it has changed to the darker color, it tends to stop causing the color reaction with skin. Some people have strong preferences regarding the color of their metal... a similar process is seen if you use sterling silver instead of copper.
More Wire Jewelry Patterns
If you enjoyed making this chain mail pattern, you may want to try some of my other wire jewelry patterns.
- Make a Japanese Chain Maille Necklace
Call it chain maille or chain mail or call it jump ring jewelry - the technique is easy and the results are stunning! This necklace, based on a Japanese motif, is a great beginner project. It doesn't take too long to complete, doesn't involve contort - Make Wire Valentine's Day Hearts
You can make heart shapes using wire by hand, using nothing more than your fingers and roundnosed pliers. However, you can get consistent sizes and shapes if you use a jig to form the heart. Here's an easy pattern that can be used with any gauge wire - How to Make a Beaded Spider
This beaded spider is an ideal Halloween decoration or traditional Christmas tree ornament. Large spiders make great pins and pendants, while smaller ones can be used as earrings, rings, and accents on purses and hairpins. - Make Bead and Wire Flower Hair Jewelry
This bead and wire flower is very easy to make and looks gorgeous in your hair. You can make vary the size, shape, and number of petals to make flowers for hair pins, bobby pins, pendants, pins, and more. - Make Beaded Chandelier Earrings
Chandelier earrings are gorgeous, but large earrings can be heavy and cumbersome and can take a lot of time to make. These earrings have three-dimensional drape and the swingy allure of chandeliers, but they are easy to make and elegant enough to wea - Make a Victorian Wirework Necklace
This autumn leaf necklace is stunning! The Victorian technique for making leaves can be used to make other shapes and sizes of leaves, feathers, and flowers. - Make Beaded Bobby Pins
Make your own beaded bobby pins or barrettes. All it takes is a few beads, some wire, and the pins/barrettes to make bejeweled creations worthy of becoming heirlooms! Beaded bobby pins are great for weddings, formal events such as the prom, gifts, or - Make Chandelier Earrings
Chandelier earrings are gorgeous! These instructions are for completely hand-made earrings. Use a jig or roundnose pliers to make the chandelier frame. The dangles are attached to the frame use wire or headpins. Finally, the chandelier is hung from a
Have You Made Chain Mail Jewelry?
Have you tried making chain mail jewelry? If so, what did you think?
Other Chain Mail Patterns to Try
Here are some other chain mail patterns you can try for this project.
Dragonscale (Idot, Wikipedia)
")
Normandy Style (Tardiff JF, Wikipedia)
")
Japanese Mail (Tadiff JF, Wikipedia)
")
Do you have questions about this project or comments about this lens? Sign the guestbook and let me know what you think!
 for Jewelry or Armor: A How-To")


