Create Autumn Leaf with Layer Styles and Custom Shape in Photoshop

In this tutorial I will show how to turn simple default Custom Shape into unique embossed Autumn Leaf with colorful gradients, Blending Options and Gray Granite Texture which is exclusive for Photoshop. All versions of the program are applicable.
Please take into account that the layer styles applied are valid for the Fixed Size of the Custom Shape I have used in this tut. If you use another size, you won't get the same look of your leaf so you will need to adjust the layer styles in order to achieve the final result.
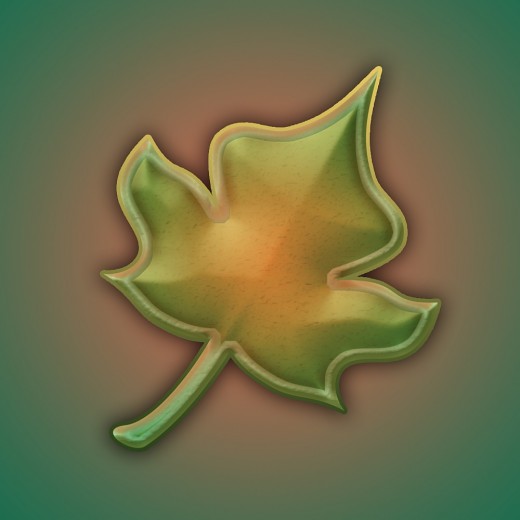
This is what you are going to create:

Prepare Rectangular Shaped Canvas and Colorize it with Radial Gradient
In the coming two steps you have to create a new Photoshop document with rectangular canvas of 1000/1000 Pixels Size. Your next task is to fill the first layer in Layers Panel with orange to green Radial Gradient in order to colorize the Background for your Autumn Leaf.
STEP 1
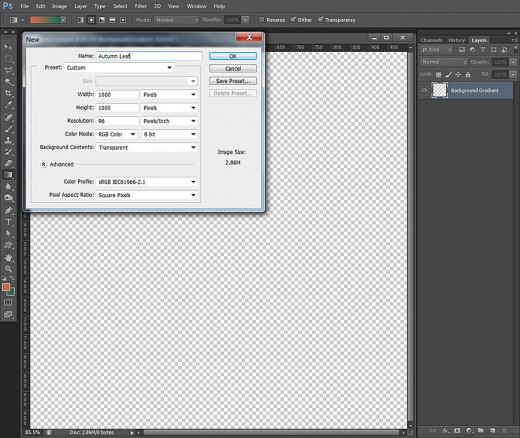
Open your Adobe Photoshop program then go to File, New to create a new .psd document. Name the New File Autumn Leaf, then set its Width and Height to 1000 pixels both. Set the Resolution to 96 Pixels/Inch, choose RGB for Color Mode and Transparent for Background Contents. When you press OK button, you'll get transparent Layer 1 in your Layers panel.
Double click on Layer 1 name and write Background Gradient in the white space to give the layer a new name.
STEP 2
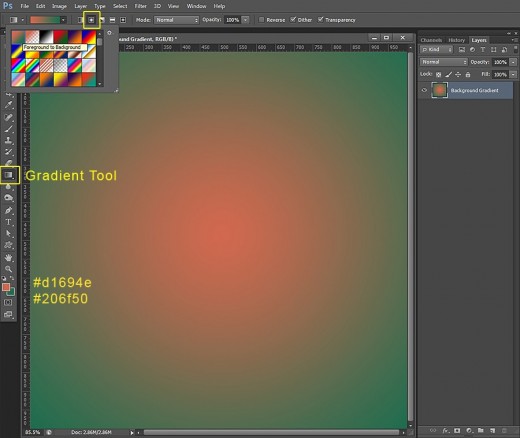
Navigate to the Tools bar. Change the Foreground color to #d1694e and Background color to #206f50. Take Gradient Tool, in the Options bar choose Radial Type of Gradient and select Foreground to Background Gradient from the Gradient Picker. Drag with the Gradient Tool from the middle to any corner of the canvas. You should get this result:
Draw the Leaf Custom Shape and Apply Layer Styles on its Original Layer
In Steps 3-12 you should firstly create a New Group in Layers Panel then draw on a New Layer default Leaf Shape of Fixed Size and in Pixels Mode. You need also to Rotate the Leaf in right direction using Edit, Free Transform Option.
After you have prepared the Leaf Shape, you should apply on its layer Shadow, two shaded Gradient, pale blue Satin, pastel colored Inner Glow and Stroke, 3D Effect and default Gray Granite Texture.
STEP 3
Create a New Layer above the Background layer and call it Leaf 7 Custom Shape after the shape we are going to use.
Set the Foreground color to #666634.
Now grab Custom Shape Tool, in the Options Bar set its Tool Mode to Pixels and find Leaf 7 in the Custom Shape Picker. Click on the gear icon in the Options bar, check Fixed Size and insert 660px for Width and 860px for Height. When you are ready with preparing the Custom Shape, check if Leaf 7 Custom Shape layer is selected and draw the shamrock.
When ready, press Ctrl+G (Layer, Group Layers) to place your leaf layer in a Group and rename this new Group from Group 1 to Leaf.

STEP 4
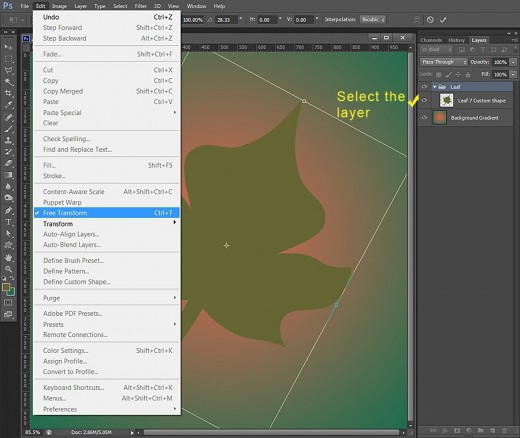
While Leaf 7 Custom Shape layer is highlighted, go to Edit, Free Transform and slightly rotate the leaf to the right. See the screenshot below for reference. Press Enter to apply the Transformation.
STEP 5
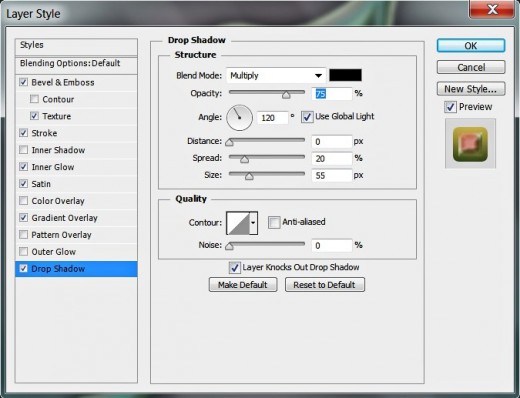
Double click on Leaf 7 Custom Shape layer to call Layer Style dialog box and tick Drop Shadow. Change its settings as follows:
Blend Mode: Multiply
Color of Shadow: #000000 (black by default)
Opacity: 75%
Angle: 120 degrees
Use Global Light: checked
Distance: 0px
Spread: 20%
Size: 55px
Contour: Linear
Anti-aliased: unchecked
Noise: 0%
Layer Knocks Out Drop Shadow: checked.
Don't press OK button to close Layer Style dialog box as we are going to add more Blending Options in the next steps.
STEP 6
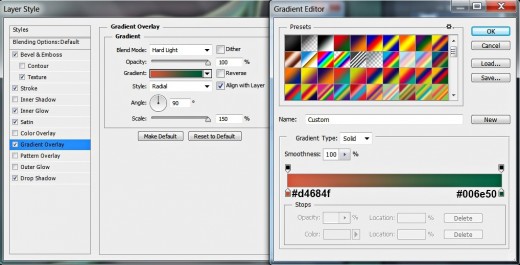
The second Layer Style to be applied is Gradient Overlay. Change its settings like this:
Blend Mode: Hard Light
Dither: unchecked
Opacity: 100%
Click to Edit the Gradient:
First Color Stop (Location 0%): #d4684f
Second Color Stop (Location 100%): #006e50
Reverse: not checked
Style: Radial
Align with Layer: checked
Angle: 90 degrees
Scale: 150%.
STEP 7
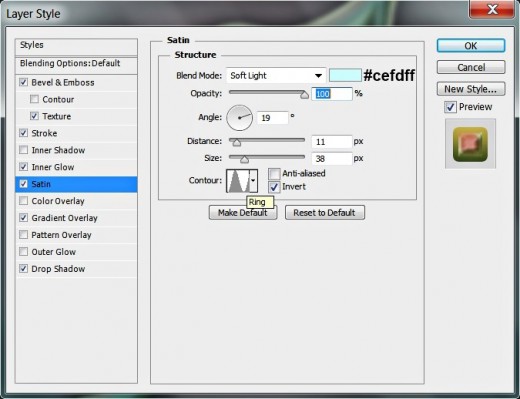
The third Layer Style to be added to our gorgeous leaf is Satin. Insert the following settings:
Blend Mode: Soft Light
Color of Effect: #cefdff
Opacity: 100%
Angle: 19 degrees
Distance: 11px
Size: 38px
Contour: Ring
Anti-aliased: unchecked
Invert: checked.
STEP 8
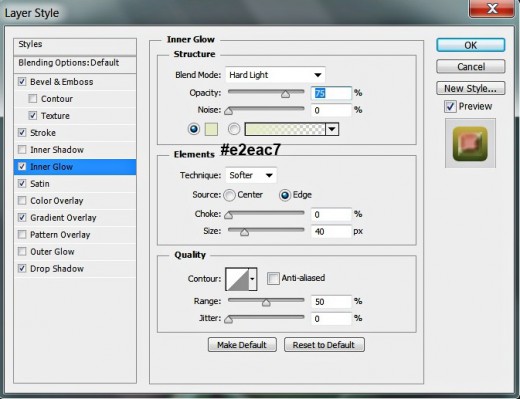
Now check Inner Glow and insert these setings:
Blend Mode: Hard Light
Opacity: 75%
Noise: 0%
Color of Glow: #e2eac7
Technique: Softer
Source: Edge
Choke: 0%
Size: 40px
Contour: Linear
Anti-aliased: unchecked
Range: 50%.
Jitter: 0%.
STEP 9
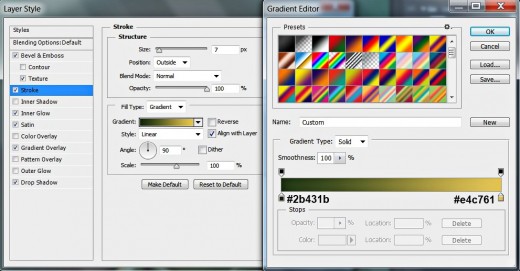
The next Layer Style to be checked is Stroke. Apply these settings:
Size: 7px
Position: Outside
Blend Mode: Normal
Opacity: 100%
Fill Type: Gradient
Click to Edit the Gradient:
First Color Stop (Location 0%): #2b431b
Second Color Stop (Location 100%): #e4c761
Reverse: unchecked
Style: Linear
Align with Layer: ticked
Angle: 90 degrees
Dither: not checked
Scale: 100%.
STEP 10
In this step we are going to add 3D look to our leaf. Check Bevel and Emboss Layer Style and apply the following settings:
Style: Inner Bevel
Technique: Smooth
Depth: 175%
Direction: Up
Size: 16px
Soften: 0px
Angle: 120 degrees
Use Global Light: checked
Altitude: 30 degrees
Gloss Contour: Linear
Anti-aliased: not checked
Highlight Mode: Hard Light
Color for Highlight: #97442a
Opacity: 55%
Shadow Mode: Multiply
Color of Shadow: #616d22
Opacity: 75%.

STEP 11
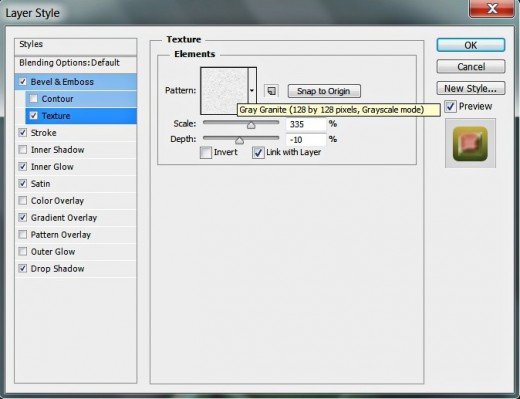
Now we are going to add slight relief and texture to Leaf 7 Custom Shape layer. For the purpose tick Texture Layer Style and change its settings like this:
Pattern: Gray Granite (128 by 128 pixels, Grayscale mode)
Scale: 335%
Depth: -10%
Invert: not checked
Link with Layer: checked.
Now just press OK button to apply the Blending Options and to close Layer Style dialog box.
STEP 12
On the screenshot below is shown how your Autumn Leaf will look after applying all seven Blending Options on the first Custom Shape layer
Now duplicate Leaf 7 Custom Shape layer- right click on it and select Duplicate Layer or drag the shape to Create a New Layer Icon at the bottom of Layers Panel.
As we have to disable the previously applied Blending Options, right click on the duplicated Leaf 7 Custom Shape Copy layer and select Clear Layer Style. This can also be done by dragging fx icon which is to the right of Leaf 7 Custom Shape Copy layer to the recycle bin icon at the bottom of Layers panel.

Load Selection on the Duplicated Leaf Layer, Delete the Excess Parts and Change the Blend Mode
In Steps 13-20 you should firstly Load Selection on the duplicated Leaf then Contract it by 20 Pixels. Your next Step is to Inverse the Selection, delete the excess parts of the Leaf Shape and Remove the inverted Selection. You also have to change the Blend Mode of the processed Leaf 7 Custom Shape copy layer to make it transparent.
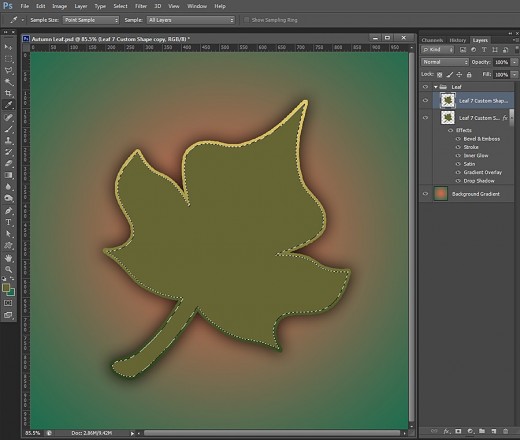
STEP 13
Now Ctrl+click on Leaf 7 Custom Shape Copy layer' thumbnail to Load Selection (Select, Load Selection).
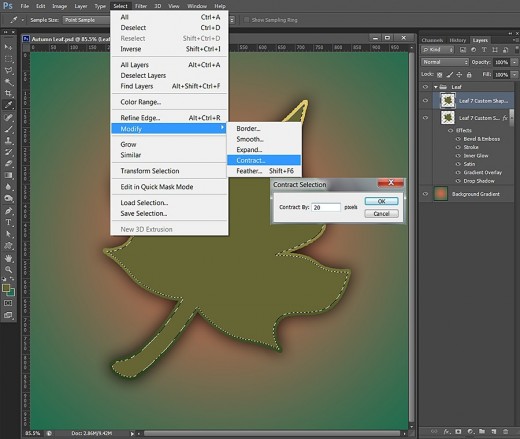
STEP 14
While Leaf 7 Custom Shape Copy layer is highlighted, navigate to the Menu bar and choose Select, Modify, Contract. Contract the Selection by 20 pixels.
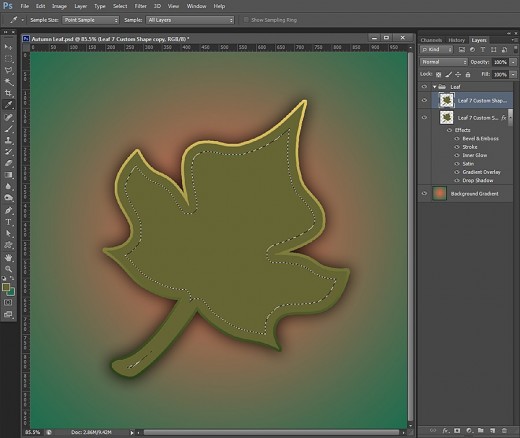
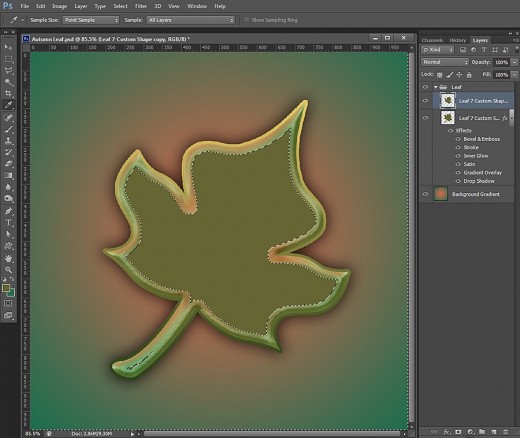
STEP 15
You'll get the following result after contracting the selection:
STEP 16
Now go to Select, Inverse in order to invert the contracted selection.
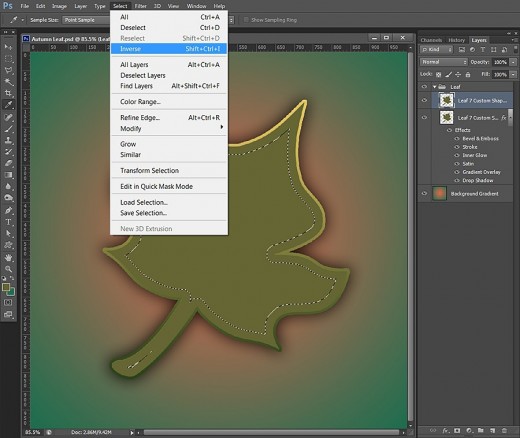
STEP 17
You should get this result after inverting the selection:

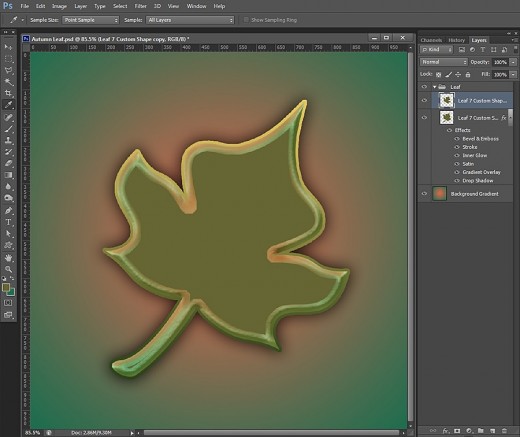
STEP 18
Press Delete key to get rid of the selected leaf borders.
STEP 19
Now simply press Ctrl+D (Select, Deselect) to get rid of the selection.
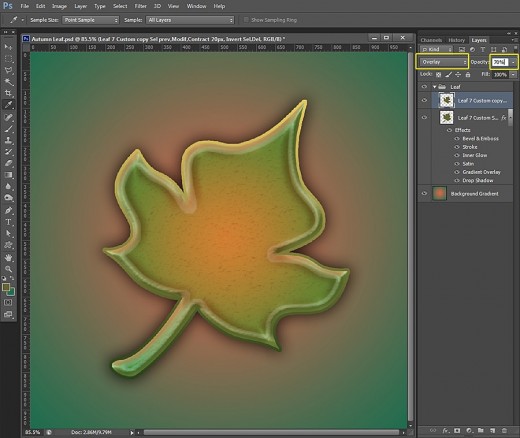
STEP 20
Change Blend Mode of Leaf 7 Custom Shape Copy layer to Overlay and reduce its Opacity to 70%.
Add Stroke and 3D Effect to the Inside Part of the Leaf
In the last steps of this tutorial you have to make the inside part of the Leaf Shape to look embossed and more prominent so you have to continue your work in the duplicated Leaf layer. Your task is to add thin green Stroke, golden and green shaded Bevel and Emboss and Gaussian type of Contour.
STEP 21
Double click on Leaf 7 Custom Shape Copy layer to activate again Layer Style box.
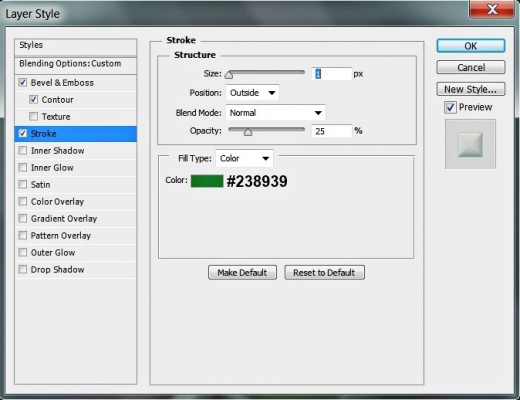
Firsty check Stroke Layer Style and change its settings to add slight grass green Stroke:
Size: 1px
Position: Outside
Blend Mode: Normal
Opacity: 25%
Fill Type: Color
Color of Stroke: #238939.
Still don't close Layer Style box as we are going to add Bevel and Emboss and Contour in the next two steps.
STEP 22
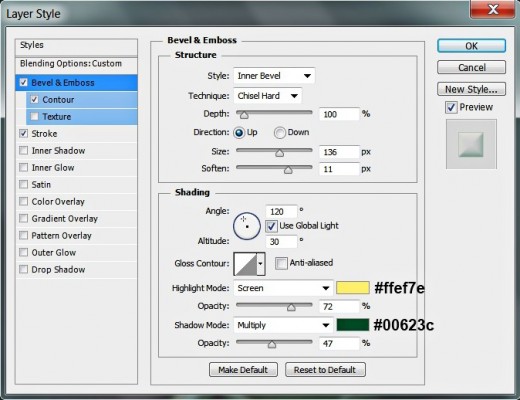
In this step we are going to increase the 3D look of our leaf so check Bevel and Emboss Layer Style and insert these settings:
Style: Inner Bevel
Technique: Chisel Hard
Depth: 100%
Direction: Up
Size: 136px
Soften: 11px
Angle: 120 degrees
Use Global Light: checked
Altitude: 30 degrees
Gloss Contour: Linear
Anti-aliased: not checked
Highlight Mode: Screen
Color for Highlight: #ffef7e
Opacity: 72%
Shadow Mode: Multiply
Color of Shadow: #00623c
Opacity: 47%.
STEP 23
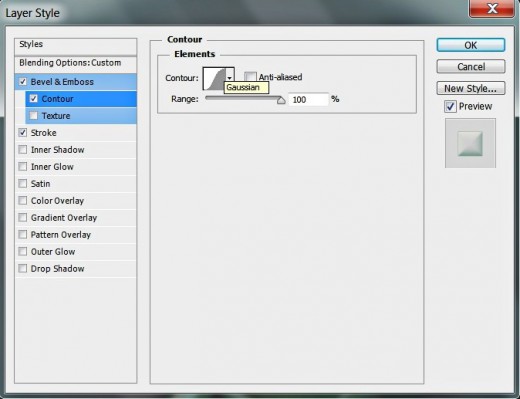
The last Layer Style to be ticked is Contour. Change the settings as follows:
Contour: Gaussian
Anti-aliased: unchecked
Range: 100%.
Press OK button to close Layer Style box.
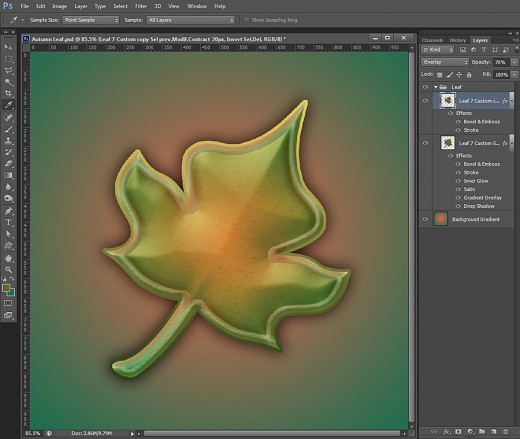
STEP 24
We finished our work on the Autumn Leaf shape. If you have followed all my steps you should get a result similar to my screenshot below. As you can see, there is in Layers pane one separate Background layer and one Leaf Group which consists of two layers: Leaf 7 Custom Shape and Leaf 7 Custom Shape Copy layer.
STEP 25
This is the final result saved in 'jpg format. Hope you enjoyed this tutorial and found it easy to follow. Thank you very much for reading. God bless! :)
![Adobe Photoshop Elements 2018 [Old Version]](https://m.media-amazon.com/images/I/51AQ4wl7eOL._SL160_.jpg)


