Create Awesome Text with Misty Morning Photo and Layer Mask
From this tutorial you will learn how to turn an ordinary photo of misty morning into an awesome Text Effect using Layer Mask and Blending Options. Many designers usually use Clipping Mask to create such type of texts. It is OK if they don't intend to improve the Text by applying Blending Options. I prefer Layer Mask because applying layer styles in this case is far more effective than if you use Clipping Mask.
The Font I have chosen to create the Text Effect is the famous Stencil Std which could be found in any Photoshop version.
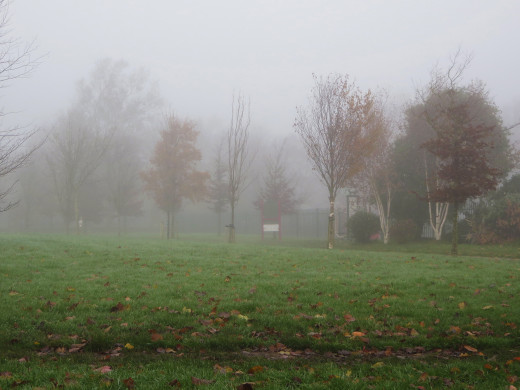
The image of Misty Morning Park which is the most important part of this tut is my own photo and unrestricted stock.
All Photoshop versions are applicable.
Well, this is what you are going to create:

STEP 1
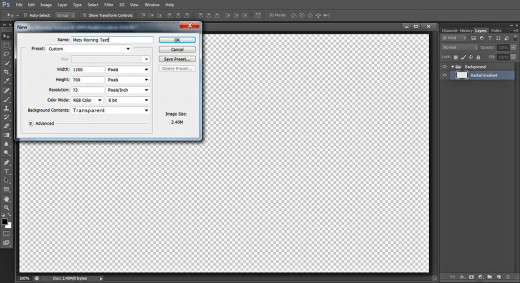
Open Photoshop program and go to the Menu bar. Select File, New to create a new .psd file. Name this new document Misty Morning Text. Set the Width to 1200px and Height to 700px. Insert 72 Pixels/Inch for Resolution, then select RGB for Color Mode and Transparent for Background Contents. If you decide to print the text, insert 300 Pixels/Inch for Resolution and select CMYK for Color Mode. After you press OK button, you'll see transparent Layer 1 in your Layers panel.
Double click on Layer 1 name and write Radial Gradient in the white space to rename the layer. Press Ctrl+G (or go to Layer, Group Layers) to place the Radial Gradient layer in a Group and call this newly created Group Background.
Fill the Background with Radial Gradient then Add Misty Morning Image
In Steps 2-5 you have to prepare the Background. Firstly you have to colorize it with Radial Gradient, then you need to crop and resize my Misty Morning Stock Photo and blend it with the Gradient by changing its Blend Mode.
STEP 2
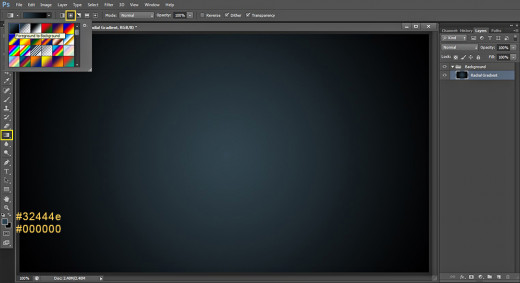
Navigate to the Tools bar, then click once on Set Foreground Color swatch. Insert #32444e Color Code in the Color Picker dialog box. After that click on Set Background Color swatch and change the Background Color to black- #000000.
Press G or just select Gradient Tool from the Tools bar. Go to the Options bar, select Foreground to Background Gradient from the Gradient Picker, select also Radial Gradient type and drag by holding down left mouse key from the middle to any side of the image. You should get a similar result:
STEP 3
Click on the Misty Morning photo below to open it in high res in a new window then right click and select Save Image As to save it in the respective file on your computer where you placed your Misty Morning Text file.
As this image is unrestricted stock, you can use it for your own projects if you like it.
STEP 4
Create a New Layer (go to Layer, New or click on Create a New Layer icon at the bottom of Layers pane) above the Radial Gradient layer in Background group and call it Misty Morning.
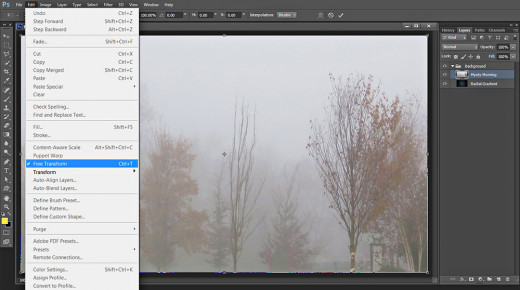
Open in Adobe Photoshop the photo you already downloaded in the previous step and using Crop tool leave only the part with the trees and mist and cut the rest of the image then press Ctrl+A to Load Selection on the image after that press Ctrl+C to Copy it. Go back to Misty Morning Text .psd file, verify that Misty Morning layer is selected and press Ctrl+V to Paste the photo there. As the Misty Morning Park image is bigger than your canvas, go to Edit, Free Transform and drag the nodes vertically and horizontally so that to resize the photo to cover your canvas. Press Enter to apply the Transformation.
STEP 5
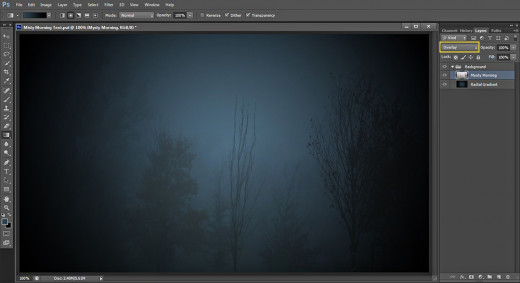
Now change the Blend Mode of Misty morning layer to Overlay.
Our Background is ready. In the next step we'll start our work on the Text Effect.
Type the Text and Mask the Duplicated Misty Morning Image
In Steps 6-10 you have to duplicate and resize the Misty Morning cropped image. After that you need to Load Selection on the Text and apply Layer Mask to make the photo cover only the Text.
STEP 6
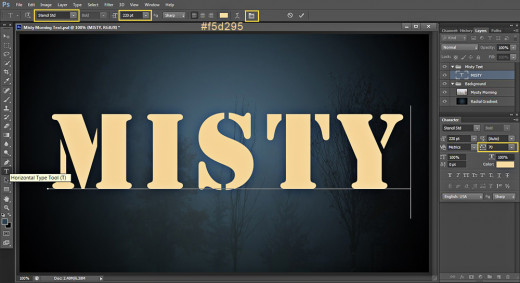
Now take Horizontal Type tool (hot key T), select Stencil Std default Font from the Font Family drop down menu. Insert 220pt for Font Size. Choose #f5d295 for Text Color then type Misty using Capital Letters.
If you like to have a bigger space between the letters, when you are ready with typing the Text, select it then click on Toggle the Character and Paragraph Panels icon in your Options bar and Set the Tracking for the Selected Characters to 70.
Move your Misty Text layer on top of Layers panel, then while the layer is selected press Ctrl+G to put it in a group and name the new group Misty Text.
STEP 7
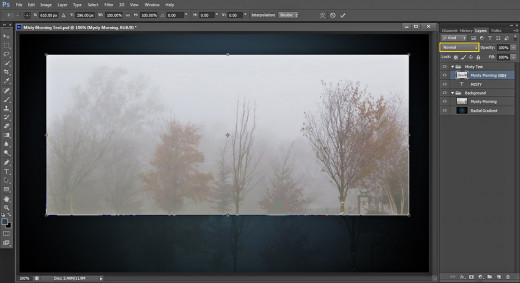
Now select Misty Morning layer from Background group and press Ctrl+J to duplicate it. Move the duplicated Misty Morning copy layer on top of the Misty Text group. Restore Blend Mode of the duplicated layer to Normal then apply Edit, Free Transform to resize the photo so that it covers your Text. Press Enter to apply the Transformation.
STEP 8
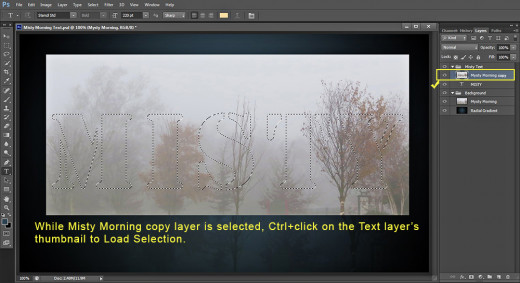
While Misty Morning copy layer is highlighted, press Ctrl and click on Misty Text layer's thumbnail to Load Selection on the Text. You should get the following result:
STEP 9
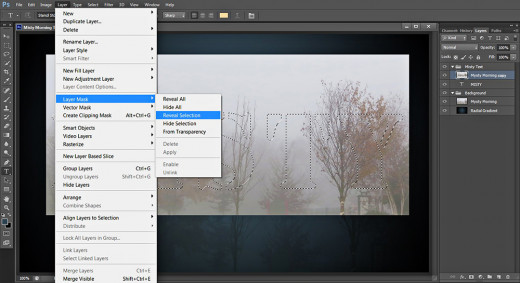
With Misty Morning copy layer selected, go to Layer, Layer Mask, Reveal Selection or just click on Add Layer Mask icon at the bottom of Layers Panel.
STEP 10
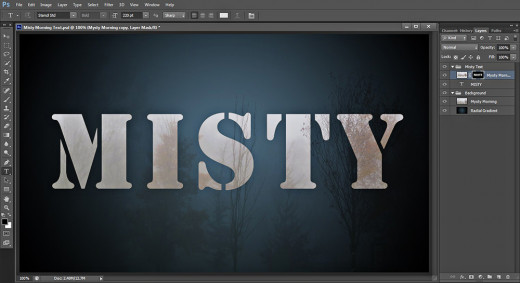
This is the outcome you'll have after adding the Layer Mask:
Apply Blending Options on the Masked Layer
In order to finish this awesome Text Effect, you need to apply Layer Styles on the masked Misty Morning copy layer. You have to add shadow, glow, stroke, subtle 3D Effect and classic Black to White Gradient Overlay.
STEP 11
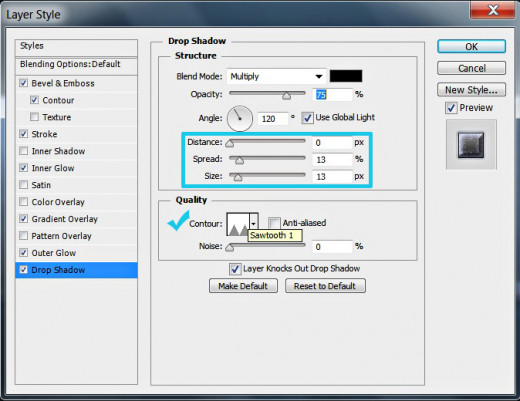
Now double click on Misty Morning copy layer's thumbnail to activate Layer Style dialog box (Layer, Layer Style, Blending Options). Tick Drop Shadow and change these four settings:
Distance: 0px
Spread: 13%
Size: 13px
Contour: Sawtooth 1.
Still don't close Layer Style box because we have to apply another six Blending Options.
STEP 12
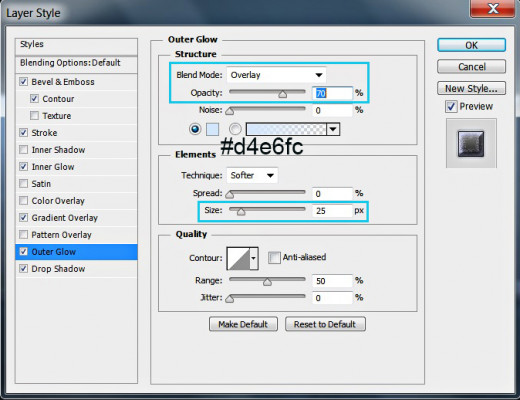
The next Layer Style we have to add to Misty Morning copy layer is Outer Glow. Change the following four settings:
Blend Mode: Overlay
Opacity: 70%
Color of Glow: #d4e6fc
Size: 25px.
STEP 13
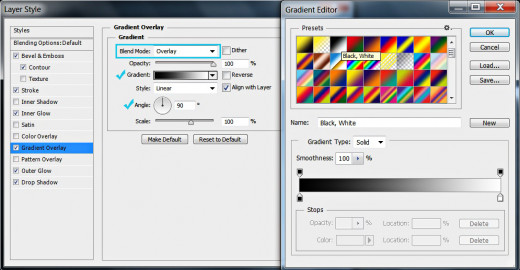
Now tick Gradient Overlay Layer Style in the dialog box, change the Blend Mode to Overlay, select Black,White Gradient from the Gradient Picker and set the Angle to 90 degrees.
STEP 14
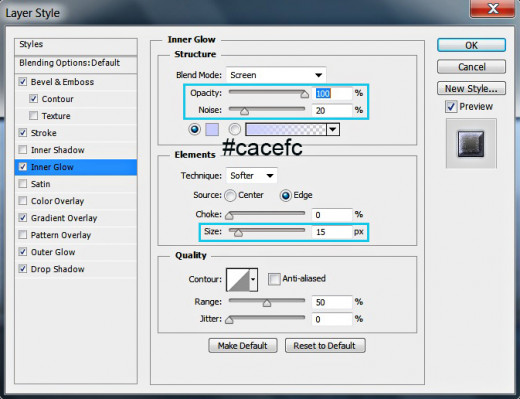
It is time to add Inner Glow. Tick it in Layer Style box and modify these settings:
Opacity: 100%
Noise: 20%
Color of Glow: #cacefc
Size: 15px.
STEP 15
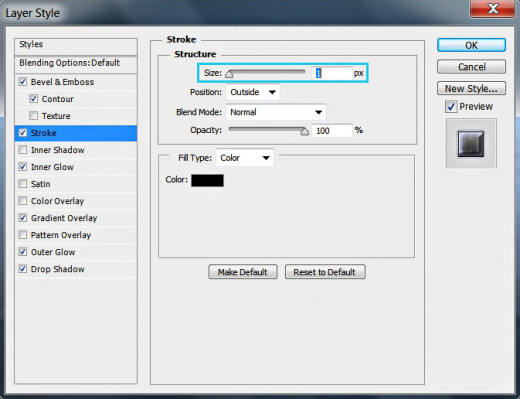
Let us add a slight touch of Stroke now. For the purpose check Stroke Layer Style and leave most of its settings as given by default, decrease only the Size to 1px.
STEP 16
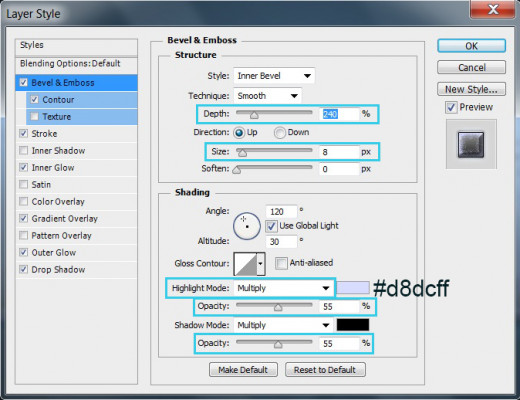
In order to add 3D Effect and to make the Text a bit more prominent apply Bevel and Emboss Layer Style and change the following of its settings:
Depth: 240%
Size: 8px
Highlight Mode: Multiply
Color for Highlight: #d8dcff
Color for Highlight Opacity: 55%
Color of Shadow Opacity: 55%.
STEP 17
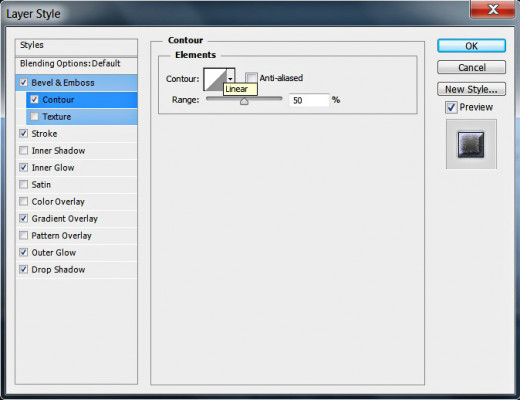
The last Layer Style to be applied is Contour. Only check it in Layer Style box and leave its default settings.
STEP 18
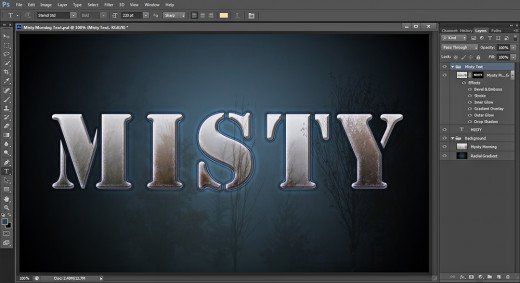
We finished our work on Misty Morning Text layer. You should have these two groups in Layers panel:
- Background group with these two layers in it: Radial Gradient and Misty Morning and
- Misty Text group which includes Misty Text layer and Misty Morning copy layer.
As the main work with the Blending Options was done on Misty Morning copy layer and we needed the Text layer only as a base for the Layer Mask (we used the selection of the Text), you can delete the Text layer. But I think that it is better to keep it in order to recollect your actions if you open the .psd file after a long time.
STEP 19
This is the final result saved in .jpg format. Hope you like the outcome. You may apply Filter, Sharpen, Unsharp Mask with settings you prefer to improve the quality of the .jpg image.
Thank you very much for reading this tutorial. God bless! :)
