Create Awesome Text with Shape Burst Stroke in Photoshop

While following all the short and easy steps described in this tutorial, you are going to create awesome colorful Text Effect by means of layer styles and especially Gradient Overlay and Shape Burst type of Stroke. We are going to use Rasterize Layer Style Option in order to make our font thicker and apply multiple strokes and other Blending Options. I have used default MV Boli Font so you don't need to surf the whole web to find appropriate font for our task.
You can create this Text Effect with any version of Adobe Photoshop which offers Shape Burst type of Stroke Layer Style (Step 15).
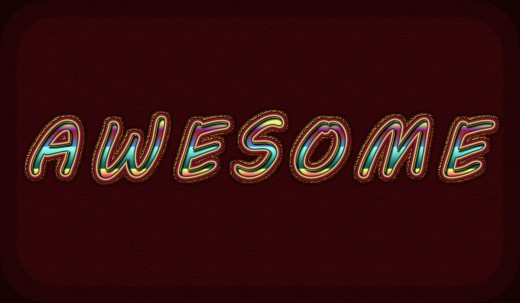
This is what you should get as a final result:

STEP 1
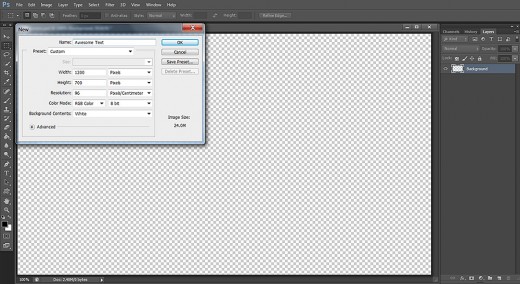
At first create a new .psd file- open your Adobe Photoshop and select File, New. Call your new file Awesome Text for example, then set its Width to 1200px and Height to 700px. Set the Resolution to 96 Pixels/Inch, select RGB for Color Mode and Transparent for Background Contents. If you like to print the ready text, set its Resolution to 300 Pixels/Inch and select CMYK for Color Mode. After you press OK button, you'll get transparent Layer 1 in your Layers panel. It is better to choose Transparent for Background contents, as it automatically creates an editable Layer 1 in your Layers panel.
Double click on Layer 1 name and write Background in the white space to rename the layer.
Fill the Background with Dark Color, Add Texture and Vignette Effect
In Step 2-4 you firstly have to fill the Background layer with dark red color. Your next task is to apply default Buff Textured Pattern to create rough surface.
You will finish your work in Background layer with adding striped Vignette Effect using Inner Shadow Layer Style with Steps Contour.
STEP 2
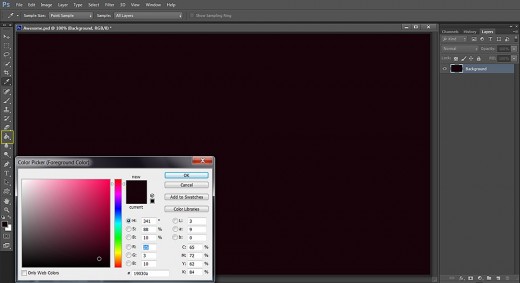
Navigate to the Tools bar and click once on Set Foreground Color swatch. When the Color Picker box appears, change the Foreground color to #19030a. Grab Paint Bucket Tool and drag with it on your canvas to colorize your Background. You can do the same by using Edit, Fill, Foreground Color option.
STEP 3
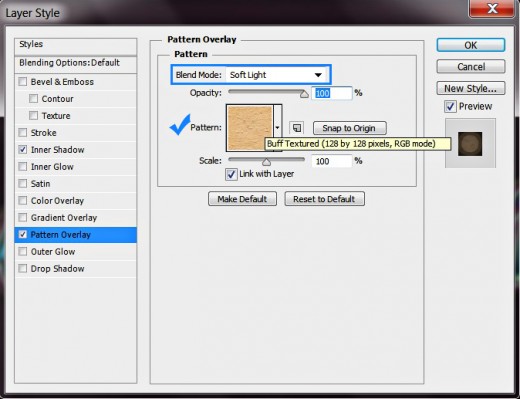
Now double click on your Background layer or go to Layer, Layer Style, Blending Options, then check Pattern Overlay. Choose the following pattern with these settings:
Blend Mode: Soft Light
Opacity: 100%
Pattern: Buff Textured (128 by 128 pixels, RGB mode)
Scale: 100%
Link with Layer: checked.
Don't close Layer Style dialog box. We have one more Layer Style to add to the Background layer.
STEP 4
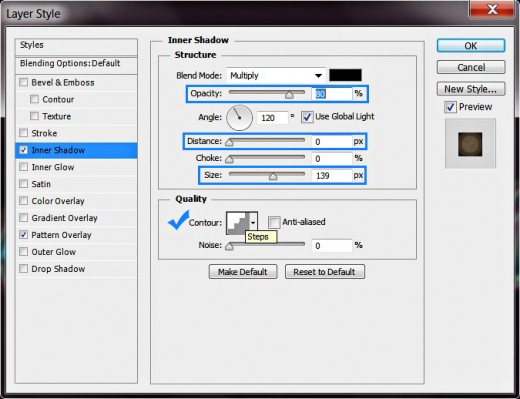
Now check Inner Shadow Layer Style and change its settings as given below:
Blend Mode: Multiply
Color of Shadow: #000000 (black)
Opacity: 80%
Angle: 120 degrees
Use Global Light: ticked
Distance: 0px
Choke: 0%
Size: 139px
Contour: Steps
Anti-aliased: unchecked
Noise: 0%.
We are ready with our work on the Background. Press OK button to close Layer Style dialog box.
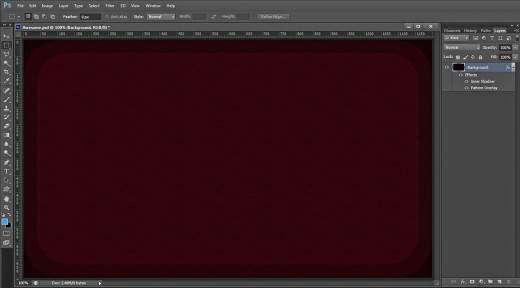
This is the Textured Background with dark borders you should get after applying both Pattern Overlay and Inner Shadow:
Type the Text, Add Noisy Glow and Thin Stroke
In the coming three steps you Firstly should type your Text with MV Boli Font which is exclusive for Photoshop. After that you have to add beige Outer Glow with increased Noise option to create translucent grainy halo around the Text. Your last task in this part of the tut will be to apply yellow Stroke to make the Text a bit thicker.
STEP 5
With this step we'll start to prepare the Text base. Now press T key or grab Horizontal Type Tool from the Tools bar.
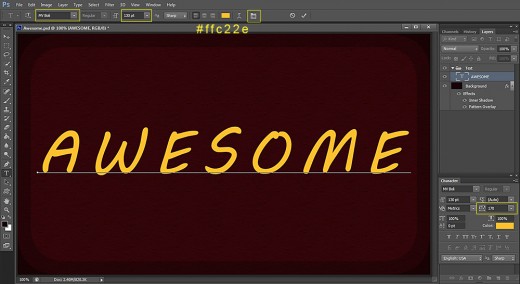
Click on the Font Family drop down menu and select MV Boli default Font and Set its Font Size to 130pt. Choose #ffc22e for Text Color then type Awesome using Capital Letters only.
When your text is ready, select it then click on Toggle the Character and Paragraph Panels icon in your Options bar and Set the Tracking for the Selected Characters to 170. Later you'll see why I have chosen so big tracking. It is to avoid overlapping of the letters after applying the thick strokes.
While Awesome layer is selected, press Ctrl+G to put it in a Group. Rename this new Group 1 to Text.
STEP 6
While your first Awesome layer is highlighted, right click on it, select Blending Options from the fly-out menu (or go to Layer, Layer Style, Blending Options) and firstly check Outer Glow. Apply the following settings:
Blend Mode: Normal
Opacity: 100%
Noise: 15%
Color of Glow: #d1be67
Technique: Softer
Spread: 0%
Size: 18px
Contour: Linear
Anti-aliased: unchecked
Range: 50%.
Jitter: 0%.
Still don't press OK button to close Layer Style dialog box. We have to add light yellow colored stroke in the next step.

STEP 7
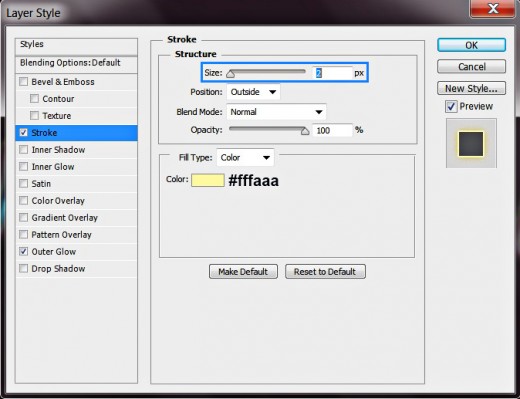
Tick Stroke Layer Style and change its settings like this:
Size: 2px
Position: Outside
Blend Mode: Normal
Opacity: 100%
Fill Type: Color
Set Color of Stroke: #fffaaa.
Now you can close Layer Style box. Don't forget to press OK button before. :)
This is the outcome you should get on your canvas after applying the Glow and Stroke to the Text layer:
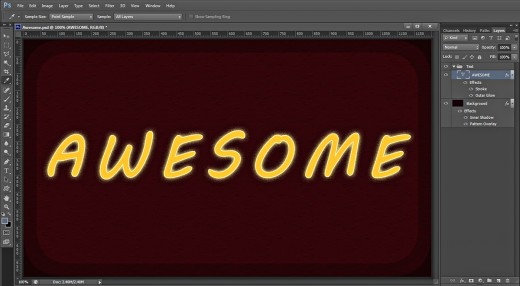
Rasterize the Text, Reduce its Fill then Add Shadow, Gradient and 3D Effect
In Steps 8-11 your first task is to duplicate the Text layer, then reduce the Fill Opacity of the copied one and Rasterize its Layer Styles to apply them and to be able to add new ones.
After the vector Text layer have been turned into raster, you have to add Shadow, Red to Green Gradient and 3D Effect (Bevel and Emboss and Contour).
STEP 8
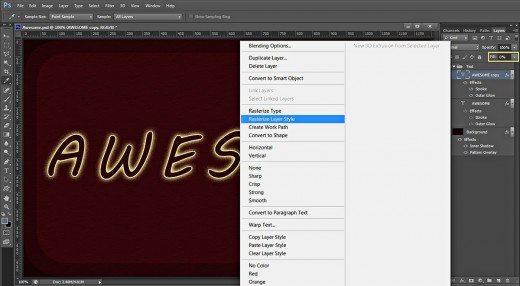
While Awesome layer is highlighted, press Ctrl+J (Layer, Duplicate Layer). Reduce Fill Opacity of Awesome copy layer to 0% then right click on it and select Rasterize Layer Style. Switch off the original Awesome Text layer because we’ll not be working in it for now.
STEP 9
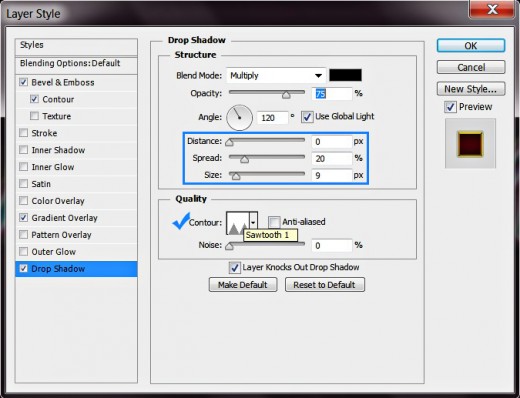
Double click on the rasterized Awesome copy layer to call Layer Style dialog box. Tick Drop Shadow and insert the following settings:
Blend Mode: Multiply
Color of Shadow: #000000 (black)
Opacity: 75%
Angle: 120 degrees
Use Global Light: ticked
Distance: 0px
Spread: 20%
Size: 9px
Contour: Sawtooth 1
Anti-aliased: unchecked
Noise: 0%.
Layer Knocks Out Drop Shadow: checked.
Don't close Layer Style box yet as we going to add more Blending options.
STEP 10
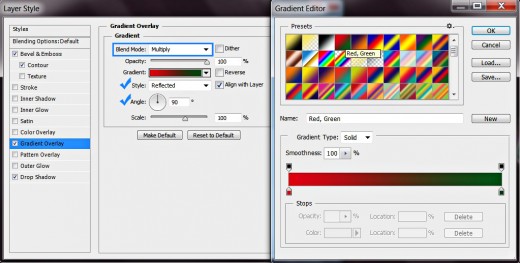
The next Layer Style to be added to Awesome copy layer is Gradient Overlay. Change its settings like this:
Blend Mode: Multiply
Dither: unchecked
Opacity: 100%
Click on the Gradient Picker drop down menu
and select Red, Green Gradient.
Reverse: unchecked
Style: Reflected
Align with Layer: checked
Angle: 90 degrees
Scale: 100%.
STEP 11
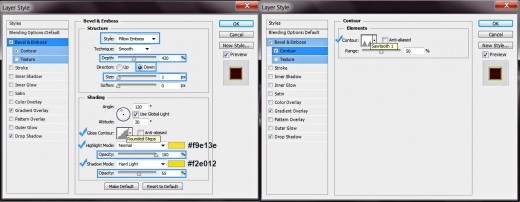
Now we are going to add slight 3D effect to the Text borders. Firstly check Bevel and Emboss Layer Style and insert the following settings:
Style: Pillow Emboss
Technique: Smooth
Depth: 420%
Direction: Down
Size: 1px
Soften: 0px
Angle: 120 degrees
Use Global Light: checked
Altitude: 30 degrees
Gloss Contour: Rounded Steps
Anti-aliased: not checked
Highlight Mode: Normal
Color for Highlight: #f9e13e
Opacity: 100%
Shadow Mode: Hard Light
Color of Shadow: #f2e012
Opacity: 55%.
Check also Contour Layer Style and change the settings like this:
Contour: Sawtooth 1
Anti-aliased: not checked
Range: 50%.
Press OK button to apply the Blending Options and to close Layer Style box.
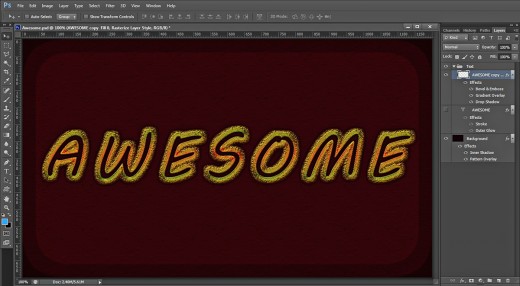
This is how your rough stroked, colorful Text will look so far:
Duplicate the Original Text Layer, Add Striped Gradient and Stroke, Shadow and 3D Effect
You will finish this tutorial with preparing another duplicate of the original Text which you don’t need to Rasterize. You have to colorize this copied Text layer on top of Text group and to make it embossed with the help of Gradient Overlay, Shadow, Bevel and Emboss and five colored thick Stroke.
STEP 12
Now duplicate the original Awesome layer (the first created Text layer in Step 5) and move the duplicate on top of Text Group. Change its name to Awesome Text, then right click on it and select Clear Layer Style in order to get rid of the previously applied Outer Glow and Stroke.
STEP 13
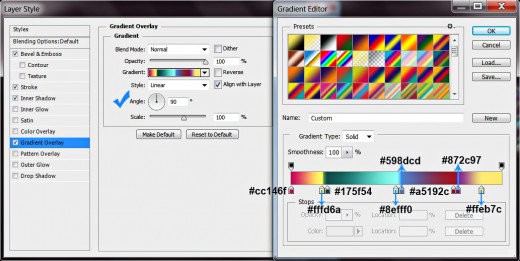
Right click on Awesome Text layer and select Blending Options. Firstly we are going to fill our Text with beautiful colors so check Gradient Overlay and change its settings as follows:
Blend Mode: Normal
Dither: unchecked
Opacity: 100%
Click on the Gradient rectangle to change the color stops:
First Color Stop (Location 0%): #cc146f
Second Color Stop (Location 15%): #fffd6a
Third Color Stop (Location 17%): #175f54
Fourth Color Stop (Location 50%): #8efff0
Fifth Color Stop (Location 52%): #598dcd
Sixth Color Stop (Location 77%): #a5192c
Seventh Color Stop (Location 79%): #872c97
Eighth Color Stop (Location 90%): #ffeb7c
Reverse: unchecked
Style: Linear
Align with Layer: checked
Angle: 90 degrees
Scale: 100%.
Keep Layer Style dialog box active as there is more work to to be done in it.
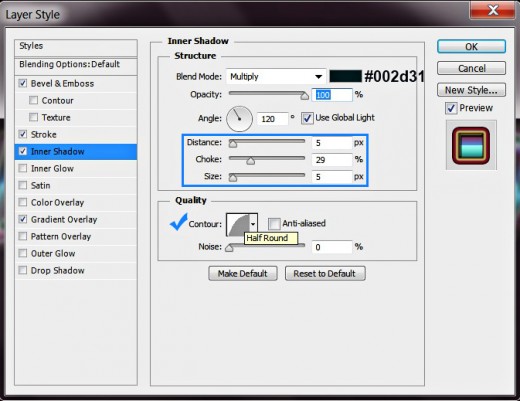
STEP 14
The second Layer Style to be added to Awesome Text layer is Inner Shadow. Apply the following settings:
Blend Mode: Multiply
Color of Shadow: #002d31
Opacity: 100%
Angle: 120 degrees
Use Global Light: ticked
Distance: 5px
Choke: 29%
Size: 5px
Contour: Half Round
Anti-aliased: unchecked
Noise: 0%.
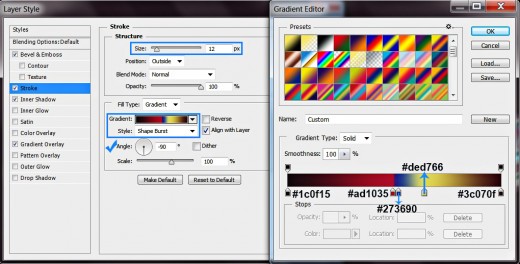
STEP 15
Now check Stroke Layer style to give our Awesome Text layer cool multiple stroke. Insert these settings:
Size: 12px
Position: Outside
Blend Mode: Normal
Opacity: 100%
Fill Type: Gradient
Click to Edit the Gradient:
First Color Stop (Location 0%): #1c0f15
Second Color Stop (Location 50%): #ad1035
Third Color Stop (Location 52%): #273690
Fourth Color Stop (Location 64%): #ded766
Fifth Color Stop (Location 100%): #3c070f
Reverse: unchecked
Style: Shape Burst
Align with Layer: ticked
Angle: -90 degrees
Dither: not checked
Scale: 100%.
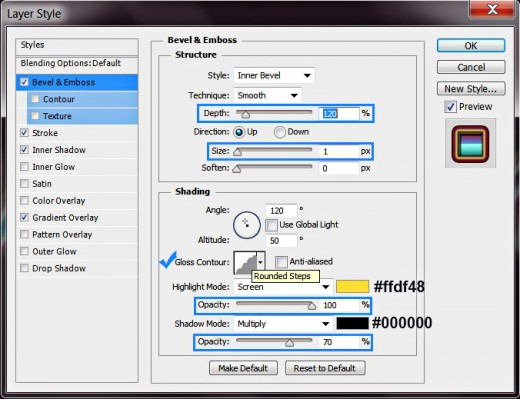
STEP 16
We are almost there. The last Layer Style to be applied on Awesome Text layer is Bevel and Emboss. Change its settings like this:
Style: Inner Bevel
Technique: Smooth
Depth: 120%
Direction: Up
Size: 1px
Soften: 0px
Angle: 120 degrees
Use Global Light: not checked
Altitude: 50 degrees
Gloss Contour: Rounded Steps
Anti-aliased: unchecked
Highlight Mode: Screen
Color of Highlight: #ffdf48
Opacity: 75%
Shadow Mode: Multiply
Color of Shadow: #000000
Opacity: 70%.
Press OK button to close Layer Style box.
STEP 17
After you finish your work on the Awesome Text Effect, in Layers panel you should have one separate Background layer and one Text Group which includes three layers: Awesome (switched off, we need it only for reference), Awesome copy and Awesome Text layer.
As you can see, I haven’t deleted the original, unrasterized Awesome Text layer and recommend you to keep it too in case you decide to modify both layer styles applied on it to achieve different effects.
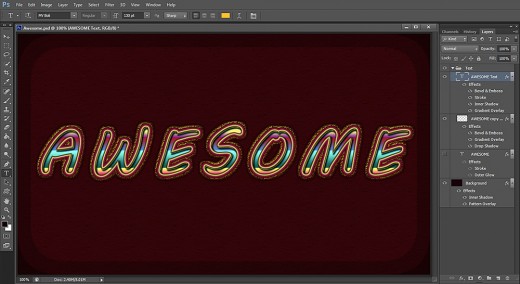
STEP 18
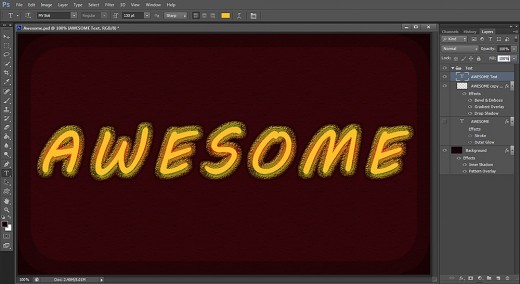
This is the outcome you should get if you have followed all my steps in detail. Hope you liked this tutorial and enjoyed it. Thanks a lot for reading and if you have any questions or need some step being better clarified, just leave a comment below.