Create Glittering Text with Extra Heavy Canvas Pattern in Photoshop

While following all twenty four steps of this tut you are going to create awesome Glittering Text Effect with lots of gradients, Extra Heavy Canvas Pattern which is default for the program and other layer styles. To prepare the cool yellowish Background with interested relief I have used my photo of Stone Texture which is unrestricted stock. The Text Effect is created in Adobe Photoshop CS6 using default Myriad Arabic Font but all other versions of the program are applicable. If you can't find Extra Heavy Canvas Pattern in your Pattern Picker, you can simulate the same effect shown in Step 14, using another Pattern Overlay with adjusted settings.
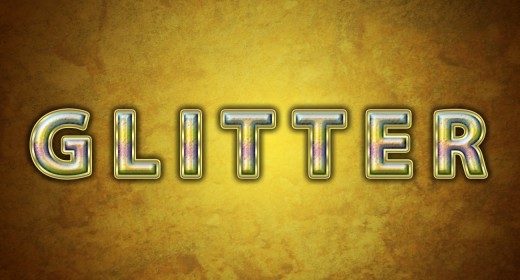
This is what you are going to create:
STEP 1
Open your Adobe Photoshop program and select File, New to create a new .psd file. Name the document Glittering Text. Set its Width to 1300px and Height to 700px. Insert 72 or 96 Pixels/Inch for Resolution, then select RGB Color for Color Mode and Transparent for Background Contents. Those who need to print the outcome should set the Resolution to 300 Pixels/Inch and select CMYK for Color Mode.
Double click on Layer 1 name and write Gradient in the white space to rename the layer. Press Ctrl+G (or go to Layer, Group Layers) to place the Background layer in a Group and call this Group 1 Background.

Create the Background with Radial Gradient and Stone Texture
In Steps 2-5 you have to create awesome Background which resembles brass surface with patina. You need only to fill the first layer with yellow shaded Radial Gradient then add Stone Texture and change its Size and Blend Mode.
STEP 2
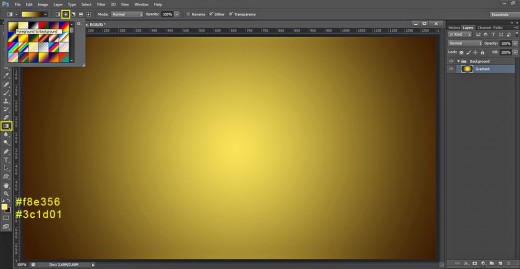
Click on Set Foreground Color swatch in the Tools bar. Insert #f8e356 for Foreground color in the Color Picker, after that click on Set Background Color swatch and change the Background Color to #3c1d01.
Select Gradient Tool from the Tools bar or press G. In the Options bar, select Foreground to Background Gradient from the Gradient Picker, choose also Radial Gradient type and drag from the middle to any chosen corner of the canvas. You should create this golden shaded Background:
STEP 3
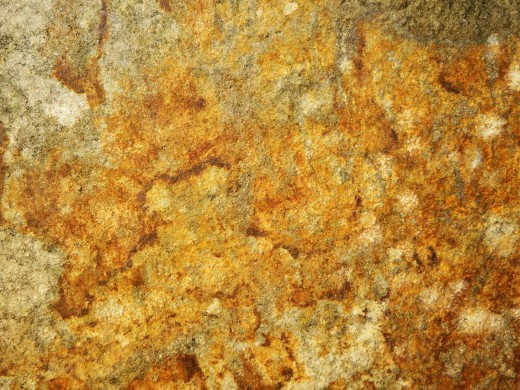
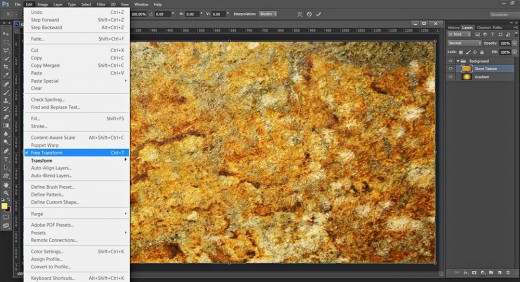
Click on the awesome Stone Texture below to open it in high resolution in a new window then right click and select Save Image As to put it in your folder (I hope you already have created a folder where to keep your Text Effect .psd file, this Texture and your final .jpg image).
STEP 4
Create a New Layer placed above the Gradient layer in Background group and call it Stone Texture.
Open in Adobe Photoshop the Stone Texture you downloaded in Step 3, press Ctrl+A to Load Selection then press Ctrl+C to Copy it. Go back to your Glittering Text .psd document, check if the Stone Texture layer is selected and press Ctrl+V to Paste the texture. To adjust the size of the Texture to the size of your canvas, go to Edit, Free Transform and drag some of the nodes in inner direction. Press Enter to apply the Transformation.
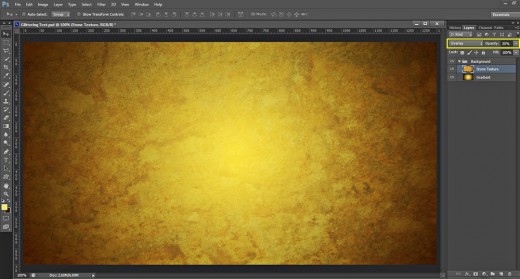
STEP 5
Change the Blend Mode of Stone Texture layer to Overlay and reduce Opacity to 35%. You'll get this Background:
Create the Text with Myriad Arabic Font and Apply Layer Styles
In Steps 6-12 your work is to type the Text, then create two duplicates of its layer and apply Blending Options on the original Glitter Text layer to add shadow, color, golden stroke and volume.
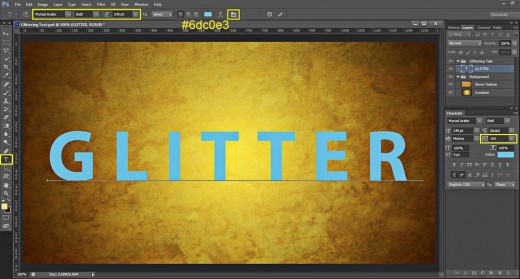
STEP 6
Now we have to type our Text. Take Horizontal Type tool (or press T), select the default Myriad Arabic Font from the Font Family drop down menu. Choose Bold from Font Style drop down menu and insert 240pt for Font Size. Choose #6dc0e3 for Text Color then type Glitter in Capital Letters.
Highlight the whole Text then click on Toggle the Character and Paragraph panels icon in the Options bar. Set the Tracking value to 150 when Character pane pops up on your screen. We need bigger Tracking to avoid letters overlapping when we add Drop Shadow and Stroke layer styles.
With Glitter Text layer selected, press Ctrl+G and name the new Group Text. Place it on top of Layers pane.
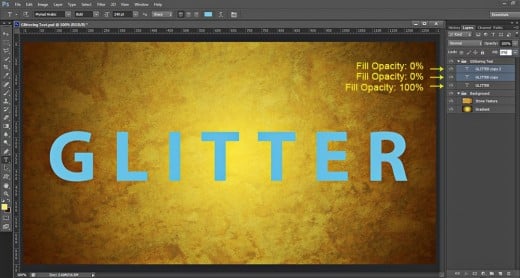
STEP 7
While Glitter Text layer is selected, press twice Ctrl+J to make two duplicates of it (Layer, Duplicate Layer). Reduce Fill Opacity of Glitter copy and Glitter copy 2 layer to 0%.
STEP 8
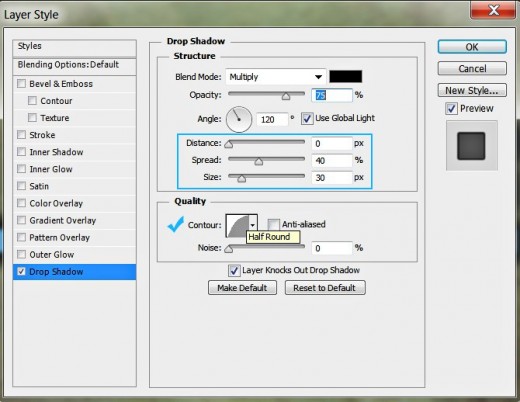
Go back to your original Glitter Text layer, right click on it and select Blending Options. Firstly check Drop Shadow in Layer Style box and change the following four settings: lower Distance to 0px, then increase Spread to 40% and Size to 30px. Choose Half Round Contour from the Contour Picker.
Keep Layer Style dialog box opened as we have to add another four Blending Options.
STEP 9
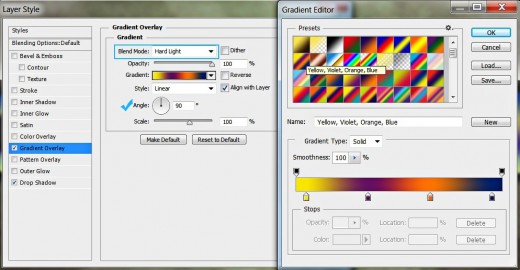
The second Layer Style we need to apply on Glitter Text layer is Gradient Overlay. Change only the Blend Mode to Hard Light and select Yellow, Violet, Orange, Blue Gradient from the Gradient Picker.
STEP 10
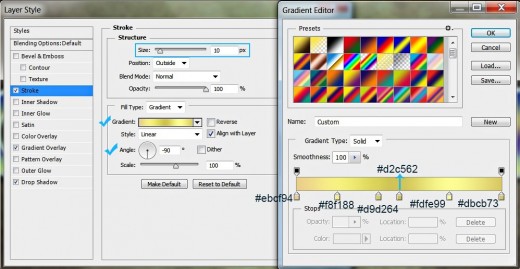
We have to add golden shaded border to our Text now so check Stroke Layer Style and change the following settings:
Size: 10px
Fill Type: Gradient
Angle: - 90 degrees
Insert these color codes to create the Gradient:
First Color Stop (Location 0%): #ebcf94
Second Color Stop (Location 20%): #f8f188
Third Color Stop (Location 40%): #d9d264
Fourth Color Stop (Location 50%): #d2c562
Fifth Color Stop (Location 75%): #fdfe99
Sixth Color Stop (Location 100%): #dbcb73.
STEP 11
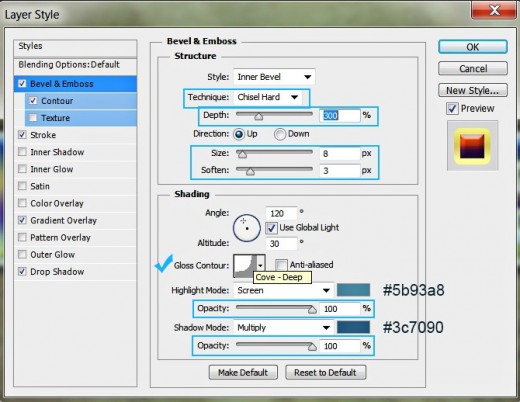
In order to add 3D look to our Glitter Text, tick Bevel and Emboss Layer Style. Change the Technique to Chisel Hard, increase Depth to 300%, Size to 8px and Soften value to 3px, then choose Cove-Deep Contour from the Contour Picker. Set Color for Highlight to #5b93a8 and heighten the value of its Opacity to 100. Set Color of Shadow to #3c7090 and also increase its Opacity to 100%.
STEP 12
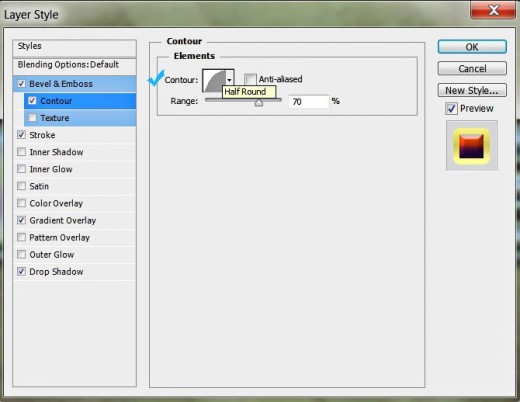
Tick Contour Layer Style which is below Bevel and Emboss in Layer Style box, choose Half Round Contour in the Contour Picker and decrease Range to 70%.
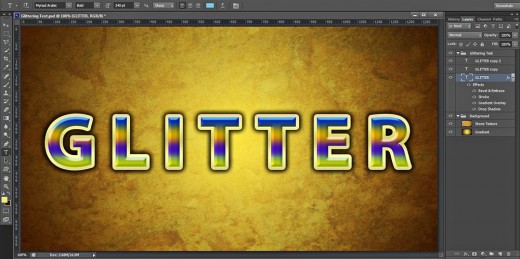
This is how our Glittering Text Effect will look so far:
Apply Blending Options on Both Duplicated Text Layers
Your task in the rest of the tut is to add Layer Styles on the two duplicates of Glitter Text layer. In the process of work you will add more golden glow and, the most important, Extra Heavy Canvas Pattern which will give the Text Effect cool texture and relief effect.
STEP 13
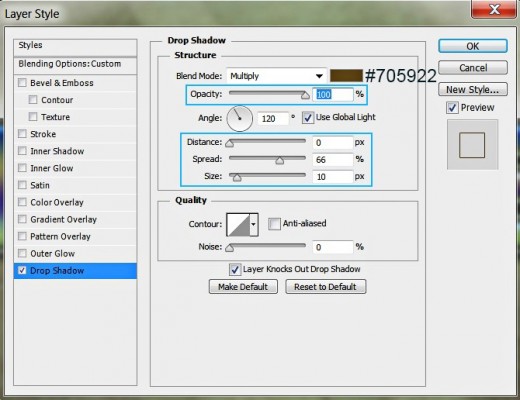
Now select the first duplicate- Glitter copy layer, right click on it and choose Blending Options. Firstly apply Drop Shadow. Set Color of Shadow to #705922 and increase Opacity to 100%. Lower Distance Value to 0px, then heighten the values of Spread to 66% and Size to 10px.
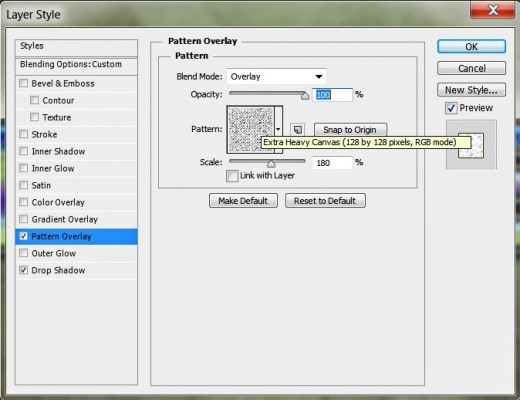
STEP 14
The second Layer Style we have to apply on the first duplicated layer is Pattern Overlay. Modify its settings like this:
Blend Mode: Overlay
Opacity: 100%
Pattern: Extra Heavy Canvas (128 by 128 pixels, RGB mode)
Scale: 180%
Link with Layer: unchecked.
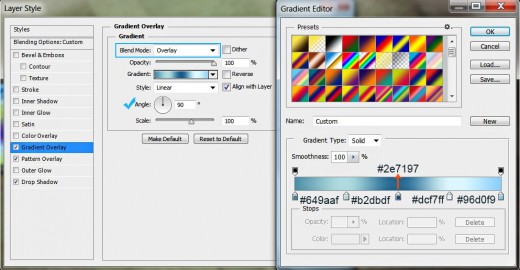
STEP 15
Tick Gradient Overlay Layer Style, set the Blend Mode to Overlay and Angle to 90 degrees then insert the following Color Stops:
First Color Stop (Location 0%): #649aaf
Second Color Stop (Location 25%): #b2dbdf
Third Color Stop (Location 50%): #2e7197
Fourth Color Stop (Location 75%): #dcf7ff
Fifth Color Stop (Location 100%): #96d0f9.
STEP 16
We are going to add pale blue glow to our Text so tick Inner Glow Layer Style and change these four settings: slightly lower Opacity to 70%, increase Noise to 77%, choose #cef4fe for Color of Glow, select Center for Source and increase Size to 25px.
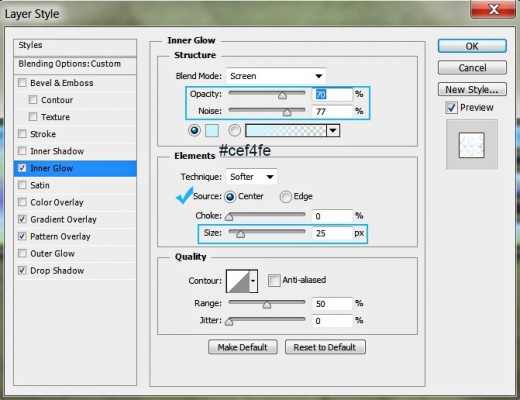
STEP 17
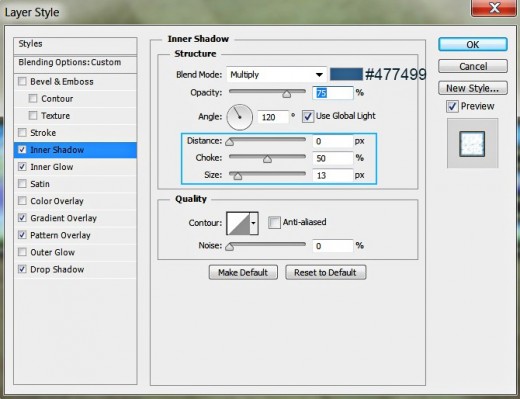
It is time to add Inner Shadow Layer Style. Select #477499 for Color of Shadow, set Distance to 0px, then increase Choke to 50% and Size to 13px.
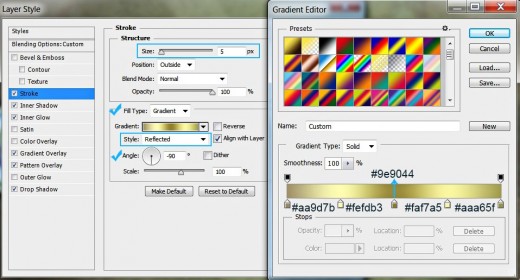
STEP 18
In this step we are going to add another golden shaded Stroke (we already added such in Step 10 to the original Glitter Text layer). Tick Stroke Layer Style, set the Size to 5px, choose Gradient for Fill Type, select Reflected Style Gradient and set the Angle to -90 degrees. Change the color stops as follows:
First Color Stop (Location 0%): #aa9d7b
Second Color Stop (Location 25%): #fefdb3
Third Color Stop (Location 50%): #9e9044
Fourth Color Stop (Location 75%): #faf7a5
Fifth Color Stop (Location 100%): #aaa65f.
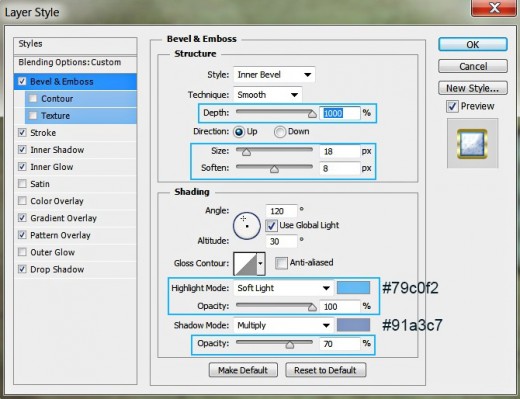
STEP 19
Now check Bevel and Emboss to apply subtle 3D Effect. Change the following settings:
Depth: 1000%
Size: 18px
Soften: 8px
Highlight Mode: Soft Light
Color for Highlight: #79c0f2
Color for Highlight Opacity: 100%
Color of Shadow: #91a3c7
Color of Shadow Opacity: 70%.
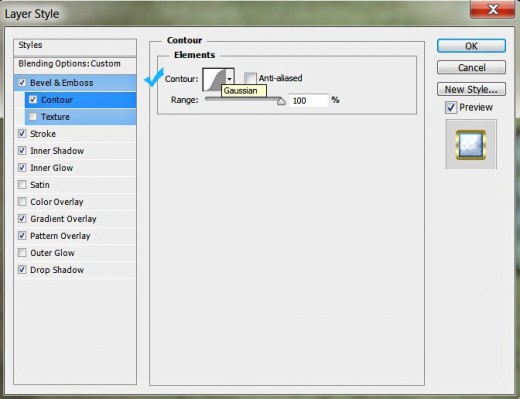
STEP 20
The last Layer Style we have to apply on Glitter copy layer is Contour. Choose Gaussian from the Contour Picker and increase the Range to 100%.
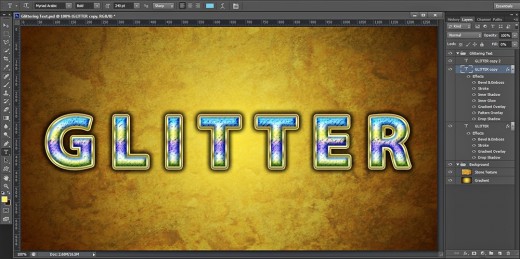
This is how our Glittering Text Effect will look after adding Blending Options to the first duplicated Text layer:
STEP 21
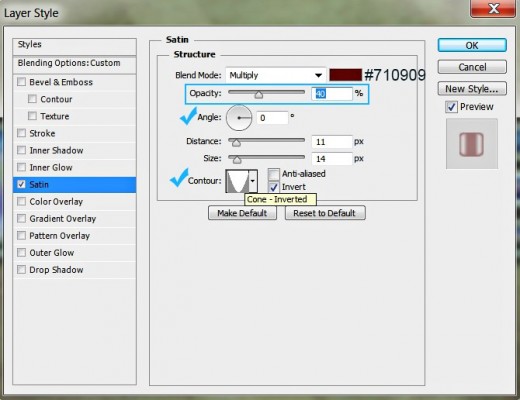
Now select the second duplicate- Glitter copy 2 layer. The first Layer Style we have to apply on it is Satin. Set Color of Effect to #710909 and Opacity to 40%. Insert 0 degrees for Angle and select Cone-Inverted from the Contour Picker.
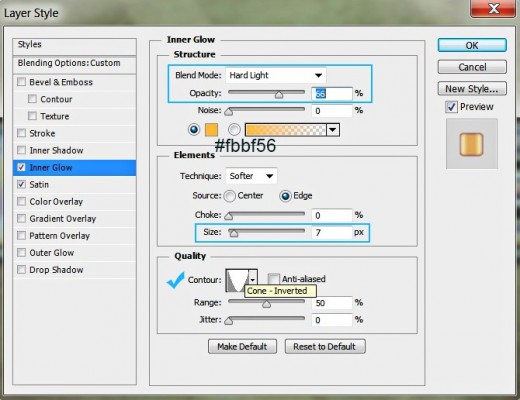
STEP 22
In this step we are going to add orange Inner Glow to Glitter copy 2 layer so check Inner Glow Layer Style and change these five settings:
Blend Mode: Hard Light
Opacity: 66%
Color of Glow: #fbbf56
Size: 7px
Contour: Cone-Inverted.
STEP 23
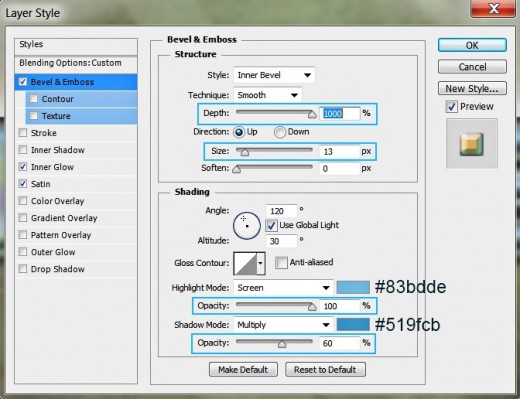
The last Layer Style we are to add to the Glitter copy 2 layer is Bevel and Emboss. Modify the following six settings:
Depth: 1000%
Size: 13px
Color for Highlight: #83bdde
Color for Highlight Opacity: 100%
Color of Shadow: #519fcb
Color of Shadow Opacity: 60%.
You can see on the screenshot below the final outcome of our work.
You should have these groups and layers in your Layers panel:
-
Background group which includes Gradient and Stone Texture layer and
-
Glittering Text group with three layers in it: Glitter, Glitter copy and Glitter copy 2.
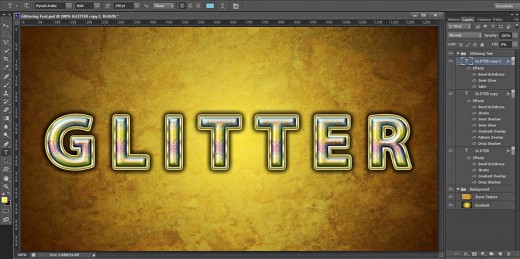
STEP 24
This is my Glittering Text Effect saved in .jpg format.
Hope you find this tutorial awesome and not difficult to follow. Thanks a lot for reading and if you have some questions, just leave a comment below. :)