- HubPages»
- Arts and Design»
- Drawing»
- Drawing Tutorials
Create a Fan with a Cat Drawing

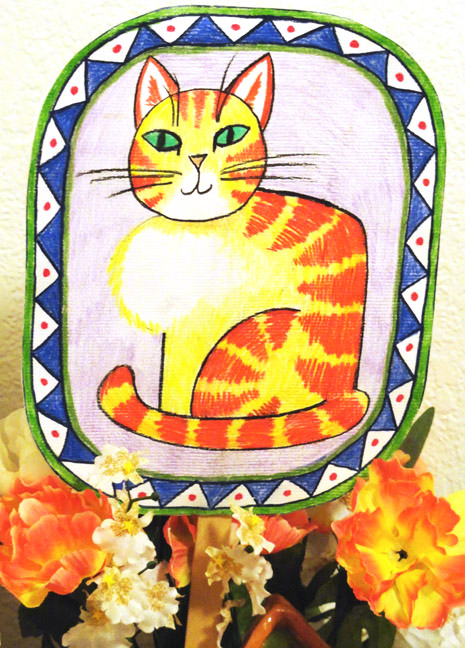
My Cat Fan Design
Project
In this project, you need to color two pieces of paper to make a sandwich with the glue and stick. You will draw a classic design on one paper and anything you want on the other. Then you will cut out the modified ovals and glue them together, sandwich-style, to make your sturdy fan. I suggest using colored pencils and white or grey construction paper, or tag board (which is just a heavy card-stock type paper). You could use watercolors but if you do, you will have to keep your fan away from sweaty hands or spilling drinks that would ruin your picture. Ready for the fun?
Classic Air Conditioning!
How many times have you been out at a ball game, cheering for your team but baking in the sun and wishing for a cool breeze? A fan would have been just the thing. A hundred years ago before air conditioning, what people relied on for hot summer days were fans; the classic, old-fashioned air conditioning method. I remember when companies would print fans with their logo and address and give them away as advertising. The classic fans were decorated with all sorts of things, from flowers to animals; from company logos to food items (like hotdogs to make you hungry). I’m dating myself by saying that! They are still worth having and using in the many outdoor activities that come up during the summer months. Watching a ball game from the bleachers is more pleasant with a fan. Standing in line for an event is more comfortable with a fan. I like making them and giving them to the elderly who are suffering more from the heat than I am.
Materials you will need:
- 2 pieces white Cover paper, Tag board, construction paper, or Watercolor paper (8.5x11)
- Colored pencils
- White glue
- 2 Tongue depressors, Popcycle sticks, or even bamboo chop sticks
- Stapler, optional


Cats
Do you like to draw cats?
Step 1. Drawing The Cat
When most artists draw something, they break it down into basic shapes: circle, squares, triangles, lines. That’s all this is. Cats are mostly circles and triangles with a few curved lines.
Use a large plate or compass to draw the rounded corners onto both pieces of paper. With a #2 pencil, draw the cat onto the ovals. Don’t use the colored pencils for the preliminary drawing, because colored pencil lines are almost impossible to erase.
Start by drawing a circle in the upper half of the oval as in the diagram. This is your cat’s head. There should be a small triangle for the nose. Draw almond eyes above the nose and a forward and backward “J” for the mouth.
Add two triangles at the top of your circle for the ears. Add a semi-circle from one side of the circle down. This is the cat’s chest.
Draw a rounded, curved line for the back of the cat. Draw two curved lines below for the tail. Draw a straight line from the chest down to the tail and a half circle for the back leg.
Design a border if desired now, as shown in the diagram.
Step 2. Coloring The Cat
Color the Tabby Cat’s stripes in orange down the back and tail as well as the face and ears. Between the stripes should be yellow but leave the chest white. The eyes should be all colored entirely one color except for a slit for the pupil. This is because you cannot see the white of a cat’s eye like a human’s eye unless the cat is terrified or angry. Next color the background and the border.
Don’t forget the whiskers. They add a lot to the look of a cat.


Step 3. Color With Colored Pencils
The second oval should also be decorated with anything you like. You can create another cat or draw flowers or whatever suits you. I colored a Siamese Cat drawing the cat the same as for Side 1. I decided to make him face the other way.
Gluing
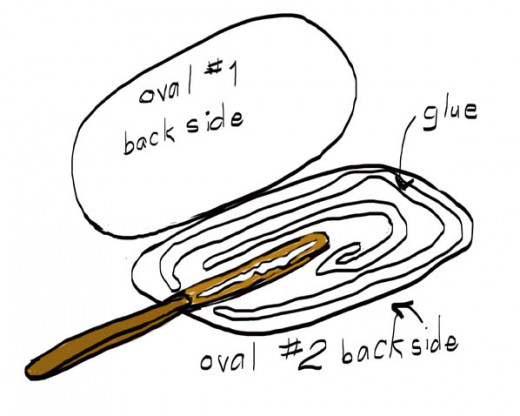
Step 4. Gluing The Fan Together
Finally, you are ready to glue the fan. Get two tongue depressors or popsicle sticks and staple them together end-to-end so that they make an extra long handle. Or use two bamboo chopsticks together for the handle. I have also used old tired long-handled paintbrushes for handles. Free paint stirrers from the hardware store make good handles also and need no stapling.
Take the two ovals you have cut out and place them face down onto a table. Cover the two ovals with lots of glue. Also, put glue on both sides of the stick just to the staple. Put the stick onto one of the ovals so that the staples are just inside the paper and sandwich the other paper over it. Press for a few minutes so the glue is evenly spread inside.
Wait for it to dry, about 2 or 3 hours. Try it out. It works great!
Instant Air Conditioning!

Rent Them On Hot Days
You are now ready for a heat wave to test your fan. All your friends will want one…. so be prepared. You could create several ahead of time and rent them for 50 cents at a ball game. Better than a lemonade stand!
More Fans
Click thumbnail to view full-size


Great Gifts
Kids love this project. I find that the fans make great gifts and are perfect for those hot family reunions that invariably meet in parks during the summer. I have even used a handmade fan as a get-well card for friends in the hospital. They are very well received.
Watercolor Fans
Watercolor paper makes excellent fans. Created in the same way, two sandwiched together or one large one folded in half, plenty of glue and an old paintbrush. Voila!