Design Stylish Red Orb Style Button in Adobe Photoshop

In this tutorial I will show you how to create cool red button in twenty nine short and easy to perform steps. In the process of work all you'll be able to achieve the final result by means of Ellipse Tool of Fixed Size and Pixels Mode, default Custom Shape and lots of layer styles.
You can design this button in any Photoshop version.
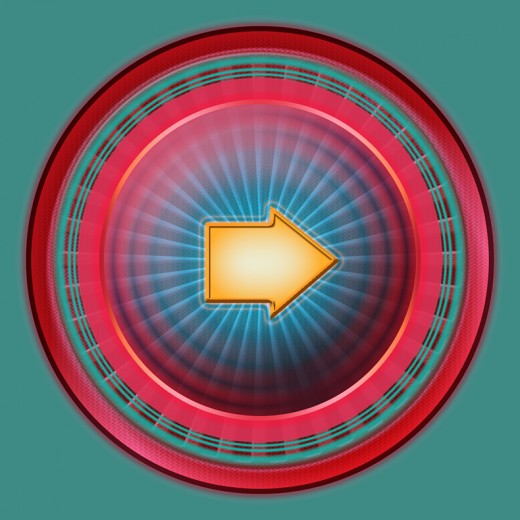
This is the outcome you should get:

Prepare your Document and Colorize the Background
In the coming two steps your first task is to create a new .psd file with square shaped canvas, then you should fill the Background layer with light navy blue color.
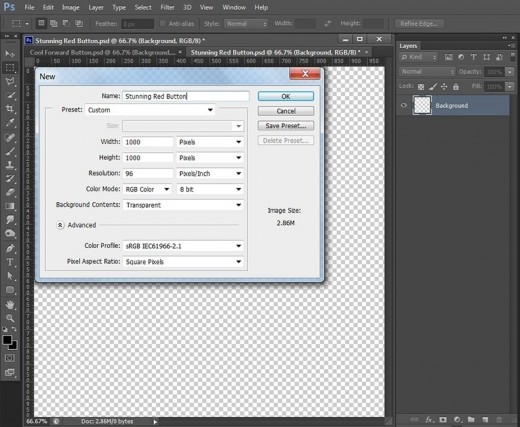
STEP 1
Create a new Adobe Photoshop .psd document of Width and Height 1000px both. Set Resolution to 96 Pixels/Inch and select Transparent for Background Contents. We'll colorize the first layer in the next step. As you can see on the following screenshot, I have called my file Stunning Red Button. Rename also Layer 1 to Background.
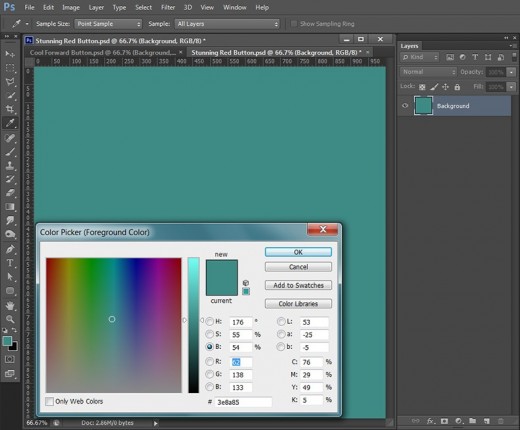
STEP 2
Navigate to the Tools bar and set the Foreground Color to #3e8a85 then use Paint Bucket Tool or go to Edit, Fill, Foreground Color to colorize your canvas.
Draw the Orb Style Button Base and Apply Six Layer Styles
In Steps 3-9 you have to draw a red circle using Ellipse Tool of Fixed Size and Pixels Mode. After that you should improve the color of the circle and also add glow, texture and volume. You have to apply Shadow, red Outer Glow and pink Inner Glow, default Herringbone Pattern, dark brown Stroke and 3D Effect.
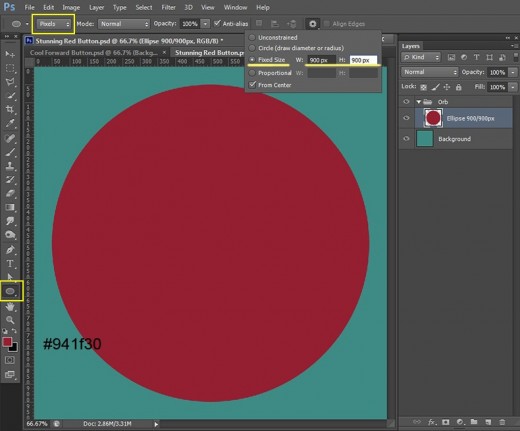
STEP 3
Create a New Layer and call it Ellipse 900/900px. Now set #941f30 as a Foreground Color, select Ellipse Tool, in the Options Bar choose Pixels for Tool Mode and insert 900/900 pixels for Fixed Size.
While Ellipse 900/900px is highlighted, click Ctrl+G (Layer, Group Layers) to put the layer in a Group. Rename this first new Group to Orb.
STEP 4
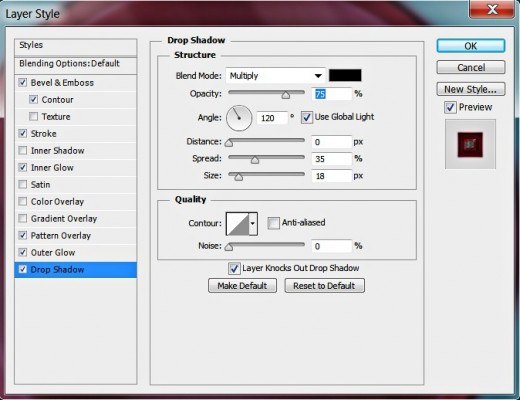
Double click on Ellipse 900/900px layer's thumbnail to activate Layer Style dialog box. The first Blending Option to check is Drop Shadow. Change its settings like this:
Blend Mode: Multiply
Color of Shadow: #000000 (Black)
Opacity: 75%
Angle: 120 degrees
Use Global Light: checked
Distance: 0px
Spread 35%
Size: 18px
Contour: Linear
Anti-aliased: unchecked
Noise: 0%.
Layer Knocks Out Drop Shadow: checked.
Still don't press OK button as we are going to apply five more layer styles on this layer.
STEP 5
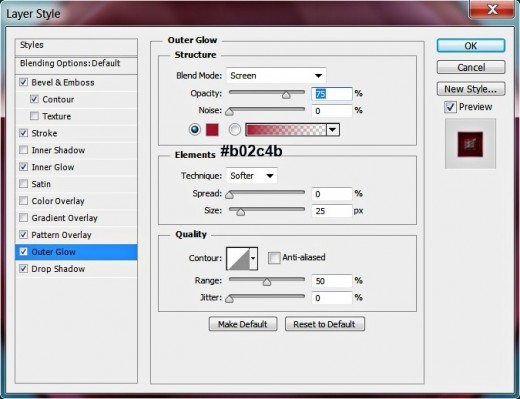
Now tick Outer Glow Layer Style and insert these settings:
Blend Mode: Screen
Opacity: 75%
Noise: 0%
Color of Glow: #b02c4b
Technique: Softer
Spread: 0%
Size: 25px
Contour: Linear
Anti-aliased: not ticked
Range: 50%
Jitter: 0%.
STEP 6
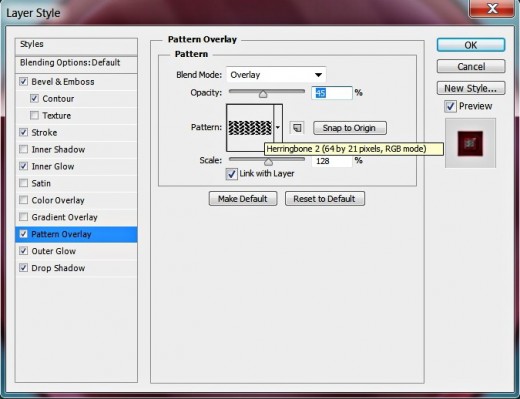
In order to beautify our orb style red button, we are going to apply Pattern Overlay so check it in Layer Style box and give it these settings:
Blend Mode: Overlay
Opacity: 45%
Pattern: from the Pattern Picker choose the default Herringbone (64 by 21 pixels, RGB mode)
Scale: 128%
Link with Layer: checked.
STEP 7
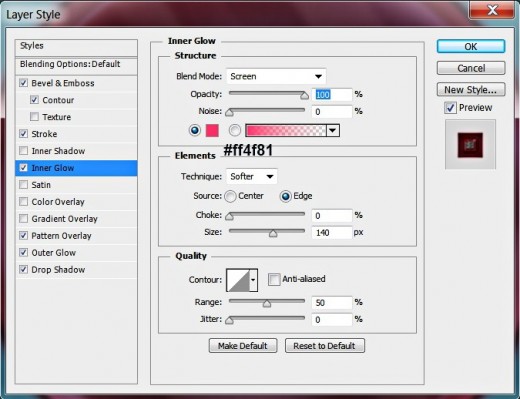
Now tick Inner Glow in Layer Style box and apply these settings:
Blend Mode: Screen
Opacity: 100%
Noise: 0
Color of Glow: #ff4f81
Technique: Softer
Source: Edge
Choke: 0%
Size: 140px
Contour: Linear
Anti-aliased: unchecked
Range: 50%
Jitter: 0%.
STEP 8
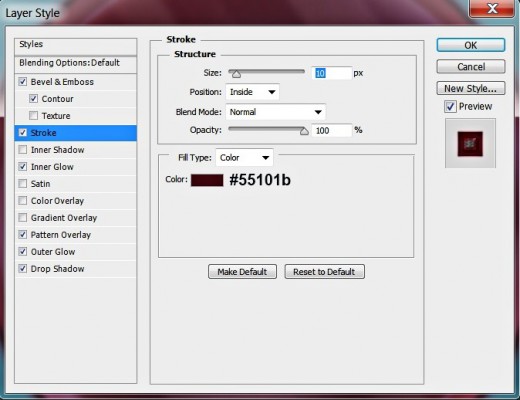
Check Stroke in Layer Style dialog box and insert these settings:
Size: 10px
Position: Inside
Blend Mode: Normal
Opacity: 100%
Fill Type: Color
Color of Stroke: 55101b.
STEP 9
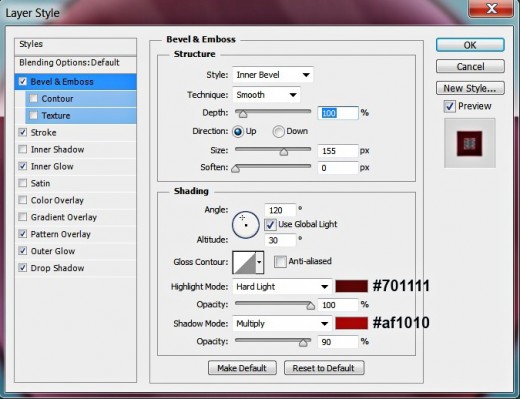
Tick Bevel and Emboss Layer Style and insert these settings:
Style: Inner Bevel
Technique: Smooth
Depth: 100
Direction: Up
Size: 155px
Soften: 0px
Use Global Light: checked
Altitude: 30 degrees
Gloss Contour: Linear
Anti-aliased: unchecked
Highlight Mode: Hard Light
Color of Highlight: #701111
Opacity: 100%
Shadow Mode: Multiply
Color of Shadow: #af1010
Opacity: 90%.
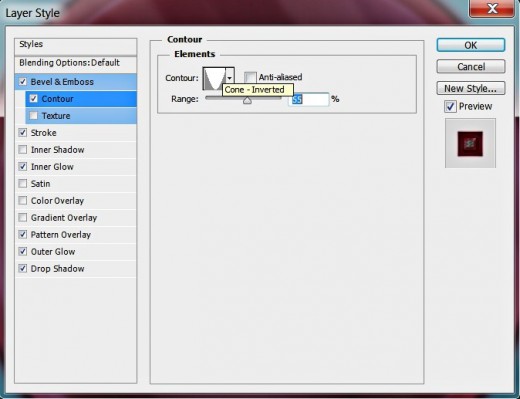
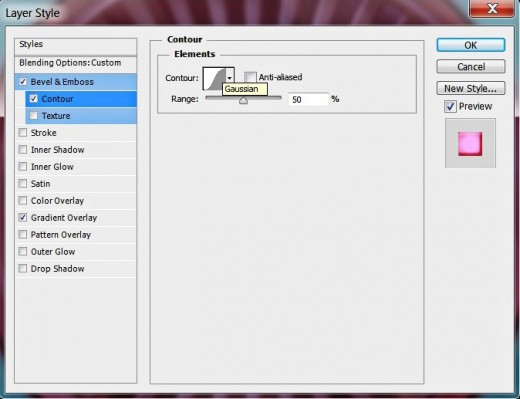
Check also Contour which is below Bevel and Emboss and change the settings as following:
Contour: Cone-Inverted
Anti-aliased: unchecked
Range: 55%.
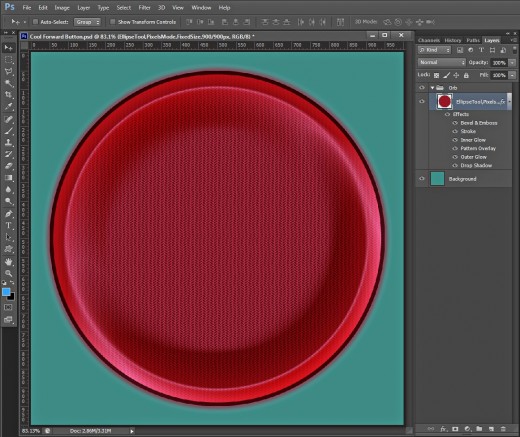
Press OK button to close Layer Style box.
This is how the red textured base of the Button will look after applying the seven Blending Options on the first circle:
Draw Default Shape to Add Rays to the Button
In Steps 10-14 you should draw on a new layer vivid red Registration Target Shape and change its Blend Mode to make it transparent. After that you have to add pink to red Radial Gradient, Bevel and Emboss plus Contour and Leather Texture which is default for Photoshop.
STEP 10
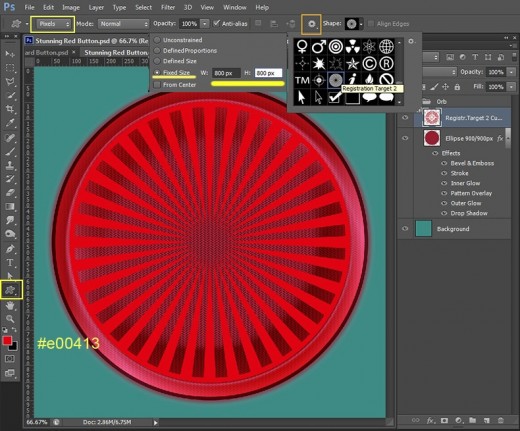
Create a New Layer on top of Orb Group and name it Registration Target 2 Custom Shape. Navigate to the Tools bar and set Foreground color to #e00413.
Select Custom Shape Tool in Pixels Mode, from the Custom Shape Picker choose Registration Target 2, tick Fixed Size and insert 800px for Width and Height. Place your shape in the middle of the canvas as you see on the screenshot below.
STEP 11
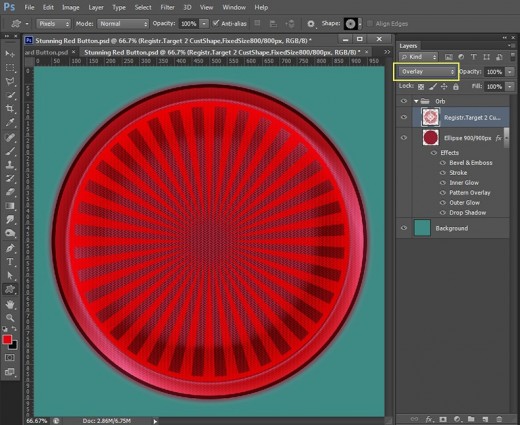
Change the Blend Mode of Registration Target 2 Custom Shape layer to Overlay.
STEP 12
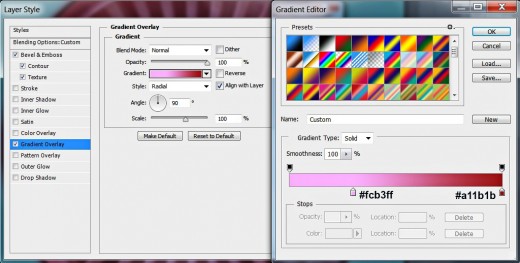
Double click on Registration Target 2 Custom Shape layer's thumbnail to open Layer Style box, check Gradient Overlay and insert these settings:
Blend Mode: Normal
Dither: unchecked
Opacity: 100%
Click to Edit the Gradient like this:
First Color Stop (Location 30%): #fcb3ff
Second Color Stop (Location 100%): #a11b1b
Reverse: unchecked
Style: Radial type of gradient
Align with Layer: checked
Angle: 90 degrees
Scale: 100%.
Still don't close Layer Style box because in the next step we'll apply Bevel and Emboss.
STEP 13
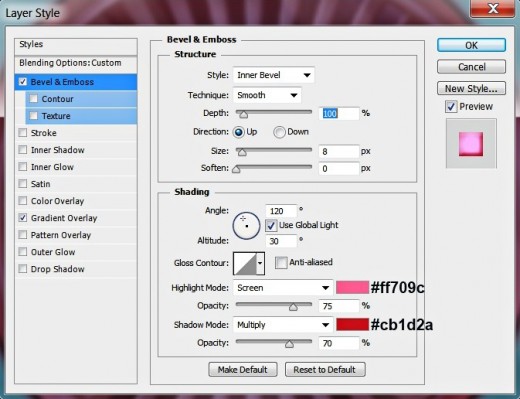
Now check Bevel and Emboss in Layer Style box and change the settings as following:
Style: Inner Bevel
Technique: Smooth
Depth: 100
Direction: Up
Size: 8px
Soften: 0px
Use Global Light: checked
Altitude: 30 degrees
Gloss Contour: Linear
Anti-aliased: unchecked
Highlight Mode: Screen
Color of Highlight: #ff709c
Opacity: 75%
Shadow Mode: Multiply
Color of Shadow: #cb1d2a
Opacity: 70%.
STEP 14
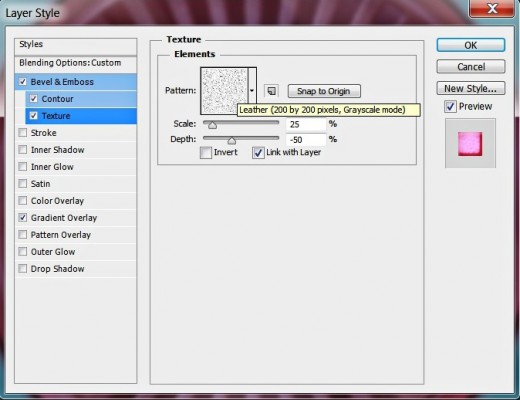
In order to get some relief for the Custom Shape, tick Texture in Layer Style box and apply these settings:
Pattern: Leather (200 by 200 pixels, Grayscale mode)
Scale: 25%
Depth: -50%
Invert: unchecked
Link with Layer: checked.
Now you can close Layer Style dialog box. We finished our work on Registration Target 2 Custom Shape layer.
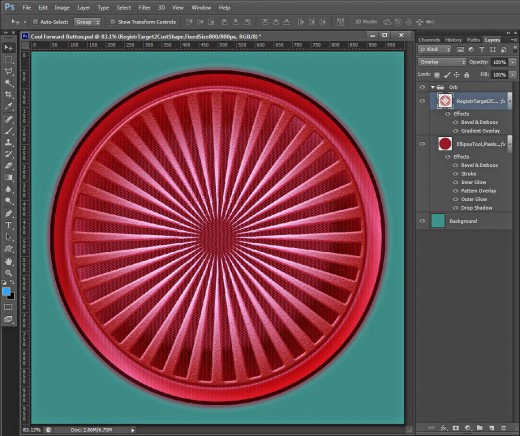
This should be your outcome after applying all four layer styles on the Registration Target shape:
Draw a New Circle to Add Blue Color to the Button
In Steps 15-18 your task is to draw a cyan colored circle of Fixed Size on a new layer then reduce its Fill Opacity value to make it translucent. You have to apply blue Outer Glow and red Inner Glow to add more color shades.
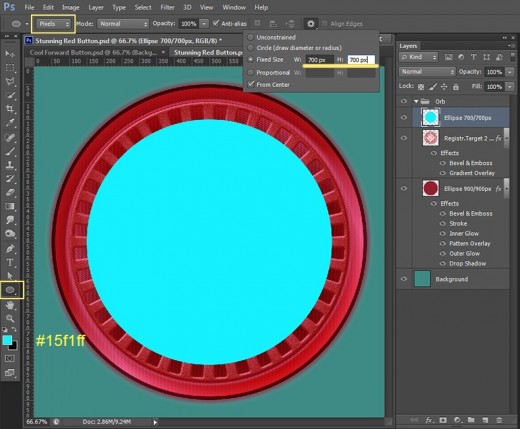
STEP 15
Create a New Layer on top of Orb Group and call it Ellipse 700/700px. Set the Foreground color to #15f1ff.
Select Ellipse Tool in Pixels Mode, navigate to the Options bar and check Fixed Size then insert 700px for Width and Height. Place your circle in the middle of the canvas.
STEP 16
Reduce Fill option of Ellipse 700/ 700px layer to 60%.
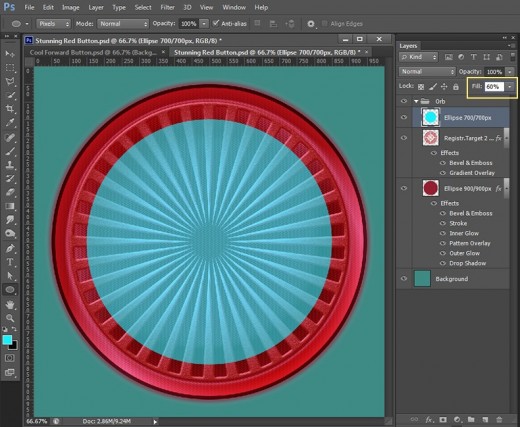
STEP 17
It's time for Blending Options. Double click on Ellipse 700/700px layer's thumbnail then tick Outer Glow in the opened Layer Style box. Change the settings as following:
Blend Mode: Normal
Opacity: 100%
Noise: 0%
Color of Glow: #12b7a9
Technique: Softer
Spread: 0%
Size: 59-60px
Contour: Ring-Triple
Anti-aliased: unchecked
Range: 50%
Jitter: 0%.
Keep Layer Style dialog box opened.
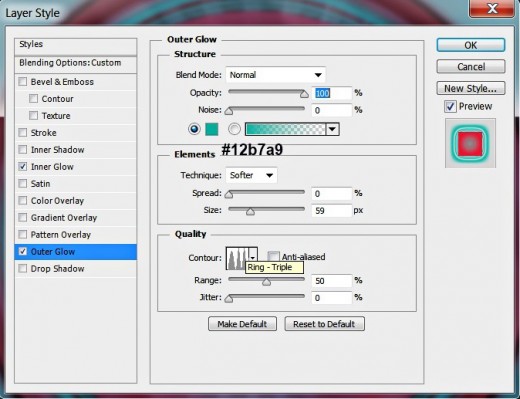
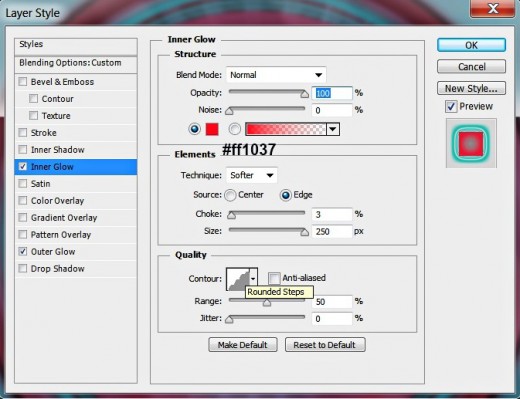
STEP 18
Now check Inner Glow Blending Option and apply these settings:
Blend Mode: Normal
Opacity: 100%
Noise: 0
Color of Glow: #ff1037
Technique: Softer
Source: Edge
Choke: 3%
Size: 250px
Contour: Rounded Steps
Anti-aliased: unchecked
Range: 50%
Jitter: 0%.
Now you can close Layer Style dialog box.
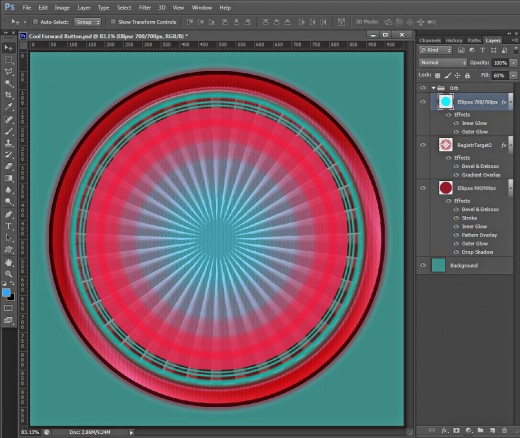
This should be the result on your screen after you have added Inner and Outer Glow to the cyan colored Ellipse.
Add Glossy Stroke and Satin Effect with the Help of New Circle
In Step 19-23 you should draw the last smaller circle, then lower its Fill Opacity value to 0%. After that you have to apply Satin Layer Style with Ring Contour, Gradient type of Stroke and 3D Effect to add more volume and glossy border to the inside part of the bottom.
STEP 19
Create again a New Layer on top of Orb Group and change its name to Ellipse 600/600px. Set Foreground color to #ffee2c. Select Ellipse Tool from the Tools bar, check if its Mode in the Option bar is set to Pixels and insert 600/600px for Width and Height (Fixed Size must be ticked). Draw the yellow circle in the middle of the canvas.
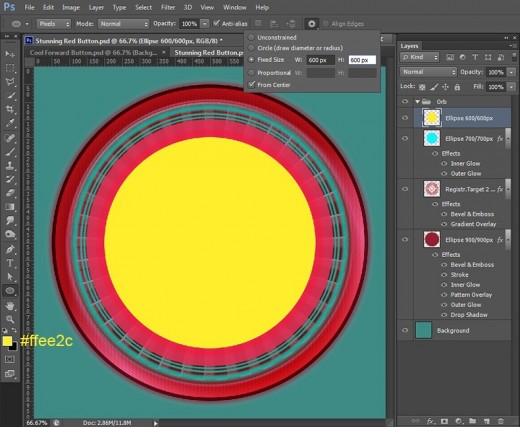
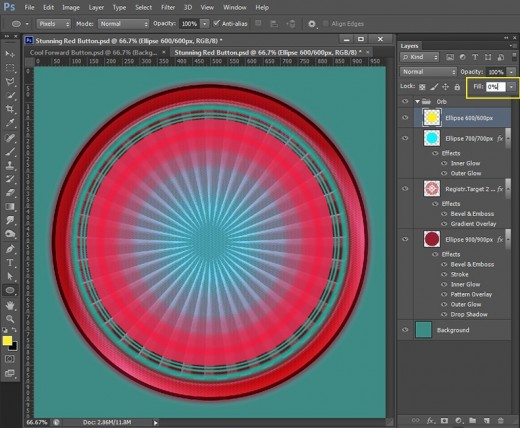
STEP 20
Now reduce Fill option of Ellipse 600/600px layer to 0%. The yellow circle will disappear for a while but you'll see it again in the next step when we start to apply Blending Options.
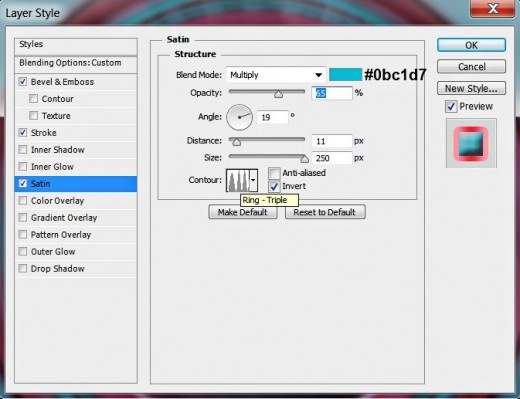
STEP 21
Double click on Ellipse 600/600px layer's thumbnail in order to activate Layer Style box. The first Blending Option to be checked is Satin. Insert these settings:
Blend Mode: Multiply
Color of Effect: #0bc1d7
Opacity: 65%
Angle: 19 degrees
Distance: 11px
Size: 250px
Contour: Ring-Triple
Anti-aliased: unchecked
Invert: ticked
Keep Layer Style box opened. We have two more Blending Options to apply in the next steps.
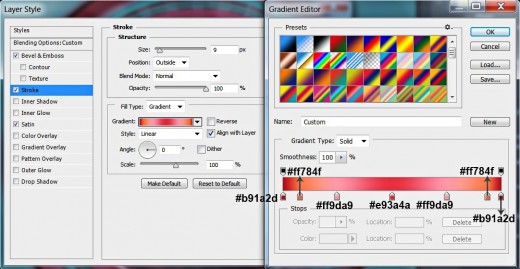
STEP 22
We are going to add bright shades gradient stroke now so check Stroke in Layer Style dialog box and insert these settings:
Size: 9px
Position: Outside
Blend Mode: Normal
Opacity: 100%
Fill Type: Gradient
Click to Edit the Gradient:
First Color Stop (Location 0%): #b91a2d
Second Color Stop (Location 8%): #ff784f
Third Color Stop (Location 25%): #ff9da9
Fourth Color Stop (Location 50%): #e93a4a
Fifth Color Stop (Location 75%): #ff9da9
Sixth Color Stop (Location 94%): #ff784f
Seventh Color Stop (Location 100%): #b91a2d
Reverse: unchecked
Style: Linear
Align with Layer: ticked
Angle: 0 degrees
Dither: not checked
Scale: 100%.
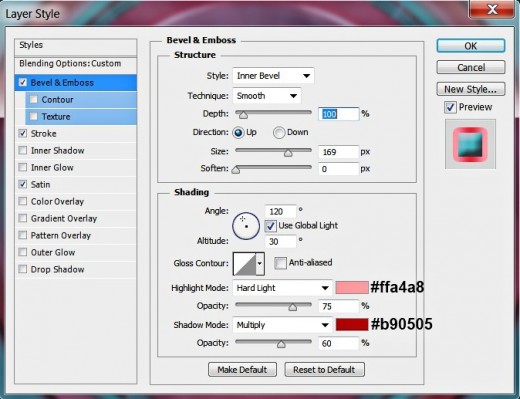
STEP 23
The last Layer Style to be applied on Ellipse 600/600px layer is Bevel and Emboss. Insert the following settings:
Style: Inner Bevel
Technique: Smooth
Depth: 100
Direction: Up
Size: 169px
Soften: 0px
Use Global Light: checked
Altitude: 30 degrees
Gloss Contour: Linear
Anti-aliased: unchecked
Highlight Mode: Hard Light
Color of Highlight: #ffa4a8
Opacity: 75%
Shadow Mode: Multiply
Color of Shadow: #b90505
Opacity: 60%.
Now you can close Layer Style box.
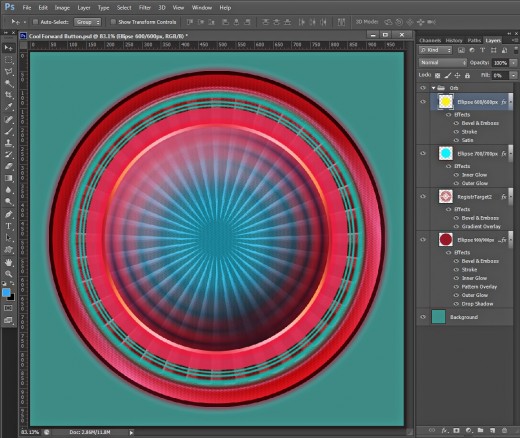
This should be your outcome so far, after applying the three Blending Options on the smaller Ellipse with 0% Fill Opacity:
Add Arrow Sign to the Button
Your task till the end of this tutorial is to draw default Arrow sigh in the center of the button. In order to make the sign more prominent, you have to apply orange Outer Glow with cone-inverted contour, cyan Inner Glow, Bevel and Emboss and Rounded Steps Contour.
STEP 24
Create a New Layer on top of Layers pane and name it Arrow 12 Custom Shape. Set Foreground color to #ffae2c then select Custom Shape Tool in Pixels Mode, choose Arrow 12 from the Custom Shape Picker and draw a nice light orange arrow in the middle of your orb style button.

STEP 25
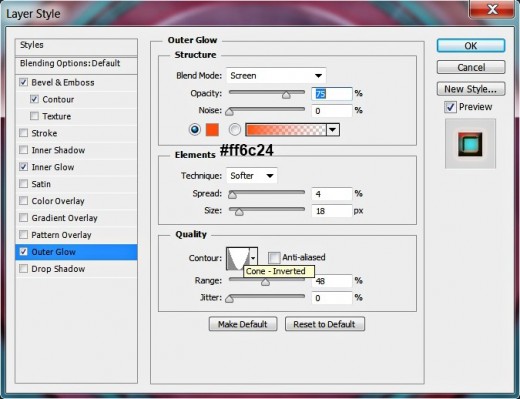
Let's apply some layer styles in order to beautify the arrow so double click on Arrow 12 Custom Shape layer's thumbnail and check Outer Glow in Layer Style dialog box. Insert these settings:
Blend Mode: Screen
Opacity: 75%
Noise: 0%
Color of Glow: #ff6c24
Technique: Softer
Spread: 4%
Size: 18px
Contour: Cone-Inverted
Anti-aliased: unchecked
Range: 48%
Jitter: 0%.
Keep Layer Style dialog box active.
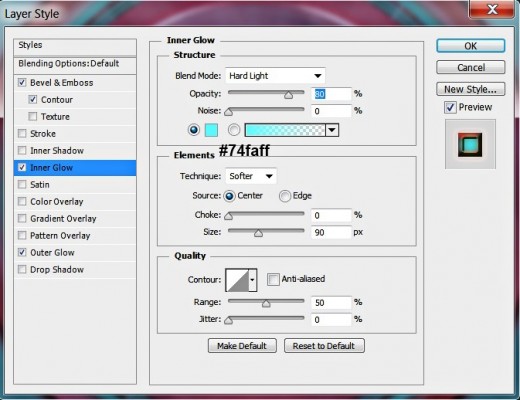
STEP 26
Now tick Inner Glow Blending Option and insert these settings:
Blend Mode: Hard Light
Opacity: 80%
Noise: 0
Color of Glow: #74faff
Technique: Softer
Source: Center
Choke: 0%
Size: 90px
Contour: Linear
Anti-aliased: unchecked
Range: 50%
Jitter: 0%.
STEP 27
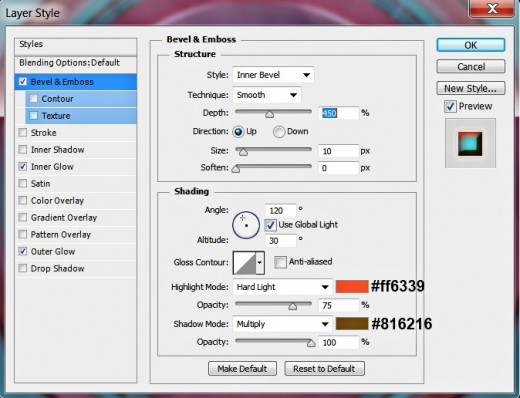
The last Layer Style we are to apply on the arrow is Bevel and Emboss. Change the settings as following:
Style: Inner Bevel
Technique: Smooth
Depth: 450
Direction: Up
Size: 10px
Soften: 0px
Use Global Light: checked
Altitude: 30 degrees
Gloss Contour: Linear
Anti-aliased: unchecked
Highlight Mode: Hard Light
Color of Highlight: #ff6339
Opacity: 75%
Shadow Mode: Multiply
Color of Shadow: #816216
Opacity: 100%.
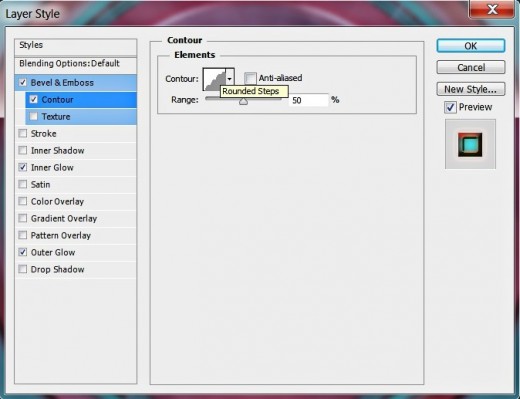
In order to improve the 3D Effect check Contour in Layer Style box and change its settings like this:
Contour: Rounded Steps
Anti-aliased: unchecked
Range: 50%.
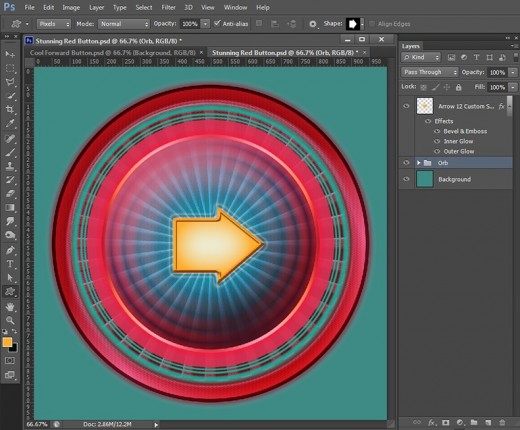
Press OK button to close Layer Style dialog box and take a deep breath. We are ready with the button.
STEP 28
This is how the button should look when all the steps have been followed as given in the tutorial. To the right is the Layers panel with the two layers- Background and Arrow 12 Custom Shape and Orb Group in between.
STEP 29
This is the final look of our stunning red orb style button. Hope you enjoyed this tut. Please leave a comment below if you have questions or need something to be clarified. :)