Drawing A Tree-Techniques to Add Texture to Your Drawing


Drawing a tree is not that hard, but it takes a little time and it takes patience to master certain techniques. I learned this technique a few months ago, and it dramatically changed how I draw trees. I really like this technique, and I hope you learn from it too! I use artist pencils which range in tonal value, and really improve the drawing as a whole. I also use a blending stick, which is helpful for blending. A kneaded eraser is useful, but you can use a regular eraser as well.
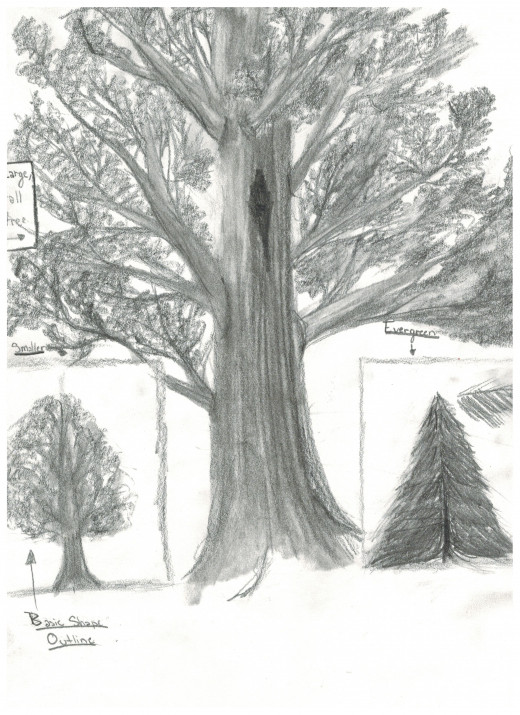
Basic Structure
Start out by drawing the basic structure of the tree. Just draw the trunk and some of the most prominent branches. At this point make sure the picture is not perfectly symmetrical, nor so imbalanced that it does not look right.

Adding Detail Branches
At this point, you should focus on adding the more detailed branches. You do not have to go all out on this, because when you add the leaves, it will cover most of the tiny branches. I prefer to do details on this part, because it helps me when I add the leaves. Make sure the branches are pointing upwards, not towards the ground, because this is how trees grow. Also make sure that the branches get smaller as they get towards the top. IMPORTANT: The branches must NOT be straight, exact lines. Regular trees do not have perfectly straight lines. Make them crooked, spiraled, or whatever else you want to fit the kind of tree you are drawing.

Adding Leaves
This tree is missing something important...LEAVES! Adding the leaves is kind of tricky if you do not know how to use the circular stroke. The circular stroke involves holding the pencil differently, and moving it in a circle-like motion. I will include a video at the bottom of the page to further explain this. Add leaves in the parts where you have smaller branches. You should vary the tone that is used for the strokes. Some parts will be darker, others will be lighter because of where the light is in the picture. Add the leaves in a balanced way, not too much light shining through, but not extremely blended so that no light streams through.
Adding evergreen "leaves" are slightly different, and I do not have much experience in doing them. You will draw a slightly curved line protruding from the trunk, then start adding the little pine needles. Usually they will be longer towards the trunk, and shorter towards the end. Do this along the trunk on both sides, and it should end up pretty nicely.

Texturizing the Bark
When adding the textures of the bark, you need to place dark vertical lines along the trunk. They should get lighter towards the light source, and they should be relatively thick. Then using vertical strokes, use the blending stick to add some tone to the space in between the lines. On the larger branches, shade them as you would a cylinder. Make sure that it is lighter towards the light source, and darker towards the other side.
Final Touch Ups
I saw a few areas that needed a little bit of work. One of the clumps of leaves on the large tree was too blended together, with no space in between a big clump of leaves. I lightened it a little bit with my kneaded eraser, and it showed that some light went through. I also noticed some areas that were not blended on the trunk, and I smoothed those out. Changing the light source seemed like a good idea, so that is what I did. Remember to look for little spots that don't look right. They can change the whole look of the picture.

Extra Notes
At the bottom left of the pictures that I scanned, you will notice the words "basic shape outline". This was just needed for the second step, and you do not need to be concerned about what that means! I hope this helps!


