Easy Christmas and Winter Crafts for Kids

Inexpensive Crafts for Kids
As a teacher and a mother of two young children, I am always looking for and thinking about easy and cheap crafts for my children and students to do. I also love in particular the kind of project that also lends itself to become a keepsake. So here are three easy and cheap crafts for your young child to do. Some involve more guidance than others, but all are great fun!
Pictures of the Hand Christmas Wreath
Click thumbnail to view full-size


Christmas Hand Wreath Directions
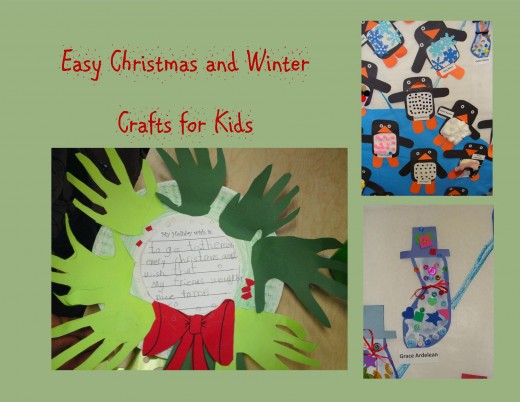
This hand wreath was made by my first grade students. Although they are not "perfect," the beauty lies within the idea that it was something made with their hands, and will become a Christmas keepsake for their parents. If you did this project with younger students, you would need to do the cutting for them. If you do this with older children, the cutting and piecing together of the project will be much neater.
Materials Needed:
- paper plates
- crayons, colored pencils, or markers
- glue sticks
- green construction paper (different shades add to the uniqueness of this project)
- scissors
- red construction paper for a bow (I drew ours and then copied it on red construction paper for each child.)
- a paper circle that is the size of the center of the paper plate (This will be used to write the holiday wish.)
Directions:
- Have students color the outer ring of the paper plate green. This ensures that there will not be any white space on your wreath even if the hands don't quite cover the entire wreath.
- Next, have students trace and cut out eight hand prints.
- Glue the bottom part of each hand around the plate so that the entire circumference is covered. Let the fingers hang off of the edge of the plate.
- Then, have students write their holiday wish on the circle. Once they have written it, have them cut out the circle and glue it to the center of the plate.
- After that, cut out the ribbon and glue it to the bottom of the plate. You can then use the "extra" red paper to cut out berries to add.
Snowman Foot Print Pictures
Click thumbnail to view full-size


Snowman Foot Print Craft
This project was done by my daughter in her preschool class. There was a lot of guidance from her teachers to complete this craft.
Materials Needed:
- blue construction paper
- white tempra paint
- sequins, beads, foam stickers, ribbon and any other adornments
- glue
Directions:
- Paint the bottom of the child's foot with white paint.
- Allow the paint to dry and then carefully cut out the foot.
- Depending on the age of the child, have pre-cut blue hats available for him to glue to the top of the snowman. The top of the snowman is actually the heel of the foot.
- Allow the child to decorate the snowman with a variety of materials. He can make a face, add buttons, a scarf or any other decorations.

Penguin Craft for Kids
This project is very easy to make and doesn't take much money to put together. Younger children will need more guidance, yet older children can do more of the cutting and piecing of the project together.
Materials Needed:
- black, white, and orange construction paper
- googly eyes or hole punch reinforcement stickers
- beads, stickers, sequins, feathers, colored noodles, anything that you can think of
- glue
Directions:
- Cut out a rounded rectangular shape for the body and two smaller rounded rectangular shapes for the arms out of black paper.
- Cut out a rounded square half the size of the penguin's body for its stomach from white paper.
- Cut out an orange triangle and two small, orange rounded rectangles for the feet.
- Have children glue the pieces together to make the penguin.
- Then allow them to "decorate" the belly of the penguin. This would also be a great opportunity to reinforce patterns for older children.
I hope that these craft ideas make a winter day a little more bearable and help to brighten your Christmas holidays!


