Easy Abstract Modern Art You Can Do Yourself

Getting started on your abstract art project: Supplies
Here is a list of supplies to gather before you get started:
1. Acrylic paint
I have a collection of small bottles of acrylic paints. You can use the thicker paint in tubes and thin down, or the more liquid paint in bottles. For this painting I mixed primary colors but please just get what you feel comfortable with and if you like pre-mixed colors go ahead and use. There are lots of colors now to choose from.
2. Canvas
My canvas was a pre-stretched canvas with a print already on it that I bought in a thrift store. I don't like to spend a lot of money on canvases so I usually paint over used ones. Someday I'll stretch my own. The one I used was 22" X 28" but I like even bigger!
3.Brushes
A large brush (like for painting walls) for painting over old art work and priming surface.
A medium size brush for applying your colors, i.e., 1" size.
4. Gesso
A white primer to cover your canvas. Not necessary if you have a pre-primed canvas.
5. Plastic wrap
6. Palette for your paint. I use cardboard or paper plates. You can cover with foil or plastic wrap to use again and for easy clean-up.
7. Old newspaper and rags.
To protect your work surface. Most often I work on my floor so I put newspapers down first.
8. Old clothing T-shirt, smock,....Acrylic paint is permanent when it dries!
Ready-Set-Go!
Step 1: Prep your canvas by painting it with Gesso (or other brand?) if you have to. When I use Gesso I usually wind up putting on two coats because I am covering something else up. The first coat I put on using horizontal brush strokes. That second coat I do more random criss-cross strokes, like X's to make a more interesting textured surface.
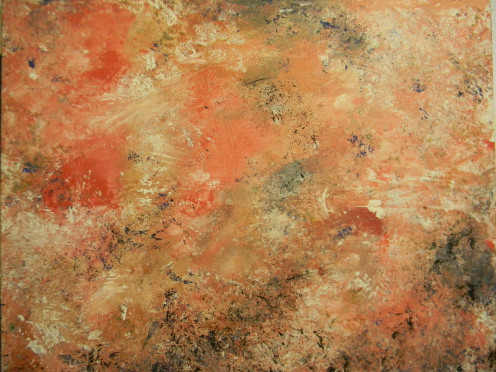
Step 2: Plan what colors you want. Following step one you should now be looking at a blank white canvas. Have you thought about colors? It is time for your own creative expression. Although it may not be easy to see my color scheme in my photos, the colors I chose were coral, sand, cobalt blue, white, and touches of black. Please remember that you may start out with certain ideas about your colors but they will change as you progress through the process. The unpredictability of this project is a huge aspect. Be prepared to let go of some of your control. In other words, go with the flow.
Step 3: Start mixing your colors on your palette. You'll need to mix quite a bit of paint for the 22'X28" canvas. Now here's the scientific part: Imagine the size of a golf ball. This is the size of each pool of paint I mixed for each color to start. Here's some help for mixing colors if needed:
Coral: Make a dark pink with red and white and then gradually add yellow until you get the coral you like.
Sand: Make brown by mixing all three primary colors and then gradually add white until you get the shade you prefer.
Cobalt blue: Pre-mixed in bottle but sometimes I add a little black to darken.
Putting the Paint on your Canvas And Don't be Afraid
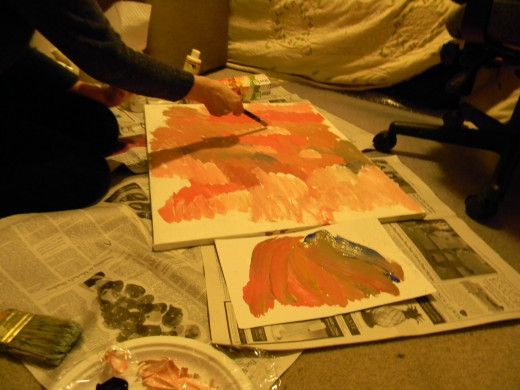
Step 4. Start painting your canvas with your chosen colors. Choose your dominant colors and put those on first. I started with my coral and then sand and then added smaller amounts of white and even tinier spots of blue. Put your paint on thick. This will make sense later. I basically just made a patchwork of colors with larger patches of the coral and sand and added small bits of white and blue as accents. Don't forget to cover the whole canvas, delicately joining the edges of your shapes. If you like bare canvas showing through definetly experiment with this too. The development of creative expression in art is all about experimentation and personal expression.
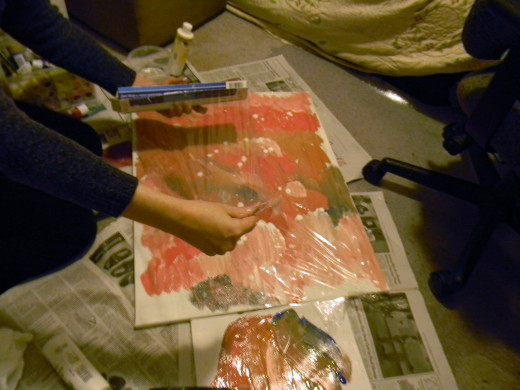
Step 5: Now take a couple of pieces of plastic wrap and lay them down on top of your paint while it is still wet. At this point take one or two fingers and move them across the plastic wrap, pressing down so that the paint is swirling under the plastic. I do this because it blends the edges of your shapes and randomly creates interesting textures and shapes. I like to go back and forth in horizontal patterns. You can also do circular or wavy movements. This is the point where you just have to wait and see what is going to happen and of course it is easier to move slightly thicker layers of paint under the plastic. Be careful not to overdo this step so that your paint becomes muddy underneath (i.e., too brown).
Step 6: Slowly pull off your plastic wrap. What do you think? Is it finished? If you love your work at this point, by all means stop, dry and hang. But I think you'll like going on to the next step.
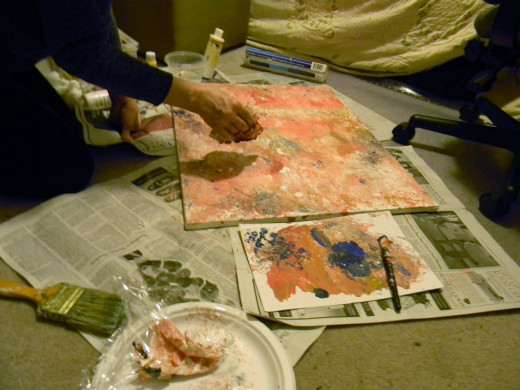
Step 7: Take a look at the special effects of what you did with the plastic. I consider this phase your color foundation and the start of better things to come. I like a layered look with depth created by darker shadowing and highlights created by white. So now I suggest that you take another piece of plastic wrap and wad it up into a ball. This is kind of like sponge painting. Take your plastic ball and dip it onto your palette where there should be a mixture of your blended colors. Lightly dip into a couple of your colors and test on another piece of paper or the side of your palette to see the effect. Lightly sponge on areas of your canvas where you want to add some interest. During this step I added a little white to the top of some of my shapes to highlight or accentuate the movement from one shape to another. I then dipped into a blend of darker shades (made by mistake) and created some shadows more towards the bottom corner. I like diagonal movement and as you can see in this painting I placed more darks at the bottom right edge.
You can use a quick tapping movement or press and swipe to create some streaks of color. I would suggest practicing this first on another paper to get more confident.
*Important! You want to make sure to sponge around the edge of your canvas with your same colors so it looks like your painting wraps around the edge. This is the most attractive technique for art that is not going to be framed.
Step 8: Kinda the last step is usually to take a good look at the movement in the picture. Inevitably I wind up adding little dabs of dark or white until I like the effect. Please have fun and use your imagination. If your shapes look like clouds, play it up. Keep in mind I did not use a brush except to prime the surface. I like the modern effect. Let your beautiful and unique piece of art dry.
****My self-critique: When I lived with my painting for a while my mind went several places. I was pleased with the color palette but not so much with the movement and shapes. Next time I would add more drama by defining a few of the larger shapes and maybe add more size and shape contrast. Darker darks and lighter lights. In summary, and this is my personal preference, I would make it more dynamic and less static so that it really grabs the attention.
Step 9: (Optional) The last step is to spray (in a well ventilated area or better yet, outside), with a matte, semi-gloss, or super gloss finish. I'm going to spray mine several times to create a thick layer of gloss. I've seen this on collages and I really like it! And by the way, what you just created could evole into a collage if you added bits of paper or interesting objects. Let your imagination soar! * See finished painting at top of page.
")


