GIMP Tutorial-How to Resize Photographs

Photographs enhance your writing
When writing articles and blogs a good photograph or even photographs, will enhance what you have written.
Uploading difficulties can still happen, even if you follow the sites own directions on how to upload your image, sometimes even then your image will not load.
Uploading an image is a very easy thing to do, but some people have found it very difficult, this tutorial will try to eliminate one of the most common reasons why an image will not upload using GIMP.
One reason for an image not to load
I have found that, one of the main reasons why a site will not accept the image, that you are trying to upload, is because it is too big. Sites very often restrict the size of an image it will allow you to upload.
When digital cameras were first out this was not too much of a problem, because the photographs you took very often were just a few kilobytes in size.
However now, with many cameras taking 10+ mega pixels photographs, the normal size of a photograph, is around five megabytes or above.
It is quite common for a site to impose a one-megabyte limit per photograph so when you try to upload one of your photographs it is too large and the site won’t let you upload it.
Resizing is not a problem
Don’t worry, when a photograph is too big, all we have to do is resize the photograph, and resizing is not a problem, it is very easy to do.
In this tutorial, I am going to talk you through the process of resizing a photograph in GIMP.
GIMP stands for the GNU Image Manipulation Program, it works on many operating systems I use it on Windows.
GIMP is a brilliant piece of software that the developers distribute freely for all to use. GIMP can do all manner of image manipulation including the one I am going to show you, that is resizing an image.
One word of warning, before you begin to manipulate any image, please remember to make a copy of the original, so that if something should go wrong, you always have that somewhere safe.
Gimps official download page

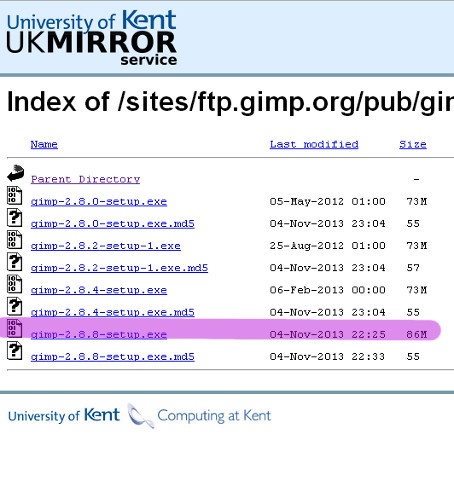
Screen shot of link for downloading the windows version
How to Download GIMP
If you don’t have GIMP don’t worry, it is a free piece of software, if you have windows you can do and download the latest version at GIMP here http://www.gimp.org it is free.
The version I have linked to is in English, but if you speak another language, GIMP is available in many languages, just follow your language’s link from GIMP’s home page link above.
The choice can be a bit confusing, at one time you could click on the download icon and it would do just that but now you are faced with a host of options.
To help make the process easier, I followed one of the options through to its conclusion, click on this link http://goo.gl/lz42YV don’t worry the link is from following the official links, offered on the Gimp website.
If you clicked on the link above the page should look like the screen shot over to the right.
I clicked on the next to the bottom link it is 86 megabytes, I have highlighted the one you should click on in the screen shot.
It is easy to download GIMP; just one click is all it takes. It will take a minute or two for it to download, but when it is finished just click on it to install, and follow the wizard.
Before you can use GIMP, you will have to reboot your computer so that it can update, but then you are ready to go and will have a fabulous piece of software to use.
GIMP will open up a completely new world of exciting things you can do with your photographs.
Open GIMP
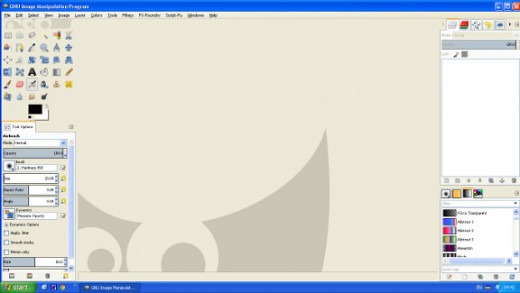
Now it is time to begin, Left click on your GIMP program and and it should open up and you should see something like this.
Screen shot of GIMP Workspace
Screen shot of drop down menus


Go to the top right-hand side of the screen and click on File, when you do this you will get a drop down menu that looks like this, click on open.
When you click on open and it will give you another drop down menu find the photo that you want to manipulate using this drop down menu and click on it.
Now move down to the bottom of the drop down menu, and on the right hand side you will find a box that says open see the box highlighted in red in the screen shot to the side.
Left click with your mouse on the box that says open, and the photo that you have selected, should now open up in GIMP.
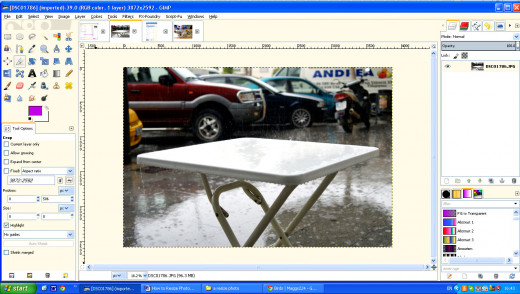
I clicked on the photograph that I selected, it became highlighted in blue, then I clicked on the box that said open, and it opened up in GIMP, your page should now look something like mine below, only with your photograph showing not mine.
This is the photograph I am going to resize
Why resizing?
My photograph is at the moment 3872 pixels wide by 2592 wide, this means next to nothing to me except that I know that it is large. I normally do my resizing in inches, as that way I can conceptualize what I am doing much better than if I use either pixels or centimetres as the measurement.
If I upload this at a resolution of 72 dpi, this image is a whopping 53 inches wide by 36 inches high and is 2.75 megabytes in size.
Rain on the table, is the image that I am going to resize in this tutorial, I am resizing it because at this size this image is too large for most sites .
I could upload this photograph to use it in this tutorial without resizing, and although HubPages would allow me to upload it at this size, it would not be beneficial to do so.
It would not be beneficial because it is such a large image, that it will slow the loading of this page considerably.
If a person has a slow connection, the fact that my photograph causes my webpage to load slowly, may well cause that person to become impatient, and to move off from my site to find another site instead.
Because the size of the image displayed width wise is limited by the size of the page it is displayed on, having it at full resolution is of no benefit as most computers can only display an image at 72 dpi, so it will look no better even if the resolution is higher.
How to resize
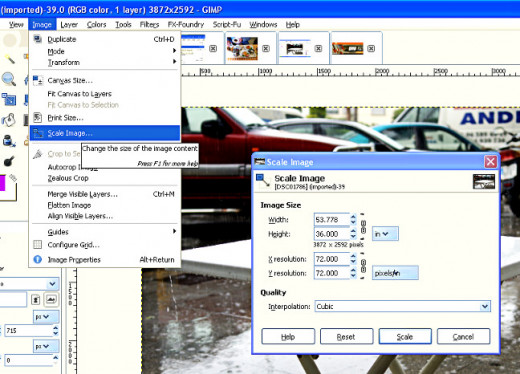
In order to resize this photograph we move our cursor up the top left-hand side and click on Image, which is the fifth option from the left on that top bar. Clicking on image will cause a drop down menu, click on the option Scale Image.
Scale Image is the eighth option down, on the Image drop down menu; see the screen shot below.
Image Drop Down Menu
Scale Image
Clicking on the Scale image option will open a Scale Image box like the one on the right. Highlighted in pink you will see a small chain icon, in this image the chain icon is closed.
Clicking on the chain icon will cause the chain icon to open, click on it again and it will close. For resizing, I need the chain closed, as I have it on the screen shot, below.
When the chain is closed, it means that when I change the information in one box I will change the information in the other box automatically.
For example, if you change the number in the X resolution box to 300 (Highlighted in Yellow) then place your cursor in the Y resolution box and click the Y box will also change to 300 because the two are tied together when the chain icon is closed.
If the chain icon is open, when I change the X resolution to 300, the Y resolution number would not change it would remain at 72.
This also applies to the Width and Height boxes, which are highlighted in green, if I close the chain link icon, when I change the information in one box; I will change the information in the other box automatically.
It does not matter which of the two boxes I choose to change width or height the other one will be changed automatically if the chain icon is closed the same applies for X or Y.
Scale Image Box
Size
I can change the size of my image by putting in what size I want it to be in one of the boxes highlighted in green. As long as the chain icon is closed, when I change one I automatically change the other.
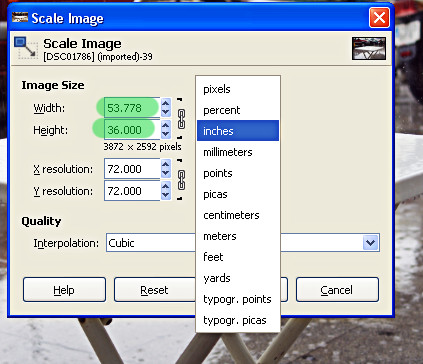
In the screen shot above, the width is in pixels, I don’t like using pixels because I am use to working in inches, so in order to change the scale from pixels to inches click on the blue box to the right of the chain icon with looks like pxv on.
Clicking on this box will cause a drop down menu to appear giving measurement options, I click on the inches option and when I do, the width that my photograph changes to inches instead of pixels.
The width of the photograph is now showing as 53.778 inches, and I want to change this to one that will suit the site that I am going to place it on.
Export
Choosing my size
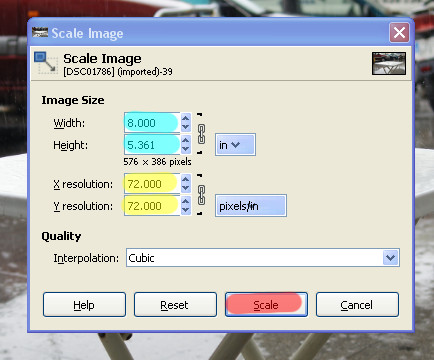
I choose the size I am going to resize my image to according to how big I want it to appear on the webpage that I am going to use it on.
When I use an image on Bubblews, it normally appears as a small image, but when you click on that image, it will show the image at a larger size, that is, if you loaded an image larger than the one shown on the article.
I normally resize my images so that the largest size is eight inches, so if my photograph is in portrait I will change the height to eight inches, if my photograph is in landscape, like my rain on the table image, then I will change the width to eight inches.
So click in the width box and replace the figure of 53.778 with 8, now move the cursor down into the height box and left click.
The height now reads 8 inches and my width now read 5.361 inches next left click on scale and this will resize the image.
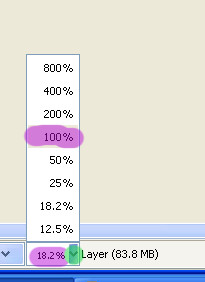
When I rescaled the image, it looks like a thumbnail now, but that is because you are not viewing it at a 100%.
Look down and to the left and on the bottom bar you will see a % figure, in this case it was showing 18.2% click on the little blue bit to the right of this 18.2% with the v shaped on it highlighted in green and a menu box will appear. Click on the 100% and the view of the photograph will return to 100% which is its actual size.
The image is ready to be saved
I have resized my image and I am ready to save it, but in GIMP, we do not use the save or save as option because the image will be saved in GIMP's own xcf format.
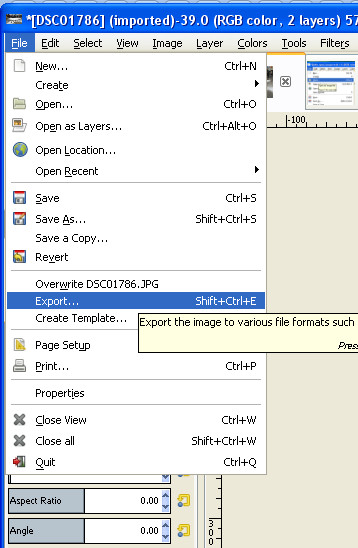
We want to save our as a jpeg and in order to save as a jpeg I need to export the image.
To export, I go to the top left hand-side and click on file, this will open a drop down menu, and come down the options to Export…
Click on the export option
Click on the export option and this will open the Export Image window.
Type the name that you want to give your image in the box alongside Name: at the top left hand side of the window see highlighted in pink, I have given my image the name of table in rain.
Now choose where you want to export your image to; the options appear on the left-hand side under Places highlighted in pink.
Under places, it will give you options, if you do not have a place just export it to your desktop and move it later.
You select the location where you want to save your image to, just by clicking on one of the options offered under Places.
Folders are selected just by clicking on them and the folders that you select from under places, will appear as you click on them.
They appear, next to the Save in Folder: located just under where the image name is.
My selections shows that my image is being saved Maggie > Desktop > a resize photo
Export Image window

File format
To select the format that you want the image to be saved as, click on the + Select File Type (By Extension) at the bottom left-hand corner of the Export Image window highlighted in pink.
This will open another drop down menu given file format options, scroll down the options until you find the jpeg option and click on it.
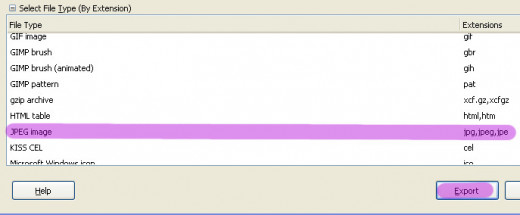
I chose the jpeg format because jpeg is the most popular format and most sites will allow a jpeg upload.
Finally
Finally
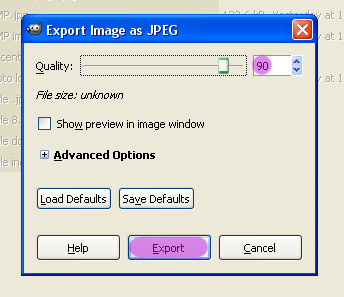
Once you have given your image a name and chosen where to save it to, click export and a new window will open, called Export Image as JPEG, this is the last one.
I set the quality, see up near the top of the window, at 90/ Quality can be set either by moving the slider or just typing in the number you want, in the box highlighted in pink.
Now all that remains is to click on Export for the very last time and you are finished.
Finally you have a resized photograph, which when you get use to doing this, will take you a lot less time, than it has taken you to read this tutorial.
Each step has been shown using screen shots, so that a complete novice, with no prior knowledge, can follow it step by step, and end up with a resized image.
I hope that this tutorial proves useful and is easy to follow.


