DIY Halloween Wreath Tutorial--Up-cycled Holiday Project


Frugal Crafting
It is almost time for my favorite holiday, Halloween. Every year I try to craft a few items, as well as buy new decorations. Since my craft room has just been organized, I am under strict orders from my husband to not clutter it up again too soon.
So I opted for this simple wreath project. All the materials were close at hand, and it uses up some of my fabric stash.
I made a similar wreath last year and glued Halloween toys to it. I have not yet been to the dollar store for more toys and novelties, so I decided to decorate my wreath with candy corn for this tutorial.
This probably means it won't last until next year, but wreathes can be decorated with more permanent decorations. Some of my favorites include Halloween lettering, ghosts, bats, and pumpkins.
Okay. Ready to make a wreath? Sure you are! It is easy and only requires a minute of sewing.

How To Make Candy Wrapper Ornaments
- Handful of Halloween candy. Peanut butter kisses in the orange and black wrappers work well.
- Fiber filling or cotton balls
Unwrap the candy carefully and eat it. Press the wrappers flat. Foil wrappers do not work as well, and will sometimes tear, but paper wrappers should lie smooth. Take a candy size piece of fiber fill and lay in the center of the wrapper. Re-twist the wrapper around the cotton. Now you should have a fake candy that can be glued to different types of decorations, or hung from a Halloween tree.
Materials for Halloween Wreath
What you will need:
- Sewing machine or sewing supplies
- Scissors
- Fabric remnants
- Yardstick, ruler, or measuring tape
- Ribbon
- Hot glue gun
- Plastic shopping bags
- Trimmings such as plastic Halloween toys, candy, foam letters, or flowers
- Clear-coat or other sealant. (optional if you aren't using unwrapped candy)
- Chocolate or other snack so you won't be tempted to eat the decorations.


Measure, Mark and Sew Your Fabric
These wreaths can be made any size you like. For this one I measured a rectangle of cloth 7" by 30". I left an inch of fabric on either side of the long mark. This will be the raggedy fringe later on.
Fold your fabric in half so that it will form a long, narrow tube. If you don't want the fringe on the outside, then pin cloth with right sides together, then you can turn it inside out after it is sewn. For this wreath I pinned it with the right sides facing out.
Now take it to the sewing machine, or your favorite hand-sewing chair. Remember that the stitches will show on the outside, so you might want to use either a matching thread or a contrasting Halloween coloured thread.
Sew along the long sides and leave the ends open. Now it is time to stuff the wreath. You can pause here for a snack. I did.

Repurpose Your Plastic Shopping Bags
Take your plastic shopping bags (yay for recycling!) and either form them into tennis ball sized wads, or make them slightly elongated. The balls work better in larger wreaths. I had to use narrower ones on this size.
Use a ruler, yardstick, wooden spoon handle, fly swatter handle or any other stuffer tool of choice and push the plastic bag balls into the tube one at a time.
If the balls are evenly spaced then the tube should be able to form a charmingly imperfect circle. This is the least fun part of the whole project, but not the trickiest. That comes next.

Sew The Ends
Now that your Halloween wreath is properly stuffed, you need to fold the edges of the ends to the inside.
Overlap the ends slightly and sew with the sewing machine, or ladder stitch the ends together to create an invisible seam.
Don't worry if the ends don't look perfect, this part will be covered with ribbon and trim later. You can also glue a large bow here.
I have heard a rumor that ironing cloth before you try to sew the ends together makes it easier. I am reluctant to try this, as I have an allergy to iron.


Creating the Fringe
Now is the time to take the scissors and make fringe. For once I did not use pinking shears because I actually want it to ravel a little to make it look ragged and cute.
Halfway through cutting the fringe, you should give up and go find a pair of scissors that are actually sharp. That made the fringing process go a lot quicker.
This is also when you will go back in your craft area and be inspired to make a thousand more projects. You should resist the temptation to drag out all of your other projects. The wreath will be done in a few minutes.
Feel free to use pinking shears if you like. There is no wrong way to make this wreath.
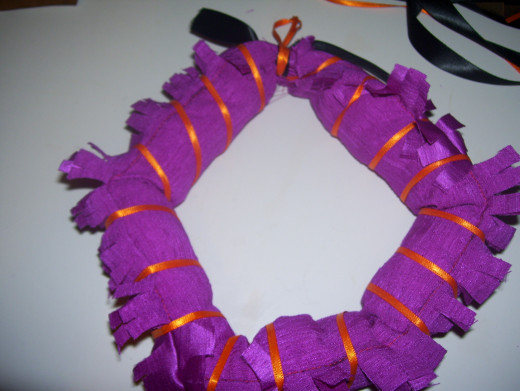
Ribbon and Trim
Now it is time for the decoration. You can use whichever colour and width of ribbon you like, or you can skip ribbon altogether.
I like to wrap it so that the ribbon falls between each of the "lumps" created by the stuffing. This gives the wreath a unique, fluffy look. This may not suit you if you prefer standard wreath shapes or forms.
I used narrow ribbon here, and carefully wrapped it so that it would hold the fringe open in some places. Wider ribbon would probably look better on a wreath without fringe.
Before wrapping the ribbon, tie it a few times around the seam that connected the ends and create your hanging loop. This should cover the seam and anchor the ribbon for wrapping. I tied a short length of wider black ribbon around the seam first to create a "bow", since the orange ribbon was too narrow.
Trim: This is the fun part. As I said, I used candy corn for this petite wreath, because I like the way it contrasts with the purple satin. I usually use plain Elmer's white glue to clear-coat edible items for crafting. This DOES NOT work on candy corn, so try it only if you want to see what happens.
After I un-peeled all of the candy from my fingers I decided to just glue plain candy corn to the fabric. I wasn't sure what would happen when candy met hot glue, but it worked just fine. after it was all glued in place I coated the candy with a spray-on clear coat. Much better.
Next: I took short pieces of the black ribbon and tied single knots in the center of each piece to create little bows. I glued these at random places between the candy. They look like little bats. Awwww!

Finished!
Now you have a unique, budget-friendly Halloween wreath. There are tons of ways to decorate these wreath forms:
- Do a black wreath and glue on white Kleenex ghosts. Compliment with some white curling ribbon
- Use a Halloween print fabric and make foam, felt or cardboard lettering
- An orange or yellow wreath could be decorated with felt or rubber bats
- Use any colour of fabric and wrap thin black thread in a criss-cross pattern. Accent with spooky spiders, including one dangling into the center of the wreath.
- Make your wreath a little more Autumn and add leaves and acorns.
- By an assortment of bargain Halloween candy in wrappers and glue to create a colorful trick or treat wreath.
- Make miniature plastic bag ghosts to glue on the wreath.
Be creative! These are fun, easy to make, and cheap. Chances are you have the materials to make them already. If any of my instructions were hard to understand, or you want to ask a question, please feel free to do so!
Hope you enjoyed!
Wreaths For Other Holidays
Holiday
| Color Theme
| Decorations to Add
|
|---|---|---|
Christmas
| Red/ green or blue/white
| snowflakes, gingerbread men, poinsettias, Christmas toys
|
St. Patrick's Day
| Green/Gold
| Shamrocks, chocolate coins, rainbows
|
Easter
| Pastels and white
| Plastic eggs, toy bunnies, Peeps, Easter toys
|
Mardi Gras
| Purple/Yellow/Green/Black
| Beads, feathers, coins, small masks
|
Some combination ideas for making various holiday wreaths.

")


