- HubPages»
- Arts and Design»
- Photography»
- Photography Instruction & How-Tos
How To Photograph Everyday Objects As Art

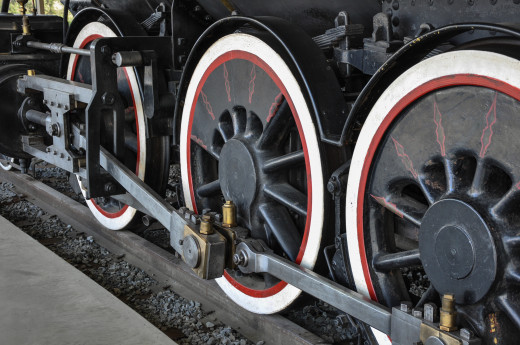
Trains Make Amazing Art Photos
Things We All Do With Digital Photos and Could Re Evaluate
- Wide Angle Shots - taking overly broad shots of the same subject instead of choosing something to focus on and capturing that worthwhile scene.
- Selfies - we want to place ourselves in the location or at the event instead of capturing the feeling of the event.
- Blurry Shots - we keep a fuzzy shot instead of deleting it because it was the only one we got, and we believe it has value.
- Multiple Photos Of The Same Subject - failing to edit our photos in order to delete the junkie ones.
- Photos Lacking Strong Composition - "getting the job done" instead of focusing on good composition and quality photo worth framing.
- Photos That Don't Make Sense - we take photos that beg the question, "what were ya thinking when ya took that?"
- Boring Non-Artistic Shots - failing to take photos that make others think about what they are seeing in a different way.
Pictures Can Be Art - And Still Tell Your Story
A photo is more than a captured moment.
Technology has given this generation a rare opportunity to capture the every day moments in our lives and transform them into memories we can hold on to and relive. It is an exciting time for armchair photographers and professionals alike. So, now that we have all these chances to capture the world around us as digital photographs, how do we make what we capture art, instead of a collection of mundane cliches?
Scan through the photos you have seen on line, or look in your phone's album and examine the "sameness" of the images collected for recalling events in people's lives. Really look at them. What do you notice? I would venture to guess you will see a few things consistently:
- Wide Angle Shots - When people visit a place and want to memorialize that location, often the only photos taken will be overly wide angle shots with no focal point. An overview if you will, a quick snapshot of the whole location, in hopes of not missing anything.
- Selfies - This term actually made it into the Oxford English Dictionary and refers to a photo taken of oneself using a digital camera or smartphone. People take a lot of these in order to place themselves at a location so they can show their friends or remember the moment.
- Blurry Shots - It is obvious a particular photo may be "just a little blurry" yet we keep them anyway, mostly because it may have been the only shot we had time to take and we want a memory of that place or situation. In spite of how disturbing it may be to the eye, we even post them on line with something of an excuse note apologizing that it was fuzzy.
- Multiple Photos Of The Same Subject - Some places or events deserve to be captured. And capture them we do. In fact, I would wager that in your phone right now there is at least one location you have photographed no less than eight times, just to be sure you didn't miss anything. It's okay, we all do it, and sometimes we just forget to go back and pick the best one or two and delete the rest.
- Photos Lacking Strong Composition - Something we should always consider in taking a photo is the way we choose to compose the subject. Because of smartphone photography and the fact that digital media allows almost unlimited shooting, we often fail to consider the final product and substitute quantity for quality.
- Photos That Don't Make Sense - Each of us possesses a photo or two that we look at later and think, "Why did I take that?" or "What IS that?". It happens, at the time something seemed like a good idea and then later we re-evaluate that and realize, "hmm, not so much..."
- Photos That Capture Familiar Items Or Places In Boring Ways - People visiting a place or attending an event seem to take photos of the exact same things which others have photographed. That's fine, but perhaps we could add into the mix a few photos that allow the viewer to see something familiar in a completely different way. Crafting something artistic and spectacular instead of commonplace.
There are probably a lot of other things you will notice as you scan through the collections you are viewing. That's a good thing - only in viewing and thinking about art can one become more educated ad capable in evaluating what art really is, and what may be exciting - interesting - worthwhile - for others to see and enjoy. So, you know what some of the things to avoid look like - now - how do you create more artistic photos in the future?
Read on friends - perhaps this article will help. At the very least, you'll be able to take a few truly interesting shots that may even be worthy of framing.
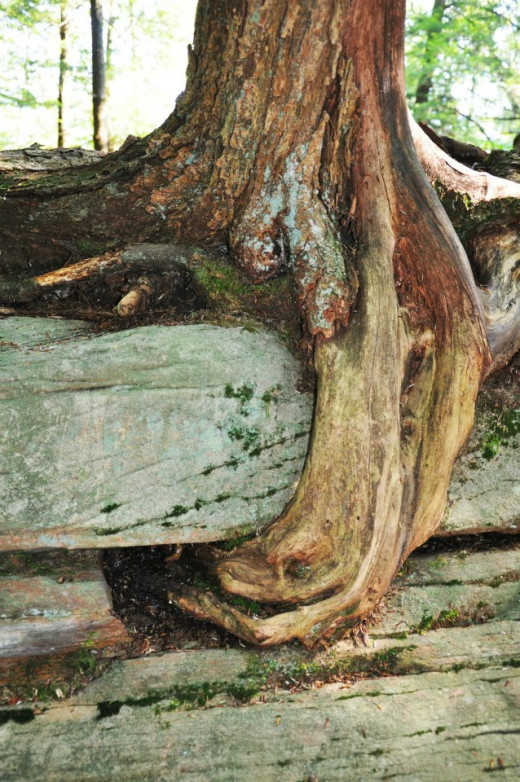
Cool - Not Sure What It Is - But It Is Awesome
How Can I Take More Artistic Photos?
Now that you've had a moment to look through the ordinary photos we all tend to take, let's focus (pardon the pun) on how to add a few artistic and interesting photos to our library. Rather than just starting to take photos differently, let's actually make a conscious decision to go and photograph something mundane and boring in a more exciting way.
In addition to explaining how to take more exciting and artistic photos, I also will offer you a couple of activities that will let you try it as you go. You can do these using every day objects that are probably easy to find in your immediate area. Hopefully you will be able to not only read about the why's and how to's but to also experience the excitement of taking some really cool photos that you can share with friends and family. Below is an overview of what we will try together, your assignments will be found below this section.
Good Composition Makes All The Difference: Anyone can take a photo of an object or place, however, taking a good photo requires a little thing called "good composition" There are a lot of things that go into good composition. Picking an interesting subject is important but more important is how you place that subject in the frame. We will try a few things to help you compose a more pleasing photo. We will look at the rule of thirds; lines that lead the eye; symmetry; and balance. There are a lot of other aspects to good composition but to start these are good things to consider. You can look up more topics related to symmetry just by plugging "good photo composition" into your favorite search engine.
Close Up Is King: Yes, it is fine to simply aim your camera or smartphone at a flower bed or a train parked in the station and click away. Everyone likes a nice wide angle shot to give the flavor of a place or object. That said, why not take an extra minute to get up close and personal with a familiar thing? It can truly change your perspective and give new life to something we've all seen before. We will be playing with the concept of good composition in a close up of a familiar object.
Color and Texture Really Do Matter: When choosing what to photograph it really helps to consider whether there are interesting elements for a viewer to connect with. Two very important elements are color and texture. These two factors can make or break a closer look at something. Look for interesting colors, rust, cracks and variations in texture or the color that covers an object. That will be the most interesting part of a close up photo, and can make a simple picture into something truly artistic.
Editing and Cropping Change Everything: Ok, so you have used the lessons below to take come pretty cool photos - now what? We will look at editing using filters, saturation of color and good effective cropping to create a piece of art instead of a "what was I thinking" photo together.
Again there are dozens of things that can help you create a good photo - and you should spend time on line searching other good photography techniques - my goal is to help you start walking down this exciting path of creativity and allow you to explore more options on your own. So, how about we get started? Your assignments follow, with example photos for you to consider as you start to capture art with your digital camera or smartphone.
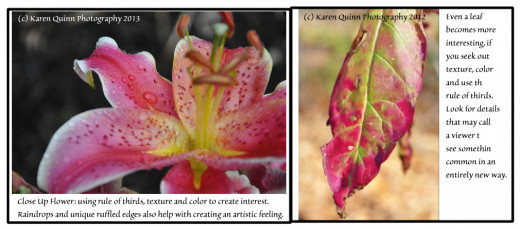
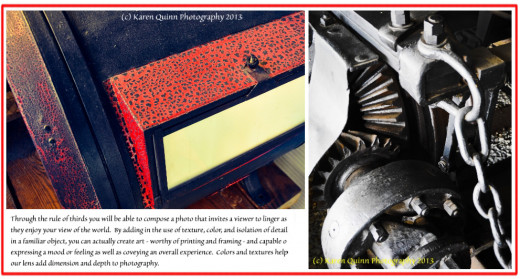
Example - Rule of Thirds

Assignment 1 - Good Composition In Close Up Photos
Assignment - Flowers or Plants: Do you have a house plant, flower bed, bouquet of mixed flowers someone gave you? Can you take a walk to a place where there may be some flowers or interesting plants? That's your first assignment. Assuming you have the plant or flower available here are some things to try.
- Take a close up photo of the entire subject. It could be a leaf, a flower, a few flowers or the whole object as long as you don't include a lot of background stuff. When doing so, avoid placing the weight of the subject in the dead center. Good composition has a lot to do with the quality of a photo. Photographers often use "the rule of thirds" which basically says to divide your viewfinder or screen into 3 equal sections. You then use the imaginary lines that separate each third and place your subject's weight along one of those lines. The thirds can be horizontal or vertical. (see photo to right) Take your Photo so the heaviest part is along one or two of the lines that create your thirds, instead of placing it dead center.
- Take a close up photo of a very small piece of the subject. Look at the subject like an artist would, SEE the details. Perhaps the little freckles on the petals interest you, or maybe you like the way the stamen enters the stem. Is there a jagged tip on a leaf or an interesting shift in color near the center of the flower? Is there an amazing texture at the center of the flower (the disk or eye) that creates interest? Get as close as you can while still having a clear photo. HINT: You can use the flower macro or setting on most devices which helps in getting a clear close up - look for an actual flower button or setting and select it - your camera will adjust the depth of field and other settings to allow clear focus when shooting close up.
- Take a close up photo of a flower that has been in the rain. When the opportunity presents itself, be sure to take a photo of a wet leaf or petal on a flower after a rain storm. The effect is amazingly dramatic and artistic. Be sure to focus well on the raindrop more than on the actual petal or leaf, and then try focusing more on the leaf than the raindrop. You will be amazed at your results.
Examples For Assignment 1
Assignment 2 - Close Up Texture and Color
Assignment - Close Up Photos NEED Color or Texture or BOTH: Somewhere nearby there must be an old railroad yard, or an old farm with rusting equipment and buildings. Perhaps just a junkyard or a structure with interesting architectural details? Well, this assignment needs you to locate such a place. I have chosen farms and rail yards because they often possess very colorful, rusty objects with interesting lines and details - all of which make for excellent art photos. Walk all around the object you have chosen to photograph. Find a small item on that object that is rusted or broken in an interesting way or that has truly rich colors to enjoy. The item you choose should immediately invite you in - you need to like the objects you capture because your feelings about a thing are easily perceived by those viewing your photos.
- REMEMBER you are always going to use "the rule of thirds" for these assignments. Imagine the viewfinder having those 2 lines that divide the screen into 3 pieces and use the imaginary lines to hold your subject's weight horizontally, vertically or both. (See photo example above)
- Get close to the item you have selected, and just look at the item through the viewfinder. Move around while looking at it, a little higher, a little lower, tilt the lens, allow light to hit the item in ways that best embrace the colors or textures you like about the item. Take a couple photos - sometimes when you see something on your computer it will look different than it did through the viewfinder. Give yourself a fair chance to capture something amazing.
- Get even closer and try again. Then get a little farther away and try yet again. You will be able to crop photos while they are in your computer and sometimes close ups taken with a less than excellent lens can be blurry so, stepping back a tad and getting a wider view that can be cropped is a good backup for you if this should occur.
- Import these photos into your computer and keep the ones which are clearly focused and interesting to look at as well as hi-lighting your textures and/or colors. Delete the junk. There will be junk - and we all need to work on our ability to keep only that which we would be proud to have others see.
I want to encourage you not to be disappointed if your first attempts are not spectacular. This is a new technique and it takes time to learn and experiment with things we've not tried before. Be patient. Trust your eye and know that in a very short time you will actually start to see things around you as though through your lens as opposed to seeing them like the average people around you are seeing them. You will get there, allow yourself the time to practice and experiment. In time it will become second nature for you to envision the shot you want.
Assignment 2 - Example - Texture & Color
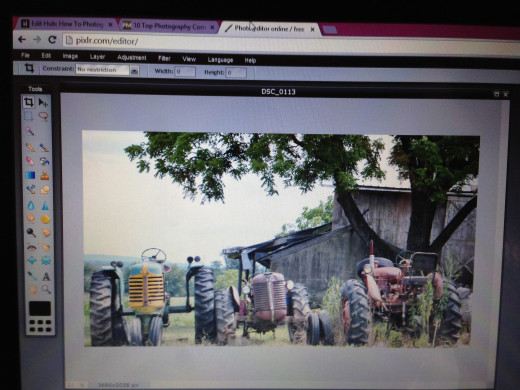
Pixlar Home Screen
Assignment 3 - Cropping & Editing to Enhance Artistic Elements
Assignment - Cropping and Editing Close Ups Artistically: Now that you have taken some interesting close up photos with texture and color, let's use your either your computer's photo editor or use Pixlr on line to edit your photos, turning them into something called "Art".
- Choose a photo you've already taken and that you like enough to want to take the time and effort required to edit it creatively.
- If you have a good photo editing software like Adobe and know how to use it, then you can use that software and adapt these instructions to fit your program. Otherwise, open the website http://www.pixlr.com and once on the page select the option for "pixlr editor". (this works entirely on line and can save to your hard drive once complete) Please note there are dozens of on line editors that are excellent - my preference tends to be Pixlr and so I thought you may like to try it since that is most familiar to me.
- A menu will appear - you want to choose "upload a photo or file" and when the window prompts you go into your hard drive using that window and load the photo you wish to use for this assignment.
- To give you better visibility, when the photo opens on Pixlr, click the window button above your photo to expand that photo so it fits the screen.
- On the left edge of the screen there is a tool bar - the first tool you want to play with is the crop tool. It is the upper left corner tool on that left side tool bar. Click it and move your mouse over the photo. Select the area of your image that you would like your final artwork to contain. Crop out background junk you don't need, and focus on a point of interest. BE SURE IT FOLLOWS YOUR RULE OF THIRDS. Yes you can center things or use other formats later but for our lesson let's keep with that rule. Cropping requires you to click at a point and while holding down that click, drag to surround the desired area. Then let go of the button. You can then adjust or fine tune your crop area by dragging the little squares about. Once you like the selected area simply hit enter. The editor finishes cropping automatically.
- Once it is cropped your choices are varied and exciting. While there are a lot of options on the left side tool bar, we won't be using them for this lesson. Look at the menu along the top edge inside the black bar (writing will be white) Hover over the word "Adjustment" and then on the drop down pick "Brightness & Contrast'. A box will pop up. Play with the sliders - see what they do. The brightness setting is good if your photo is dark or overly bright but your best friend will be the contrast slider. With art photos, it is almost always helpful to push your contrast to the right or the "more heavily contrasted" side of the scale. This makes the difference between dark and light more dramatic. It also sets you up for saturating the color in a more striking way. Try it different ways and save the one you like best to your hard drive just in case you lose the page - you can always re-open.
- Now that you have your contrast and brightness where you like it, let's work with color saturation. Again hover over the word "Adjustment" on that black tool bar up along the top of the editor window. On the drop down select "Hue & Saturation". A menu box will appear. Hue is something to be careful with, you may want to shift that a little up or down depending on the level of realism you like, but generally as a beginner, it is best left alone. Focus instead on the center slider, "Saturation" and play with that slider until you find the amount of rich color and drama you would like in your art. I tend to be heavy handed with saturating photos because the intensity of color pulls a viewer's eye into your work. Once you are happy with that setting you can play with "lightness" again, this is often best left alone as a beginner. Save your work to your hard drive and add the number 1 to the end of the name so you can find it later.
- Go back to that "Adjustment" selection and this time pick "Color Vibrence" when the menu box opens, play with your vibrancy options. I tend to pull it to the more vibrant side. You may prefer something different. Again, save your work with a number 2 after the name so you know how to find it later.
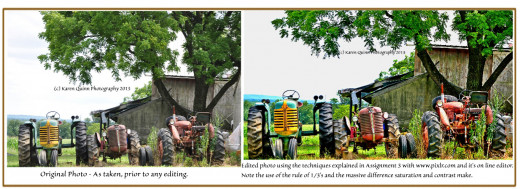
- For the purpose of this Assignment, we will be finished there. Your final work is the one you titled with the number 2 at the end. In my example below you will see the original and the edit done using Pixlr.com so you can appreciate the change it makes to edit well when creating art.
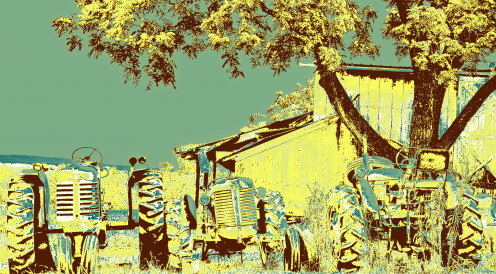
- Want to take it a notch farther on your own? There is a menu called "filters" try each of them. Some are spectacular. Save the ones you like. I have chosen one filter and saved my project again after using that filter so that you can see what it may look like to apply a filter called "tritone" and in that filter i chose the blue option. There are many other choices, try them all.
The only limit to creating art photography with editing and cropping is the amount of time and imagination you are able to give to the process. Every photo has the ability to be spectacular, as with any art the definition of "spectacular" is up to the artist. Give your inner artist permission to experiment and emerge.
Assignment 3 Example - Before & After
Assignment 3 - Extra Step - Filtering - Tri Tone Blue
Help the Author Know What You Need
What topic in this article has been the most helpful to you:
Some Final Thoughts To Consider
It is my hope that through this article you have learned some new ways to look at digital photography and art. I am also hopeful that you feel more confident in composing your shot, selecting interesting close up subjects, and using creativity in editing. It can be refreshing to try some things that may be outside of your photographic box and to experiment with allowing your eye to see more creatively.
If you would like to continue experimenting, consider doing the assignments again but adding in a few other elements as you form your shot. Consider using "leading lines" that begin in a corner and lead a viewer's eye to the most important aspect of your photo; try taking photos of objects with very symmetrical lines or shapes and placing them in your photo so they fill the space evenly (architecture is a good place to find this). Read other articles about art photography and unleash your inner photographer.
Enjoy - and always - express yourself artistically - it's good for the soul.
© 2014 Karen Quinn