- HubPages»
- Arts and Design»
- Graphic Art & Design»
- Design Software
How to Add Strokes to Text in Photoshop

Strokes are the marks made by pencil, pen or paint brush. In Photoshop, strokes can be added to text or objects. Strokes on the text are the lines drawn outside, inside or the center of the text. You can add single or multiple strokes and create fancy texts. Strokes on text give extra dimension to the word art. It is not only easy but also fun.
While working with the stroke styles, make sure you align your Layer Style box just below the text in the document. This will allow you to see the changes being made.
Here is the step by step guide to add single or multiple strokes to text in Photoshop. Learn how to apply strokes on the text and express your creativity in word art.


How to Add a Stroke to the Text in Photoshop
Click Text tool, and write the text. Choose font, size, color, orientation and text wrap of your choice.
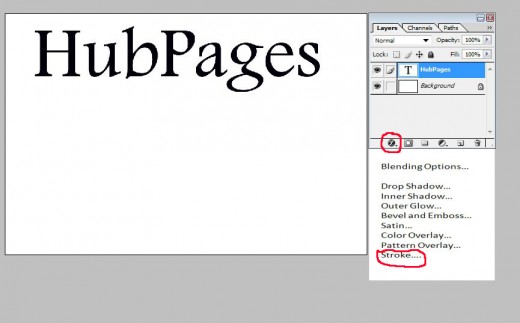
Click layer style icon on the bottom of the layer palette and select Stroke from the drop down menu. A dialogue box will appear. Check stroke. (You can also double click the text layer for layer style dialogue box, and then choose stroke.)
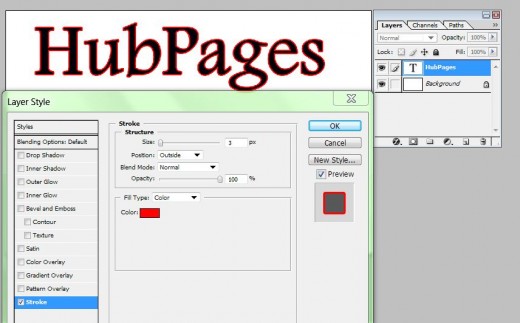
In the layer style dialogue box, you will have multiple options.
To change the color of the stroke, click the Color box and select the color.
To change the size of the stroke, drag the pointer on the Size bar.
Click on the Position box to position the stroke inside, outside or center.
You can choose blend mode and opacity of your choice.
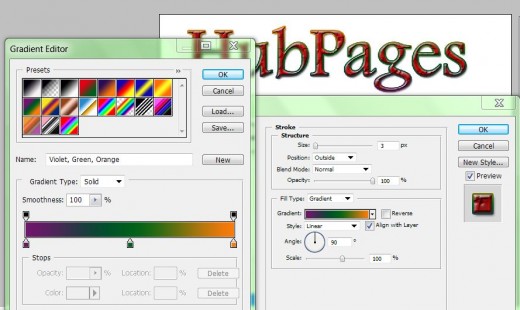
Click the Fill Type box, you will get three options for strokes fill. You can choose Color, Gradient, or Pattern.
When you chose Gradient and click the gradient box, Gradient Editor dialogue box will appear. You will have options to choose the presets of your choice.
If you choose Pattern and click on pattern box, a dialogue box will appear. You can choose pattern to fill in your text. If you have your photo as a Pattern, you can fill it inside the text. If you want to create a new Pattern, open the photo, or select the area in your photo, which you want to use as the pattern. Go to Edit, Define Pattern and then click OK.
After you are satisfied with the result, click OK.


How to Add Multiple Strokes to Text in Photoshop
Type the text.
Click add layer style icon or double click the text layer. A dialogue box will appear, click Stroke.
Increase the size of the stroke by dragging the pointer on the Size bar.
Choose the Color of your stroke. And hit OK.
Right click the text layer. From the drop down menu, select Convert to Smart Object.
Now, open the layer style dialogue box again and go to stroke option.
Increase the size of the stroke and choose different color for the stroke. Hit OK.
You can now see two different strokes on your text.
You can repeated the process again (convert to smart object) to add more strokes.
In the Layer Style box, you can click Style and experiment with different styles. You check drop shadow, inner shadow, outer glow, inner glow, emboss etc. and get amazing results.


