How to Build a Farmhouse Style Shelf

Betty's Difficulty Scale
Help Me
| It's Not Too Hard
| I Got This
|
|---|---|---|
*****
|
Think You are up to the Task?
So you are wondering if you can build a shelf yourself. If you are a lady like me, you generally were told to do "ladies work". I have always loved woodworking and enjoyed crafts from a young age. Well I am here to tell you we girls can do it all. With a few tools and materials you can create your own, one of a kind, shelf.
How Cool is This Shelf?

Let's Get Ready to Build
Make sure you have safety glasses.
Materials
- 2- 1 x 12 x 6 pine boards.
- Wood glue.
- 1 5/8 finish nails or 1 5/8 wood screws.
- 3 or 4 pegs or coat hanger hardware.
- Paint of your choosing.
- Stain.
Don't Forget Ear Protection
I am sure you would like to keep your hearing the best it can be. Make sure you grab ear plugs or earmuffs.
Tools
- Hammer
- Nail Gun if you have one
- Mitre saw or jigsaw
- Speed square
- Clamps if you have some
- Tape measure
Cuts Needed for Project
Cuts
| Lengths
| Quantity
|
|---|---|---|
1
| 60"
| 1
|
1
| 58"
| 1
|
2
| pattern of your choice
| 2
|

Let's Get Started
Once you have all of your materials and tools together, you can start to build your shelf.
Just remember, you can do it!
Measuring and Cutting
- Measure your first board to 60".
- Using your speed square draw a line across the board. This gives you an easy guide when cutting.
- Cut your piece of lumber using whatever cutting tool you have available.
- Set that piece aside.
- Measure your second board to 56".
- Repeat step 2
- Repeat step 3
- Set that piece aside.
- Take one of the leftover boards and draw a decorative brace.
- Make sure the brace is 12" wide
- The length you make it can be your choice.
- BE CREATIVE! This is your own original piece.
- Cut your pattern and use it to make another brace.
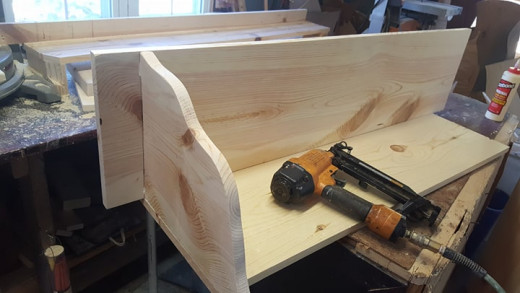
It is Time to Put it All Together
- Measure in 2" on each side of the 60" board.
- Using the speed square, draw a line across the width of the board.
- Repeat step 2 on the other end of the board.
- Put a bead of glue along the whole length of the 56" board.(On the 1" depth of the board).
- Nail or screw the 2 boards together in a L pattern. Making sure the shorter piece is nailed to the 12" side of the board.
- Measure in 1" from each side of the 60" board.
- Using the speed square, draw a line on each end.
- Put a bead of glue on your decorative brace piece along the sides that you will be gluing.
- Using your 1" line nail your brace the top side first. This would be the 60" piece.
- Repeat step 9 for other support.
- Flip the shelf so you can nail the support on the shorter board.
- You can then add some nails to the top of the shelf for added strength.
- Use clamps if you have them to close any gaps.
- If you don't have clamps, you can just use your own strength.
Finishing Up
A Finish Like Mine
- Paint the whole shelf black and let dry
- Paint the whole piece granite gray and let dry
- Sand entire piece with 220 grit sand paper.
- Distress the edges with the sand paper. The more you sand the more distressed it will be.
- Wipe the shelf after sanding.
- Stain entire shelf with Minwax Dark Walnut.
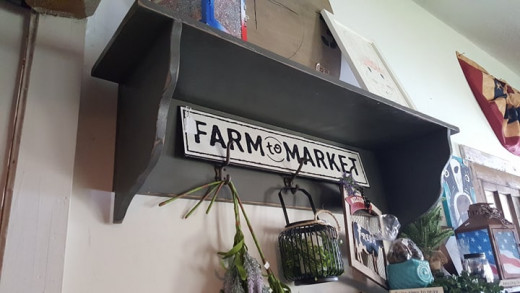
Added Touches
- Add your hardware. You can use as many as you want. Just make sure the hardware looks even.
- Make measurements first and mark them. It makes it so much easier.
Finished Shelf
What Did You Think?
Did you find this project easy?
This content is accurate and true to the best of the author’s knowledge and is not meant to substitute for formal and individualized advice from a qualified professional.
© 2020 Betty Lamont