How to Build a Homemade Photography Lightbox

Advantages of a Lightbox
Why Build a Lightbox?
Before we start, keep this in mind: it will save you both time and labor to buy yourself a nice, mid-sized lightbox that's both easy to use and store. I use the one listed on the right, which folds up nicely into my closet and is easy to carry to the office. But when I started taking photographs, it was for an amateur food blog, and I wasn't sure I wanted to spend the money - at the time, I didn't have much. So, I built one, and it changed how I take pictures forever!
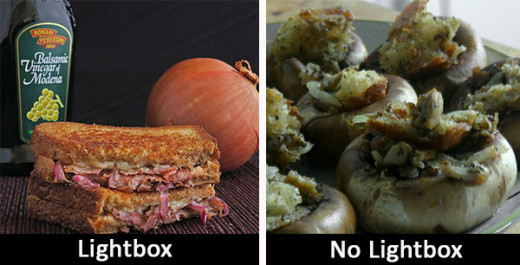
You can see the difference above. The shot on the right was taken in a poorly lit corner of my kitchen, while the one on the left was taken using the lightbox I'm about to describe how to build. Notice how evenly distributed the light is, which allowed me to create certain effects by playing with the camera settings. With the shot on the right, I was lucky if someone could even tell what I was shooting.
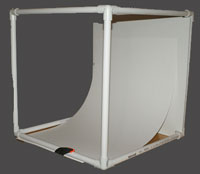
A Homemade PVC Lightbox
How Does a Light Box Help My Photography
You may have tried to take pictures of products or meals where the light was too harsh in a certain direction and created long, awkward shadows, or washed out what you were shooting with a white glare. A light box allows you to attach lighting from any angle you want, and can buffer light through a fabric, washing out shadows and cutting glare down significantly. If you want, you can even use a colored fabric to create some cool effects, or to help balance the color of different kinds of bulbs.
Get Yourself Some PVC


Building Materials
- Twelve (12) pieces of 1" round, 2' long pvc pipe
- Eight (8) 1" round pvc elbows three female connections (see image)
- One (1) relatively thin piece of white fabric (like a window curtain), roughly 2' x 7'
- Two (2) short screws
- One (1) large piece of white or black posterboard about 23" wide (Keeping one of each on hand is a good idea)
Building the Lightbox
- Take one of your 2' long piece of pipe and attach an elbow joints to either side of it, and lay it down on the ground so, with both joints, there is one connection facing up towards the ceiling.
- Attached another 2' long piece to one of the elbows so it is also laying on the ground.
- Get two more piece of pipe and two more joints and repeat steps one and two.
- Connect the two assemblies at the elbows connections that are NOT facing towards the ceiling - this will make a square.
- Make a new square by repeating steps 1-4.
- Take one of the square assemblies. One one of the pipes, mark two spots with a marker - each about about 6" away from the center of the pipe. THIS SHOULD BE DONE ON THE INTERIOR side of the pipe - the side that faces the inside of the square.
- Carefully screw the two small screws into those spots - leave the screws sticking out about a 1/4 of an inch.
- Leave both square assemblies on the ground with the remaining elbow connections facing up towards the ceiling. Take the remaining 2' long pieces of pipe, and insert them into the up-facing elbow connections into the square WITHOUT the screws.
- Pick up the the square with the screws, and with the screws positions on the BACK pipe, insert the four upwards facing pipes into the remaining joints, creating a cube.
- Take your poster board, and hold it up to the two screws, and poke holes so the posterboard can hang on the two screws. If you need to, cut the posterboard so that it fits.
- Drape the fabric over the box so it covers the top and hangs over either side of the box. This is your lighting buffer.

Lighting for Your Lightbox
Lightboxes can be used a variety of different ways with all sorts of lighting sources. Take your lightbox outside on a bright, cloudless day, and your new creation will give soft, natural lighting for your photograph. Or attache 3 clamp lights with high wattage bulbs facing inwards from the left, right and top of the box, and you can create professional, even lighting in the darkest of rooms. I find that four clamp lights with bulbs above 75 watts tend to work well with a 2' lightbox - just watch that your bulbs don't get too hot, or they can burn the buffering fabric.
Also remember, you probably can't shoot every subject with the exact same lighting setup. Play with your light, use different sources, and try to have fun with it. Getting the lighting right in a photograph rarely happens on the first try, and while the lightbox is a fantastic tool, it doesn't solve all your lighting problems.
That's all there is to it - all it cost you was the price of materials and a little bit of time, but it's a small price to pay for professional looking photographs!
© 2014 J. Ezra Gordon
Related

How to Build a Two-Story Shed, With a Lot of Help!

How to Make a Photo Light Box on a Shoestring Budget

Building Wooden Boats - Speculation on a Joint Adventure

Making Bespoke Dimmer Switch Unit to Use With Halogen Lights For Photography Studio Lighting

Tips for Doing High-end Photography on a Shoestring Budget


