How to Capture Color with GIMP

A Gimp Tutorial
We all take pictures and often times, once we pull an image up on our computer screen, we notice a blemish or some other oddity in an otherwise good picture.
What to do?
You can use the color picker tool in GIMP to help you get rid of those imperfections. No one will ever know that your photography skills aren’t perfect of that your pictures weren't perfect in every way!
GIMP is a free photo-editing program. Its letters stand for “Gnu Image Manipulation Program.” Within the program itself are lots of tools to help you create the best images possible. If you don't want to pay hundreds of dollars for a photo editing program, this is one of the best I've seen out there.
Why Use the Color Picker Tool?
Besides helping to rid your photos of imperfections, you can use this tool to help you get rid of unwanted objects in pictures. For example, I took this picture on a recent hike:

There was a car in the picture and I wanted to get rid of it. I used the color selector tool to match up the colors and “painted in” where the car was.
If you had not seen the before and after pictures, you wouldn’t be able to tell there was a car in the picture in the first place:

In addition, if you have an image where you want to match text to a color in the picture, you can use the color picker tool to help you with that.
In the picture below, I wanted to select the red color to create text that would match it:
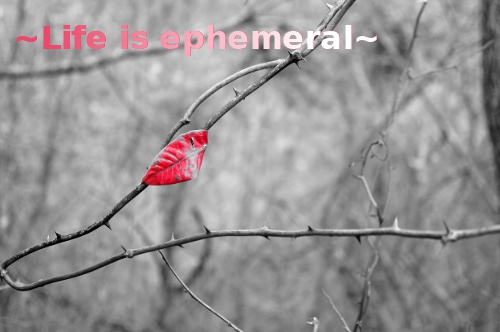
How to Capture Color
Open up GIMP. Upon opening, GIMP will default to displaying a tool box on the left side of the screen. In the second row there will be a tool that looks like an eyedropper (again, assuming you’re on default settings). Select that tool and you’re ready to find the colors you need on your picture.

Now take a look at this picture:

Matching Colors
On the gold ornament in the center of the above picture, there are a couple spots that are a bit distracting. We want to get rid of those spots to improve the overall quality of the picture.
Let’s work on one spot at a time; we’ll tackle the top little spot, first.
Using the color picker tool, select an area next to the spot. If you don’t, the colors will not match exactly because of various degrees of shading:
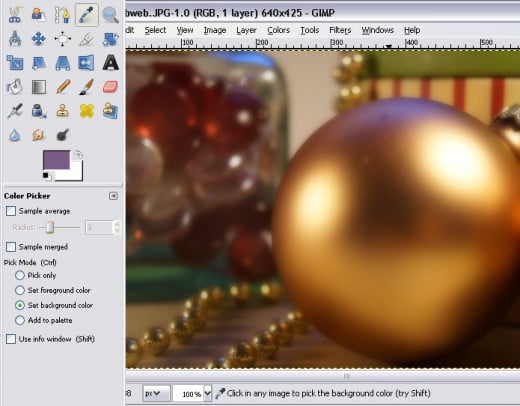
The color picker tool came up with a color that looks like a dark lilac – no where near gold! But those are the colors of the pixels right next to where the first spot is.
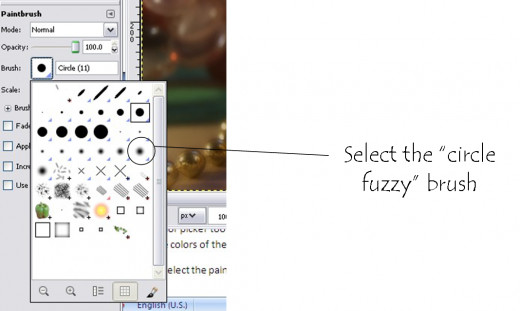
Now, select the paintbrush tool. For the actual brush, you’ll want to select a “fuzzy” brush so that it feathers your edges and helps to hide your edits a little more:
Now, start painting over the spot. You may find it better to do short, small strokes rather than one large one. Large strokes tend not to blend as well:
Do you photo-edit a lot of your images?
Use the Smudge Tool
Do the same for the other spots.
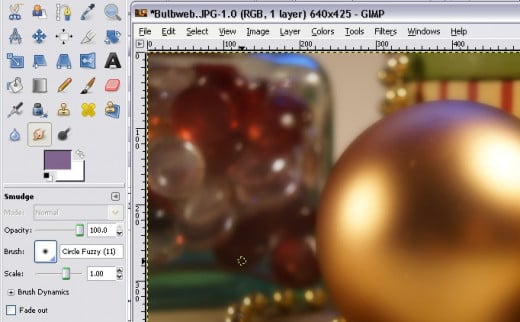
Sometimes it can be hard to match up the colors perfectly. When that happens, you can use the smudge tool (it looks like a little index finger pointing near the middle of the toolbox) to help blend the colors more effectively.
Just remember, you’ll want to do short strokes, even “dots.” That helps to keep the colors matching better because if you do one long stroke, the chances increase that you’ll move into an area with a different color than your brush.
Here’s what the finished picture looks like:

Of course, once you get the hang of this, then you can try different things. For example, you can choose a brush with a different “tip” for interesting effects:

By color matching all the “shining” areas of the photo, and then using a texturizing brush, I added an interesting effect to it:

The Color Picker Tool Works Wonders!
Thus, the color picker tool has a number of applications that you can use to really do a lot with just one photo.
© 2012 Cyn Lee

