- HubPages»
- Arts and Design»
- Graphic Art & Design»
- Design Software
How to Clone in Photoshop Using the Stamp Tool

Clone Stamp: Photoshop Basics
The clone stamp in Photoshop is an incredibly useful tool. If you haven't used the clone stamp yet, you haven't really seen how powerful Photoshop can be. This tool allows you to sample a portion of an image and then paint that portion onto other areas of a image. You can also use the tool to sample from one image and paint it into another file as long as they use the same color mode. The clone stamp tool is incredibly useful for removing defects during retouching or to duplicate portions of a photo.
The photo in the video above was taken from stock.xchng. If you would like to use the same photo it can be found here. In the video I am using Photoshop CS4.
Using the Clone Stamp Tool
Using the clone stamp tool in Photoshop is incredibly easy. In just a few simple steps you'll be cloning things left and right.
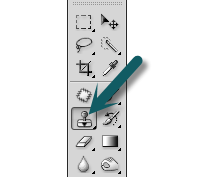
- First you need to select the clone stamp tool. The tool can be found in the tool menu and looks like a stamp. It is located on the upper half of the menu if you can't find it.
- Now that you have selected the stamp tool you will need to create a sample. A sample is what you will be painting with. To choose your sample hold down the "ALT" key and click on the area you want to sample. When you hold down the "ALT" key your cursor should change.
- Lastly, you simply need to paint by holding down the left mouse button and moving your cursor over the areas you want to paint. As you paint you will see that you will actually be painting with other portions of the image.
Settings for the Clone Stamp
When using the clone stamp tool you will have several settings that you can choose from. Below I'll go over each setting and how they work.

Brush Setting: This setting is located on the far left of the menu bar and allows you to adjust the type of brush the tool will use. You can adjust the size and softness of the brush. The softness creates a gradient on the edge of the brush which is very useful for this tool. I suggest when you use the clone tool to retouch a photo that you use a very soft brush. When you want to duplicate an item in a photo you can use a hard brush.
Mode Setting: If you are not very familiar with Photoshop this setting could be confusing. Basically, this setting sets the blending mode for the brush. In most cases, "Normal" is what you are going to want to use, but feel free to experiment with the different blending modes.
Opacity: This setting determines how prominent you want the paint to appear on the photo. A low setting will almost be transparent and a high setting won't be transparent at all. Lower settings can be useful for touching up photos.
Flow: This setting is very similar to opacity. It determines how much paint to put down when using the tool. I personally never make adjustments to flow. If you have a tablet you may want to set this to pen pressure.
Aligned: If you choose this option the clone tool will continuously draw from where you left off even if you release the mouse button. If you don't choose this option you will find that when you release the mouse button the clone tool will jump back to where you originally sampled.
Sample: This setting determines which layers the sample will be taken from. You can have the clone tool sample from several layers or just one layer. Make sure you do not have an adjustment layer selected because the clone stamp tool does not work with adjustment layers.
Example
Click thumbnail to view full-size


