How to Create Super Cool Grunge Heart in Photoshop

In this tutorial I am going to show you how to create unique Grunge Style Heart in Adobe Photoshop. We are going to use Custom Shape Tool, Blending Options, three rasterized strokes and two Textures- one for the Background and one applied on the Heart. Both textures are my own photos and unrestricted stock so you won't bother for author's rights or stock images. Of course, you can add another textures if you prefer to achieve different effect.
You can create this Grunge Heart in every Photoshop version. Programs like Adobe Illustrator are applicable too.
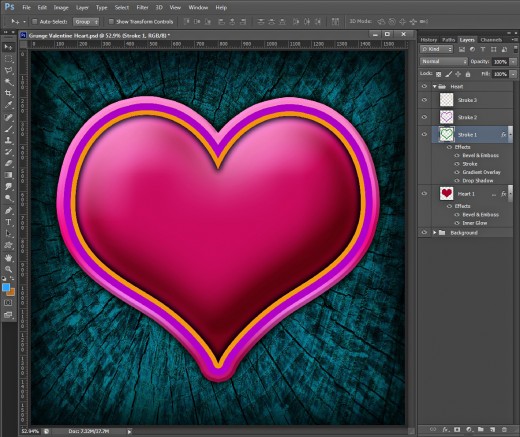
This is the final result:

![Adobe Photoshop Elements 2018 [Old Version]](https://m.media-amazon.com/images/I/51AQ4wl7eOL._SL160_.jpg)
STEP 1
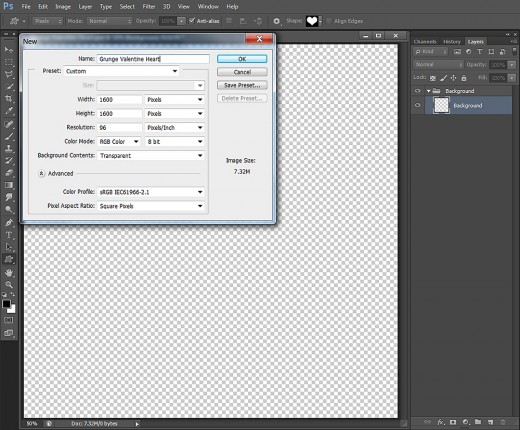
Start your work by opening Adobe Photoshop document and going to File, New to create a new .psd file. In Name field insert Grunge Valentine Heart. Set both Width and Height to 1600px in order to get a square canvas. Insert 96 Pixels/Inch for Resolution and select RGB from the Color Mode drop down menu. Select also Transparent for Background Contents so that your Layer 1 to become automatically editable.
If you would like to print the grunge heart when you are ready, set the Resolution to 300 Pixels/Inch and select CMYK for Color Mode.
Double click on Layer 1 name and insert Background in the white space to rename it, then press Ctrl+G (Layer, Group Layers) to place it in a Group. Call the Group Background too.
Fill the Background with Blue, Create Dark Vignette then Add Three Trunk Texture
In Steps 2-6 you have to fill your Background layer with soft blue color then apply Inner Shadow effect with increased Size and Choke values to create transparent dark Vignette.
When you are ready with the first layer in your Background group, you have to Copy and Paste awesome Three Trunk Texture in a new layer on the top of the group, resize it and change its Blend Mode to make it translucent and blend it with the blue layer below.
STEP 2
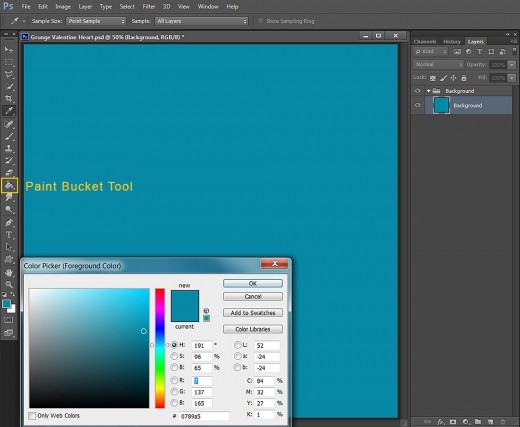
Now select the Background layer, not the group, and navigate to the Tools bar. Click on the Set Foreground color swatch and insert #0789a5 in the Color Picker dialog box. Grab Paint Bucket Tool and drag on the canvas to colorize it in dreamy blue.
STEP 3
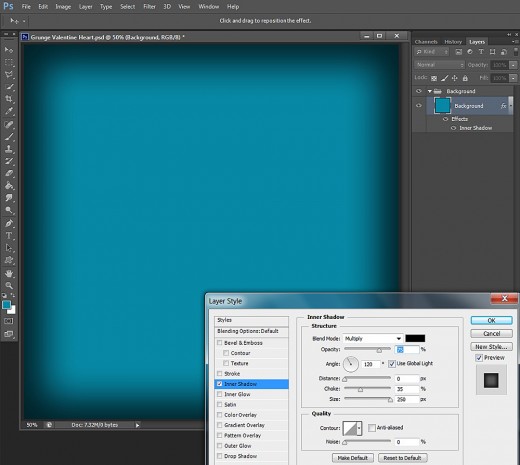
Double click on the blue Background layer's thumbnail to call Layer Style dialog box or go to Layer, Layer Style, Blending Options. Tick Inner Shadow and insert the following settings:
Blend Mode: Multiply
Color of Shadow: #000000 (black by default)
Opacity: 75%
Angle: 120 degrees
Use Global Light: ticked
Distance: 0px
Choke: 35%
Size: 250px
Contour: Linear
Anti-aliased: unchecked
Noise: 0%.
Press OK button to close Layer Style box. We finished our work on the first Background layer.
STEP 4
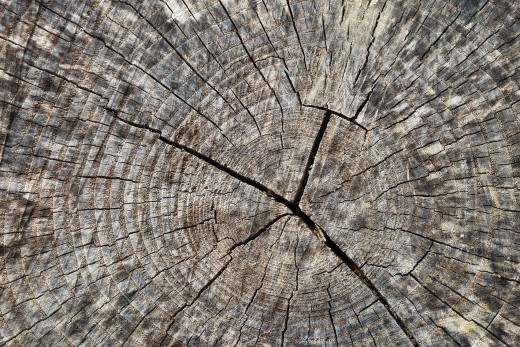
Click on the Tree Trunk Texture shown below and when it opens in a new window, right click on it and select Save Image As to save it in the respective folder on your computer.
STEP 5
Create a New Layer on top of Background group and name it Tree Trunk Texture. Keep this new layer selected as we are going to work in it in this and in the next steps.
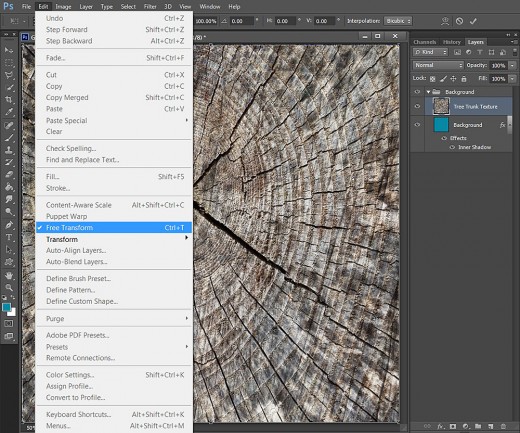
Open in Adobe Photoshop the Tree Trunk Texture you already downloaded, press Ctrl+A to load selection on the whole Texture image then press Ctrl+C to copy it. Go back to your Grunge Valentine Heart document and press Ctrl+V to paste the texture in the Tree Trunk Texture layer. You see that the texture is a bit bigger than your canvas, so go to Edit, Free Transform and drag the nodes vertically and horizontally to resize the texture so that it covers your canvas. Don't forget to press Enter key to apply the Transformation.
STEP 6
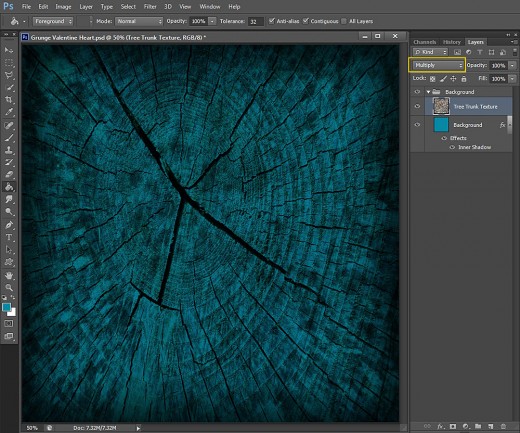
Change the Blend Mode of Tree Trunk Texture layer to Multiply.
Draw Heart Custom Shape, Duplicate its Layer and Apply Thick Colorful Strokes
In Steps 7-14 you should firstly draw red Heart Card Custom Shape of Fixed Size and Pixels Mode. Secondly, you have to create three duplicates of the Heart shape and reduce their Fill Opacity to 0%. Your next step is to add thick strokes- green, purple and orange to each of the duplicates, then apply pink Inner Glow and 3D Effect to the original Heart layer. At last you have to rasterize the three Stroke layer styles because we are to add more Blending Options to each Stroke layer at the next stage of the tutorial.
STEP 7
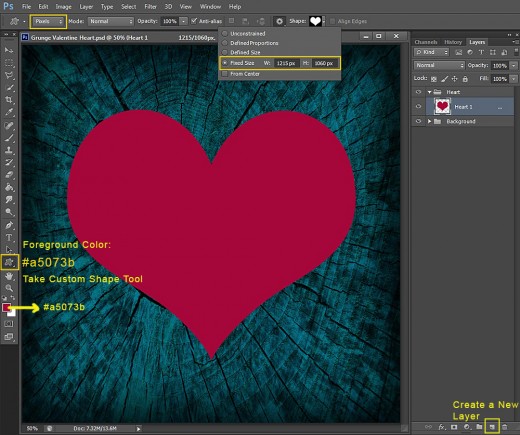
Now highlight the whole Background Group and click on Create a New Layer icon at the Bottom of your Layers panel. Rename your new layer (separated, above Background Group) to Heart 1.
Set the Foreground color to #a5073b then grab Custom Shape Tool from the Tools bar, go to the Options bar and set its Mode to Pixels. Click also on the Gear icon in the Options bar, check Fixed Size then insert 1215px for Width and 1060px for Height. Find Heart Card shape from the Custom Shape Picker and draw the red heart in the middle of your canvas.
With Heart 1 layer selected, press Ctrl+G to place in a new Group wich you should call Heart.
STEP 8
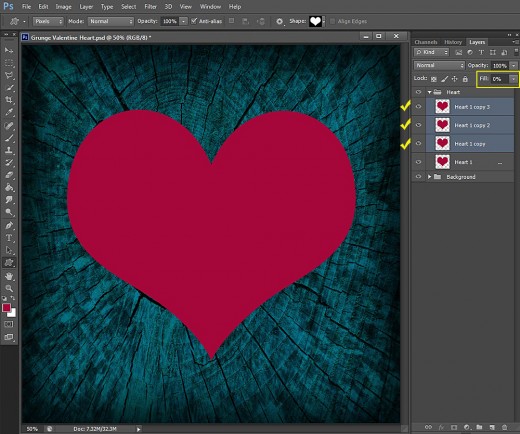
While Heart 1 layer is highlighted press three times Ctrl+J (Layer, Duplicate Layer) to make three copies of the layer.
Reduce the Fill Opacity of each one of the three copies to 0%.
STEP 9
In this and the following two steps we are going to add strokes of different colors. As later we are going to apply Gradient Overlay to the strokes, you can use any Stroke color. I have chosen vivid colors for better visibility and used different color for any stroke in order to discern them.
Switch off the Original Heart 1 layer to get a better vision of the strokes. Only the Background will be left on your screen as the Fill Opacity of all three copied Heart 1 layers is 0. No bother, we'll fix it with applying the strokes.
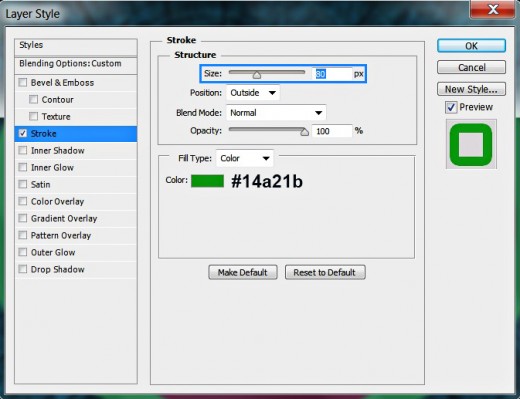
Firstly select Heart 1 copy layer, double click on its layer's thumbnail and when Layer Style dialog box appears on your screen, check Stroke and insert these settings:
Size: 80px
Position: Outside
Blend Mode: Normal
Opacity: 100%
Fill Type: Color
Color of Stroke: #14a21b.
Press OK button to close Layer Style box. We are ready with the first stroke.
STEP 10
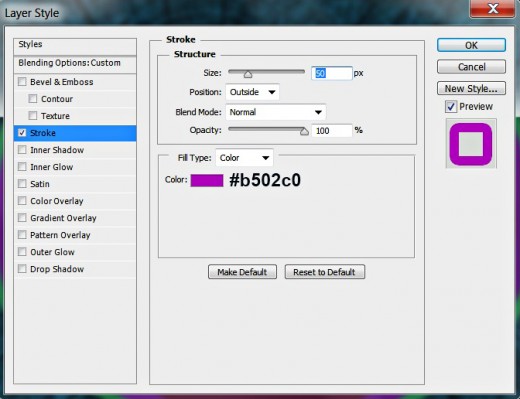
Select Heart 1 copy 2 layer and also apply Stroke Layer Style on it but with these settings:
Size: 50px
Position: Outside
Blend Mode: Normal
Opacity: 100%
Fill Type: Color
Color of Stroke: #b502c0.
Press OK button. The second stroke is ready.
STEP 11
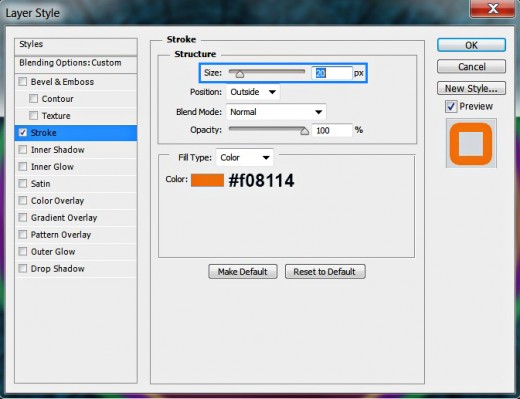
Now highlight Heart 1 copy 3 layer, double click on its layer's thumbnail and again check Stroke in Layer Style box. This time apply these settings:
Size: 20px
Position: Outside
Blend Mode: Normal
Opacity: 100%
Fill Type: Color
Color of Stroke: #f08114.
Press OK button. The third stroke is ready too.
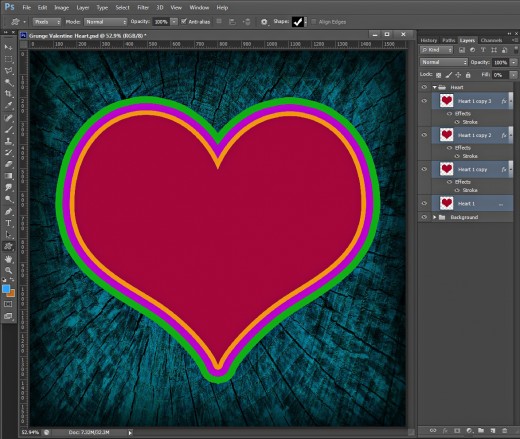
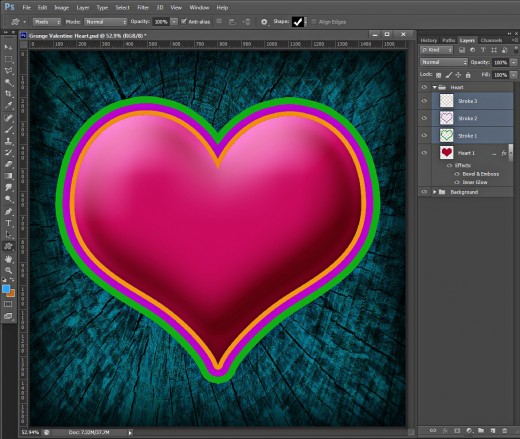
This should be the result on your canvas after adding green, purple and orange strokes to the Heart Shape:
STEP 12
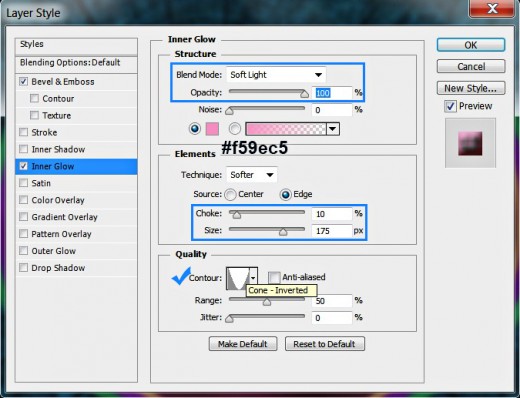
We shall leave the three copied heart layers for now. Go back to the original Heart 1 Layer, switch it on, activate Layer Style box and firstly check Inner Glow. Insert the following settings:
Blend Mode: Soft Light
Opacity: 100%
Noise: 0%
Color of Glow: #f59ec5
Technique: Softer
Source: Edge
Choke: 10%
Size: 175px
Contour: Cone-Inverted
Anti-aliased: unchecked
Range: 50%.
Jitter: 0%.
Still don't close Layer Style box. We have to add 3D effect in the next step.
STEP 13
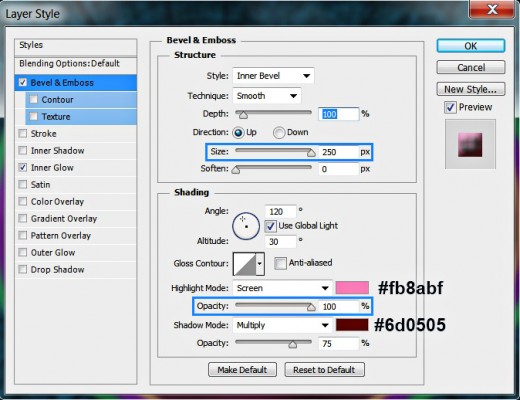
It's time to check Bevel and Emboss Layer Style to give our heart some volume. Insert these settings:
Style: Inner Bevel
Technique: Smooth
Depth: 100%
Direction: Up
Size: 250px
Soften: 0px
Angle: 120 degrees
Use Global Light: checked
Altitude: 30 degrees
Gloss Contour: Linear
Anti-aliased: not checked
Highlight Mode: Screen
Color for Highlight: #fb8abf
Opacity: 100%
Shadow Mode: Multiply
Color of Shadow: #6d0505
Opacity: 75%.
Press OK button to close Layer Style box. We are ready with the heart base.
STEP 14
On the screenshot below you can see what outcome I have got after applying Inner Glow and Bevel and Emboss on Heart 1 layer.
Now holding down Shift key click on each of the three copied Heart 1 layers in order to select them. Then right click and select Rasterize Layer Style.
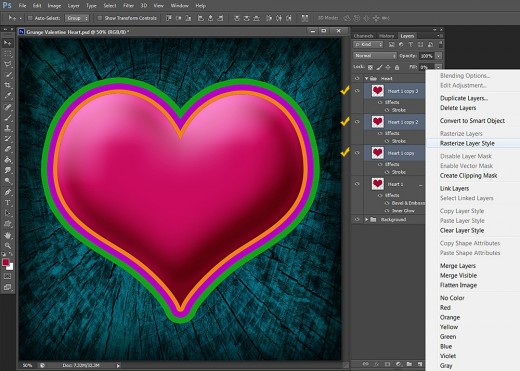
After you have rasterized the layer styles, you'll have firstly to change the names of the copied layers.
Firstly Rename Heart 1 copy layer (the green stroke) to Stroke 1.
Rename Heart 1 copy 2 layer (the purple stroke) to Stroke 2.
Rename also Heart 1 copy 3 layer (the orange stroke) to Stroke 3.
Add Four Blending Options to the First Stroke Layer
In Steps 15-18 you have to apply four layer styles to the first thickest Stroke- the green one of 80px Size. You should add Gradient of five pink color shades, Drop Shadow, subtle thin dark Stroke and Bevel and Emboss to colorize it and make it embossed.
STEP 15
Now we'll start adding volume and slight 3D effects to our Strokes layers.
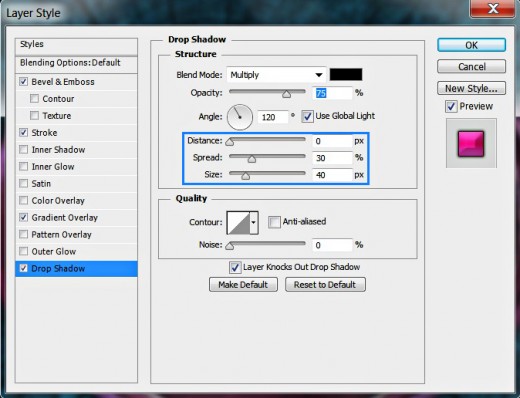
Firstly select the green stroke- Stroke 1 layer, double click on its layer's thumbnail and check Drop Shadow Layer Style. Insert the following settings:
Blend Mode: Multiply
Color of Shadow: #000000
Opacity: 75%
Angle: 120 degrees
Use Global Light: checked
Distance: 0px
Spread: 30%
Size: 40px
Contour: Linear
Anti-aliased: unchecked
Noise: 0%.
Layer Knocks Out Drop Shadow: checked.
Keep Layer Style box opened. We'll have to add three more Blending Options in the next steps.
STEP 16
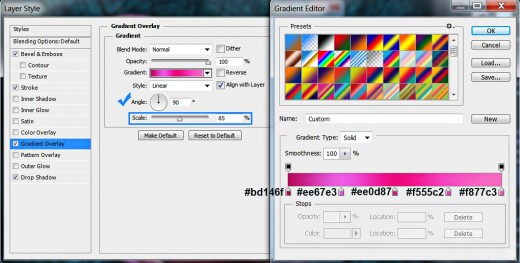
The second Layer Style to be applied on Stroke 1 layer is Gradient Overlay. Change its settings like this:
Blend Mode: Normal
Dither: unchecked
Opacity: 100%
Click to edit the Gradient:
First Color Stop (Location 0%): #bd146f
Second Color Stop (Location 25%): #ee67e3
Third Color Stop (Location 50%): #ee0d87
Fourth Color Stop (Location 75%): #f555c2
Fifth Color Stop (Location 100%): #f877c3
Reverse: unchecked
Style: Linear
Align with Layer: checked
Angle: 90 degrees
Scale: 85%.
STEP 17
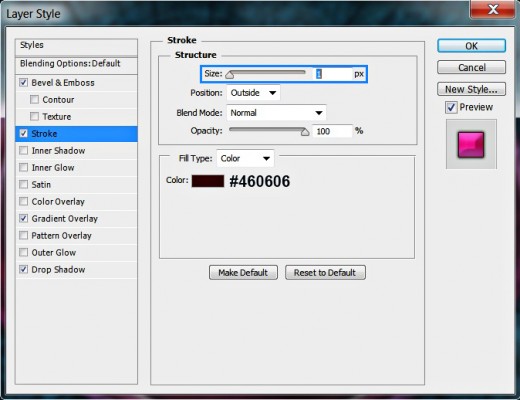
The third Layer Style to be ticked is Stroke. Insert these settings:
Size: 1px
Position: Outside
Blend Mode: Normal
Opacity: 100%
Fill Type: Color
Color of Stroke: #460606.
STEP 18
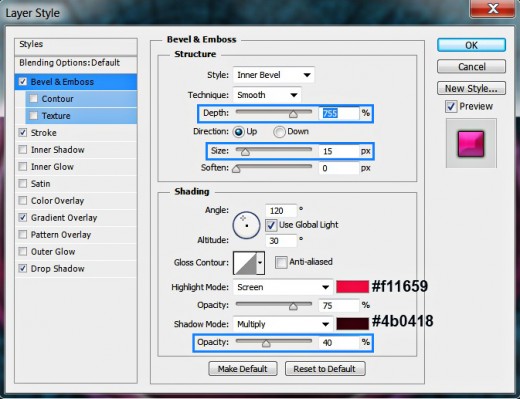
The last Layer Style to be applied on Stroke 1 layer is Bevel and Emboss. Change the settings like this:
Style: Inner Bevel
Technique: Smooth
Depth: 755%
Direction: Up
Size: 15px
Soften: 0px
Angle: 120 degrees
Use Global Light: checked
Altitude: 30 degrees
Gloss Contour: Linear
Anti-aliased: not checked
Highlight Mode: Screen
Color for Highlight: #f11659
Opacity: 75%
Shadow Mode: Multiply
Color of Shadow: #4b0418
Opacity: 40%.
Now you can close Layer Style box. We completed our work on Stroke 1 layer.
This should be your outcome after colorizing and embossing the outer Stroke of the Heart:
Add Blending Options to the Other Two Stroke Layers
In Steps 19-24 your simple task is to add Blending Options to both purple and orange strokes. You should apply Shadow, Gradients of pink and red shades and 3D Effect to make the strokes more prominent and to colorize them so that they blend with the other Heart elements.
STEP 19
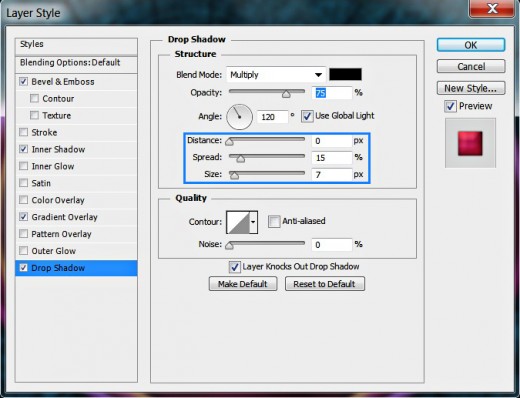
In this step we'll start to modify Stroke 2 layer so select it, double click on its layer's thumbnail and firstly tick Drop Shadow. Change its settings as follows:
Blend Mode: Multiply
Color of Shadow: #000000
Opacity: 75%
Angle: 120 degrees
Use Global Light: checked
Distance: 0px
Spread: 15%
Size: 7px
Contour: Linear
Anti-aliased: unchecked
Noise: 0%.
Layer Knocks Out Drop Shadow: checked.
Keep your Layer Style box opened. Three more Blending Options are to be applied in the coming steps.
STEP 20
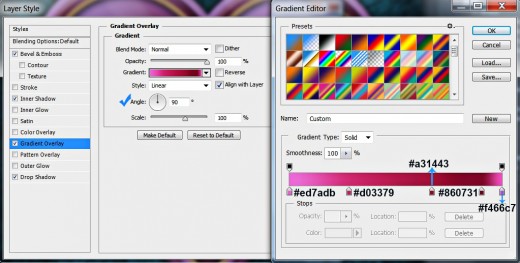
The second Layer Style to be applied on Stroke 2 layer is Gradient Overlay. Change its settings as follows:
Blend Mode: Normal
Dither: unchecked
Opacity: 100%
Click to edit the Gradient:
First Color Stop (Location 0%): #ed7adb
Second Color Stop (Location 28%): #d03379
Third Color Stop (Location 67%): #a31443
Fourth Color Stop (Location 90%): #860731
Fifth Color Stop (Location 100%): #f466c7
Reverse: unchecked
Style: Linear
Align with Layer: checked
Angle: 90 degrees
Scale: 100%.
STEP 21
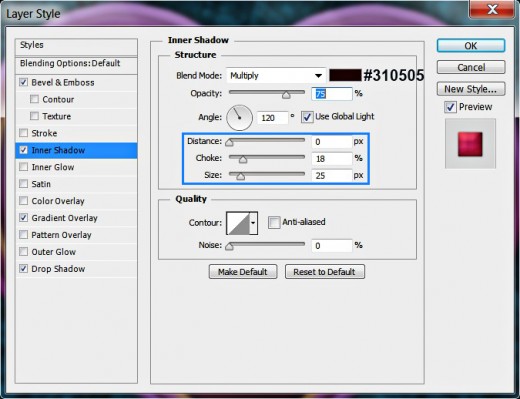
The third Layer Style to be ticked is Inner Shadow. Insert the following settings:
Blend Mode: Multiply
Color of Shadow: #310505
Opacity: 75%
Angle: 120 degrees
Use Global Light: ticked
Distance: 0px
Choke: 18%
Size: 25px
Contour: Linear
Anti-aliased: unchecked
Noise: 0%.
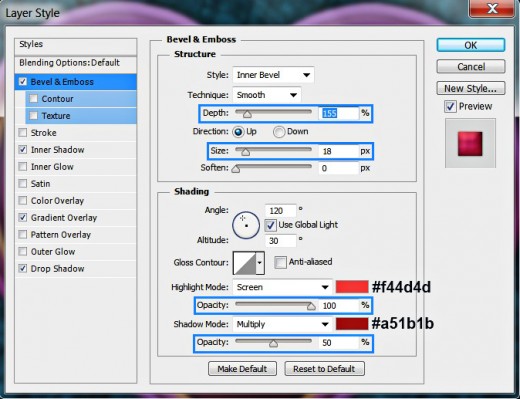
STEP 22
Now let us add 3D effect to Stroke 2 layer so check Bevel and Emboss Layer Style and insert these settings:
Style: Inner Bevel
Technique: Smooth
Depth: 155%
Direction: Up
Size: 18px
Soften: 0px
Angle: 120 degrees
Use Global Light: checked
Altitude: 30 degrees
Gloss Contour: Linear
Anti-aliased: not checked
Highlight Mode: Screen
Color for Highlight: #f44d4d
Opacity: 100%
Shadow Mode: Multiply
Color of Shadow: #a51b1b
Opacity: 50%.
Close Layer Style box after you press OK button. The work on Stroke 2 layer is finished too.
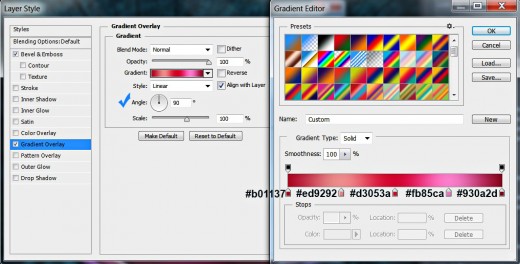
STEP 23
Let us add sweet pinkie shaded Gradient to the orange stroke. Select Stroke 3 layer and apply this Gradient Overlay:
Blend Mode: Normal
Dither: unchecked
Opacity: 100%
Click to edit the Gradient:
First Color Stop (Location 0%): #b01137
Second Color Stop (Location 25%): #ed9292
Third Color Stop (Location 50%): #d3053a
Fourth Color Stop (Location 75%): #fb85ca
Fifth Color Stop (Location 100%): #930a2d
Reverse: unchecked
Style: Linear
Align with Layer: checked
Angle: 90 degrees
Scale: 100%.
Don't close Layer Style dialog box. In the coming step we'll add another effect.
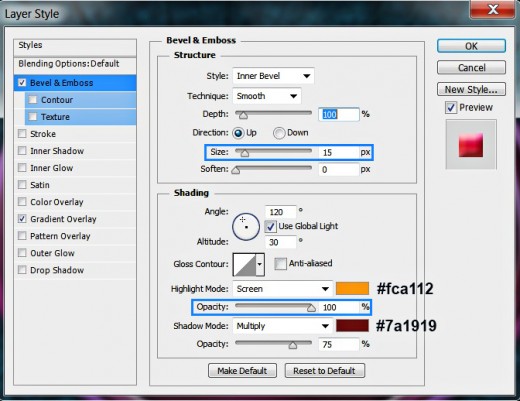
STEP 24
The second (and last) Layer Style to be added to Stroke 3 Layer is Bevel and Emboss. Insert the settings given below:
Style: Inner Bevel
Technique: Smooth
Depth: 100%
Direction: Up
Size: 15px
Soften: 0px
Angle: 120 degrees
Use Global Light: checked
Altitude: 30 degrees
Gloss Contour: Linear
Anti-aliased: not checked
Highlight Mode: Screen
Color for Highlight: #fca112
Opacity: 100%
Shadow Mode: Multiply
Color of Shadow: #7a1919
Opacity: 75%.
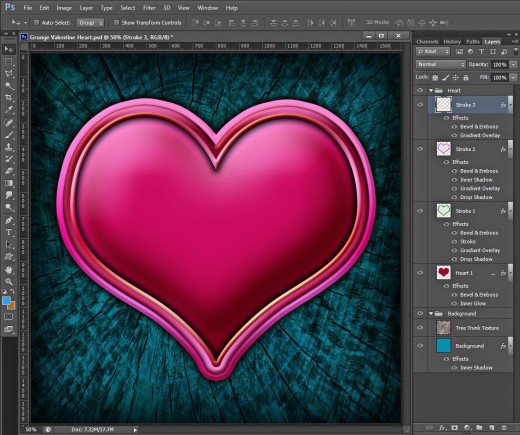
Press OK button to close Layer Style box. The main work on the heart is done and we finished with applying the Blending Options. In the next steps we are going to add awesome Stone Texture to give our heart design grunge look.
Your main work on the Heart is completed. You should get the following outcome after adding the Blending Options to both inner strokes. Your next task is to give the Heart grunge worn-out look.
Add Stone Texture to the Heart and Create Scratches with the Help of Layer Mask
You will finish the work on your Grunge Style Heart when you texturize it and add scratches.
Firstly you should Paste Stone Texture in a new layer on top of your Heart Group then resize it. You also have to use Selection loaded on the Heart and inverted to be able to erase the excess portions of the Texture, then you have to change the Blend Mode of the Stone Heart cover.
Your next step is to Add Layer Mask to the Stone Texture and brush within it with default Spatter Brush to create random scratches according to your taste.
STEP 25
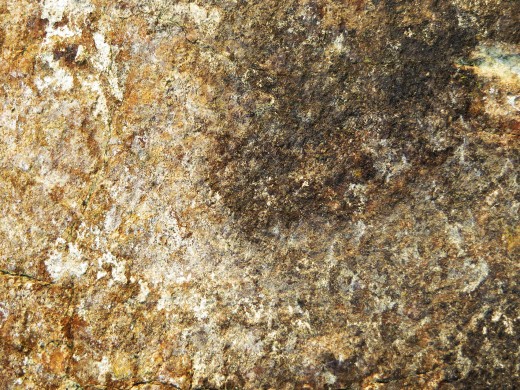
Now download the Stone Texture shown below. Simply repeat Step 4.
STEP 26
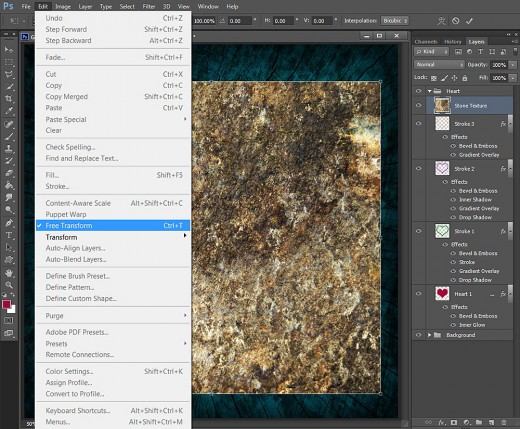
Create a New Layer on top of Heart Group and call it Stone Texture. Copy and paste in this layer the previously downloaded texture and apply Edit, Free Transform to resize the Stone Texture so that to cover the heart shape. Press Enter to apply the Transformation.
STEP 27
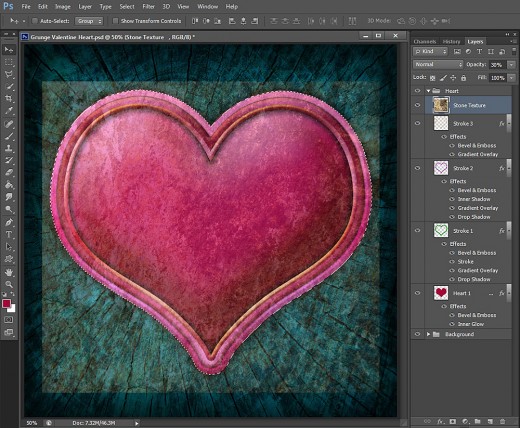
In this step I have reduced Opacity of Stone Texture layer to 30% for a better visibility. Now firstly Ctrl+click on Heart 1 layer's thumbnail to load selection on it then immediately press Ctrl+Shift and click on Stroke 1 layer's thumbnail to add its selection to the selection of the heart. You should get this result:
STEP 28
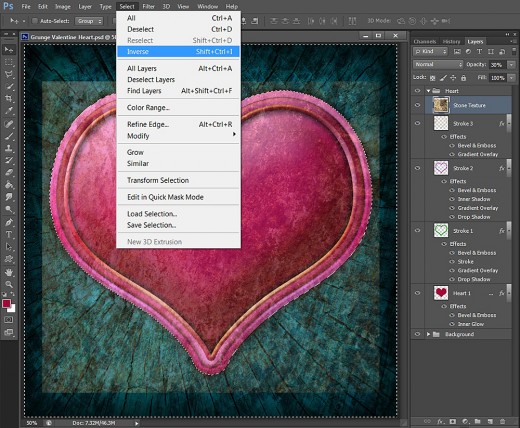
Highlight stone Texture layer and go to Select, Inverse then press Delete key to get rid of those parts of the Texture which are out of the heart shape. Press Ctrl+D (Select, Deselect) to remove the selection.
STEP 29
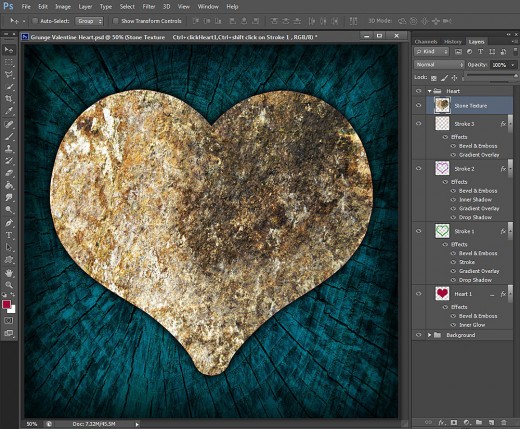
Now your heart should appear covered with Stone Texture. As you can see I have restored the Opacity of the Stone Texture layer to 100.
STEP 30
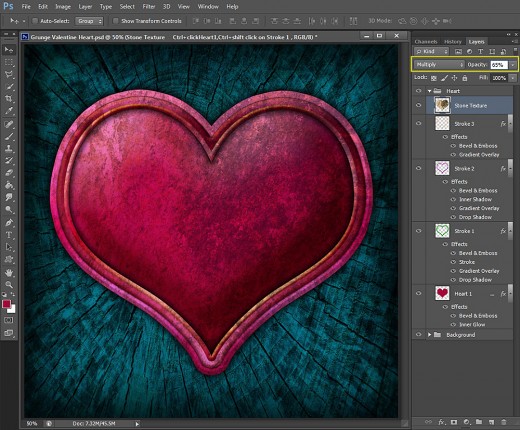
It is time to change the Blend Mode of Stone Texture layer to Multiply and lower its Opacity to 65%. As our heart design looks already grunge enough, if you like the result you can stop up to here and save your image in .jpg or other format. In the next steps which are optional, we are going to add scratches in order to increase the grunge effect.
STEP 31
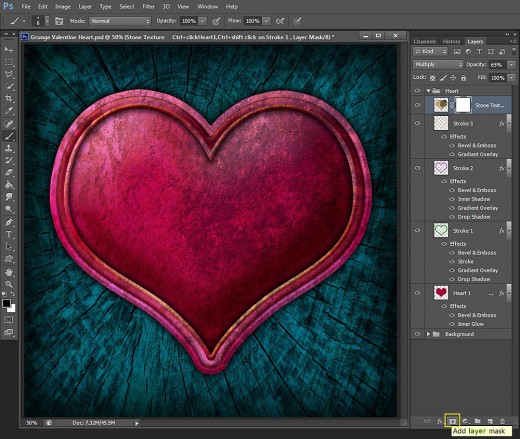
While Stone Texture layer is selected, press Add Layer Mask icon at the bottom of your Layers panel. Thus you'll mask your texture layer.
STEP 32
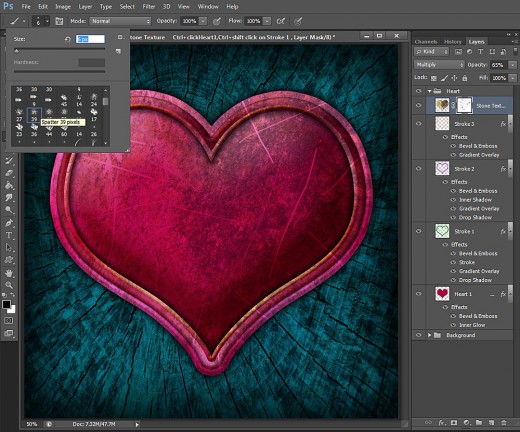
Now check if the Layer Mask applied to the texture layer is selected. Check also if your Foreground color is black. Now grab Brush Tool and select any Spatter brush from the Brush Preset Picker. Reduce the Brush Size to 6px and start to make scratches with the Brush. You can play with its Size. I used also 10px Brush Size to add thicker scratches.
You should get a result resembling mine on the screenshot below.
STEP 33
Mission accomplished. Our boring work with the Blending Options and Texture play is done. You should have two groups of layers in your Layers panel:
- Background Group which includes two layers: Background and Tree Trunk Texture and
- Heart Group which contains five layers: Heart 1, Stroke 1, Stroke 2, Stroke 3 and Stone Texture layer.
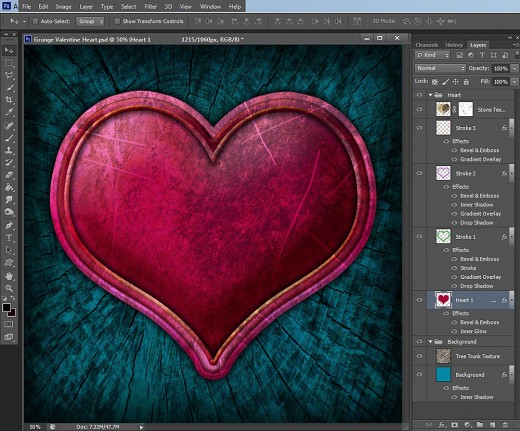
STEP 34
This is the final result saved in .jpg format. Before saving it I applied Filter, Sharpen, Unsharp Mask to sharpen the edges and the image as a whole.
Hope you like this turorial and find it cool and easy to follow. Thank you very much for reading. God bless! :)


