How to Create a Timelapse Video

Timelapse photography is a great way to experiment with the passage of time and see things in a different perspective than you normally would be able to - like a flower blooming in five seconds as opposed to waiting for five hours.
For this specific look at a timelapse workflow, I will be using my Canon T3i with Magic Lantern installed (for the intervalometer), Lightroom (to edit the photos) and After Effects (to string together the image sequence). However, feel free to substitute any of the steps below with a program that you'd rather use. Below is a table I've put together of a list of some of the programs you can substitute for in this guide.
Substitute Programs for other Programs
Timelapse Capture
| Editing Photos
| Building the Timelapse
|
|---|---|---|
External Intervalometer
| Photoshop (use action scripts or batch mode)
| After Effects
|
Magic Lantern Intervalometer (Canon)
| Lightroom
| Quicktime
|
Interneral Intervalometer (Some Nikons)
| Video Editing Program
| Virtual Dub Mod (freeware)
|
How to Capture Images for Your Timelapse
The first thing you're going to need is a camera and access to an intervalometer. Your camera may have an internal intervalometer, or you may be able to install one with a third party software like Magic Lantern for Canon DSLRs.
If you want to use an external remote, you can find some cheap ones to play around with on ebay that ship from China (I've included a link to the side), or you maybe be able to find one in the $40-$60 range in camera stores.
You'll also want to consider what it is that you're taking a timelapse of and decide how often you want to take a photograph. If your subject is going to take a long time to make a change, say for example a rotting apple, you don't want to take a photo every minute because there will be no visible change. Instead, you'll just end up with a ton of photos and your timelapse will not be as interesting because there won't be any visible change.
How to Decide on Intervals for Pictures
This one is a bit of a tricky subject. A lot of this is just going to come from trial and error and your own preference for your timelapse. If you want a smoother timelapse and your subject matter changes quickly, a good two minutes between photographs may work. Clouds, traffic and flowers blooming are all good examples of this.
If you want a more choppy or static looking timelapse, you may want to take a photo every ten minutes or maybe every hour. It all depends on what you're taking a timelapse of.
Additional Factors to Consider for Your Timelapse
- Will there be wind that will distrupt the change in your subject matter and will it make a difference?
- How long will you be shooting for and will you need to change batteries every couple of hours?
- Do you need to watch out for animals or people who will disturb your camera?
- Is your tripod sound enough to stay in one position without moving?
- What kind of shutter speed do you want?
- If you shoot in raw you'll be able to fix exposure issued in post.
Magic Lantern User Guide
For a more detailed outline of everything the Magic Lantern intervalometer can do, check out the wiki user guide here.
Some highlights include:
- Automatic adjustment of iso & expsure (blub ramping)
- Power Saving Tips
Setting Up Your Camera and Your Intervalometer
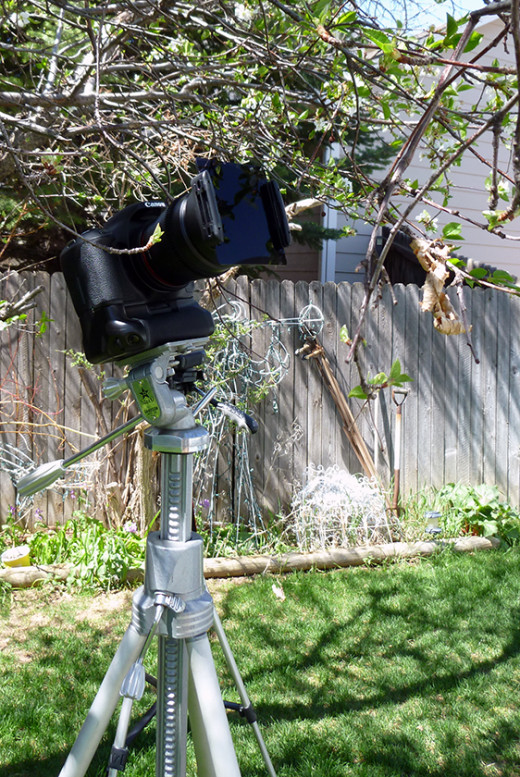
As I stated before, I'm going to be using my Canon T3i and will be using the Intervalometer that is installed with magic lantern. My subject matter is going to be a cherry blossom flower blooming so I'll be setting my camera up to take a photo every two minutes. Now one thing that I had to deal with was the win rustling the cherry blossoms, but overall, with the light breeze I think the intervals of two minutes gave the timelapse the effect I was looking for.
A handy little trick in Magic Lantern is the ablility to have the camera automatically change the exposure and iso as the day progressed. This is called "bulb ramping" and can be enabled in the shoot menu.
- Position your camera so that it is focused on the subject. Check your focus, exposure and f-stop. Be sure to take into account that the light will change throughout so be extra careful to set an exposure that isn't over or underexposed.
- Navigate to your intervalometer and set the interval you want the pictures to be taken at and the duration. For magic lantern users this is under the "Shoot" Menu.
- Set your intervalometer and let your camera do it's job.
- Occasionally check on battery levels, memory card space and the exposure if you're doing a long timelapse over hours. I sometimes adjust my aperature and focus if my subject matter falls out of focus or is too dark (You can also adjust the settings if you're shooting in RAW format).
- Once your timelapse has been captured, you're ready for the next step: editing your photos!
Editing Your Timelapse Photos
This step is completely optional. I actually shoot my timelapses in RAW format so I can then make any changes that I want, including exposure and color correcting. With the RAW format, you have the ability to really refine your shots and perfect them. It's also good if you need to fix the later frames if the light made your timelapse too dark if you did not enable bulb ramping.
This step is also handy if you have any frames where someone walked in front of the camera or something went wrong. You can easily delete the frame and save your timelapse! Please note that if you delete one frame, you may end up having to rename all of your images if your photo editing software won't export with a custom naming convention.
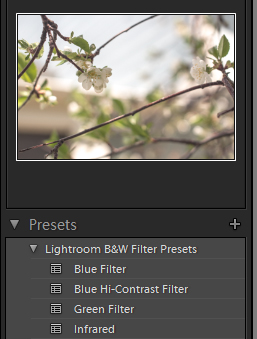
You can use Photoshop or various other photo editing programs, but the one I'm going to be using is Lightroom. Simply for the fact that it's easier to affect all of your photos instead of having to write an action script for Photoshop to make the changes to all of your photos.
Editing Your Photos in Lightroom
- Import all of your photos from your timelapse. (File > Import Photos and Video).
- Adjust the settings of one photo and when you're happy with how it looks, right click on the thumbnail of your photo and go to Develop Settings...> Copy Settings.
- A window will pop up, select all of the attributes you want to copy to the other photos and click okay.
- Now select all of your photos in the slider select the first or last one, then scroll to the end and while holding down the shift key left click on the opposite end of the timelapse
- Right click on any photo in the slider and go to Develop Settings > Paste Settings.
- All of your photos will now be edited exactly the same way. (A HUGE time saver.)
Exporting Your Photos from Timelapse for Post Production
After you have made all of the changes you want, it's time to export them so you can string them together into a movie file. Below are the simple steps to do this from Lightroom.
- File > Export (or ctrl + shift +e)
- In the window that pops up you have the ability to save these images into a subfolder. Be sure to check this as it will make all of your edited photos save into one folder for you to turn into a movie file.
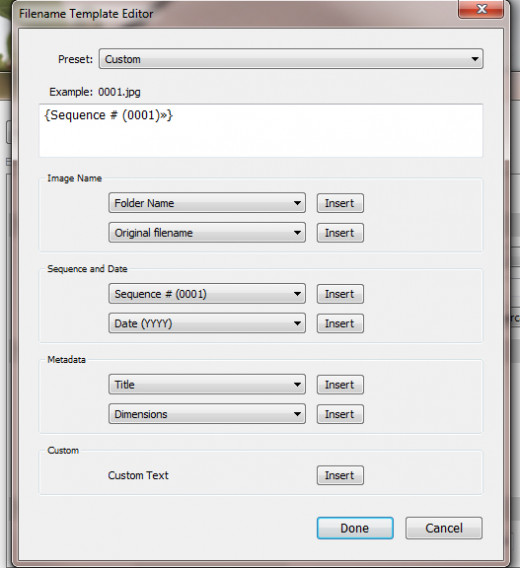
- Under File Renaming, select "edit" from the drop down menu. You want to select Sequence # (0001) so that all of your frames will export in chronological order (handy if you deleted a few frames). Choose the number of 0's that matches how long your timelapse is. You always want one more than what you have in photos. So if you have 10 photos, choose 000 so that it will show up as 010 and will appear chronologically.
- If you want to export any additional setting such as sharpening or adjusting the image resolution, select those now, if not go ahead and hit Export. Your photos will now be saved out.
Turning Your Photos into a Movie File
After you've edited your photos and have made all the changes you want to them, it's now time to turn them into a timelapse video. This step is very easy and like the other steps can be done in various programs. For this one however, I'll be using After Effects CS6.
Additional Tips and Tricks
Get a Battery Grip - this allows you to change the battery without removing your camera from the tripod for long timelapses and extends the amount of time you can film at one time.
Invest in a Heavy Tripod or Weigh it Down - you don't want anything to move your tripod or camera during your shoot. If you have a lighter tripod, consider getting sandbags or hanging your gear at the bottom of it to provide more support.
Use a low f-stop - this will allow you to separate your focal point from your background.
Importing Timelapse Photos in After Effects
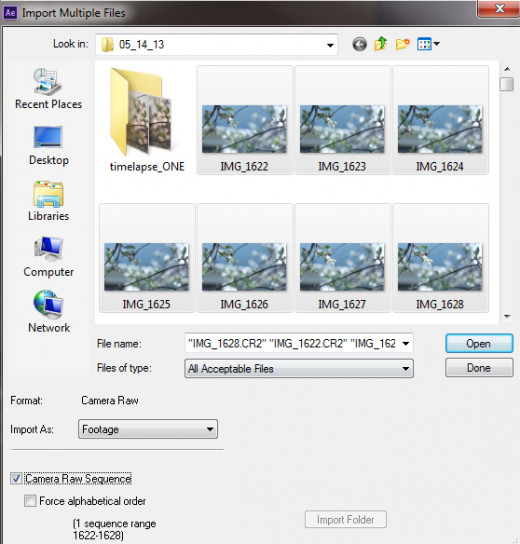
- Open up After Effects. You'll want to import multiple files so go to to File > Import > Multiple Files.
- A window will pop up which will allow you to navigate to the folder your images were in. Hold down shift to select which files are part of your timelapse. The box at the bottom that says "Camera RAW sequence" or "JPEG Sequence" should automatically check, but if it doesn't be sure to check it.
- Click open. After Effects will now build your sequence. Once it's done the window will pop up again to make sure you don't have more images to add, just hit cancel or I'm done.
- Create a new composition.(Composition > New Comp) and create the resolution and settings that you want for your timelapse. I usually choose 1920x1080, 1080p and 24 fps with square pixels.
- After creating the composition, you can now drag your timelapse sequence into your composition. If you didn't resize your images in the previous step, you can resize it to automatically fit by going to Layer > Transform > Fit to Comp. (this is good for perfecting your framing of your timelapse).
- Make any color correction or final tweaks.
- Export your movie file. FIle > Export > Add to Render Queue. Adjust your settings for your final output. I usually use Quicktime, h.264.
- You're all finished!
Conclusion
Timelapse photography is something everyone should consider doing at one point. It takes a certain mindset to be able to see the outcome and waiting for your images to finish shooting is exciting. After waiting all that time while your timelapse is taking, I find that stringing it together and seeing what actually is happening to a flower is thrilling.
If you've tried flowers blooming, what about experimenting with a night sky timelapse or long exposure timelapse? Or maybe capturing your travels and looks in one year?

