How to Draw a Polar Bear


Why You Need to Know How to Draw a Polar Bear
So you're a sharp cookie and you noticed that drawing to the right is not a polar bear but a cat. That drawing was scrawled on that envelope over 50 years ago by my grandfather. Whenever he sent me a letter, he drew that cat on the envelope every time. I loved to see that cat on the envelope because I knew he did that just for me.
That drawing made each letter and the relationship with my grandfather very special.
And that is the reason you need to know how to draw a polar bear. Think of the young folks in your life who might see a polar bear drawn on an envelope that contains a letter you sent to them. How would it change their life for the better?
Well, I have a 50-year-old envelope with a cat drawn on it. Obviously that relationship was very special to me - a special relationship represented by a crudely drawn cat.
If you're the sort of person who knows the invaluable worth of little things, this is the article for you. I'm going to teach you how to draw a Polar Bear in just a few simple steps. Take a few minutes to learn how to do this and I guarantee you'll be sketching Polar Bears all over the place!
It's very easy, just follow these few simple steps...
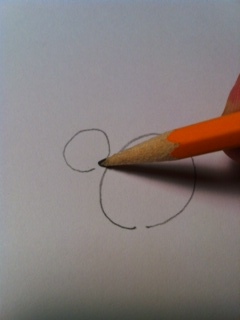
Step 1: Basic Shapes
Start by drawing one big circle and then one smaller circle just above and to the left of the bigger circle as shown...
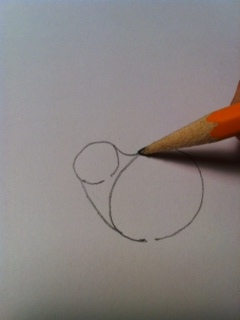
Step 2: Connect the Shapes
Now draw two separate curving lines from the left and right edges of the larger circle to the left and right edges of the smaller circle, as shown...
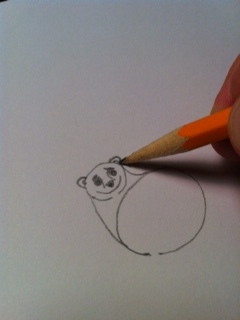
Step 3: The Face
Here is where you can really have some fun with your Polar Bear. Complete the face by drawing a curved line inside the lower diameter of the smaller circle - this is the smile.
Next draw an upside down triangle just above the smile.
Add two eyes, a curve or two for the sides of the nose. Lastly, add the ears.
Congratulations! You're done with the hardest part!
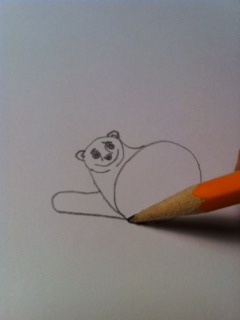
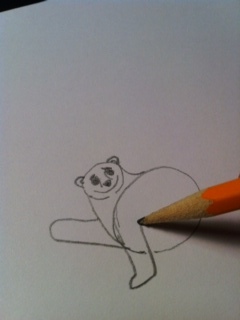
Step 4: Extended Paw
OK, this one is easy. Just draw a line extending from middle of his neck outward to the left, circle back and end this line at the middle of the larger circle, as shown.
This is his extended paw - he is waving at you!
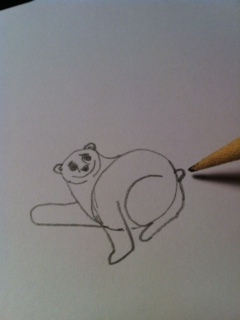
Step 5: Draw the Other Leg
OK, so every polar bear has two legs, right?
Here's how you draw his other front leg.
Simply start drawing a straight line form the same point where you ended the line for his other extended paw.
Extend this line downward and slightly forward adding a small hook on the end. End this line by extending it upward into the larger circle, as shown.
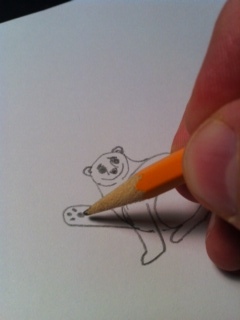
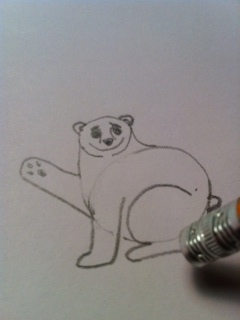
Step 6: Draw the Hind Leg and Tail
OK, draw a semi-circular line starting from just inside the right edge of the large circle.
Make another hook at the end and extend the line back to the hind end of the bear as indicated. This is his hind leg.
Now for the best part - add a small half-circular line on his hind end - this is his tail!
Step 7: Draw the Paw Pads
This is so simple - just draw three smaller black spots just inside the left edge of his extended paw as shown.
Make one last larger black spot in the middle of the three dots - Viola! You have just drawn his paw!
Step 8: The Finishing Touches
Now you can erase a few of those extra lines.
He's really looking good now!
You can also change it up a bit by adding something at the end of the extended paw like a baseball, pencil, paintbrush or other item that is unique to the addressee.
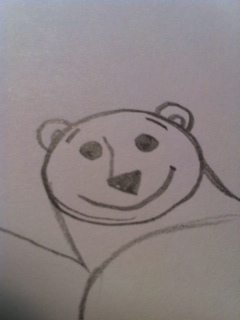
Details of the Polar Bear Face
Here is a close-up of the Polar Bear's face.
You can change it up as you see fit and have some fun with it.
For example, if you miss the person for whom you are drawing this - add a sad face, maybe a tear and a conversation bubble that reads, "I Miss You!"
Practice this a few minutes each day and soon you'll be drawing Polar Bears on everything.
Good Luck!


