- HubPages»
- Arts and Design»
- Drawing»
- Drawing Tutorials
How to Draw a Red Car - Ferrari Sketch Tutorial
The Red Car Sketch - Ferrari
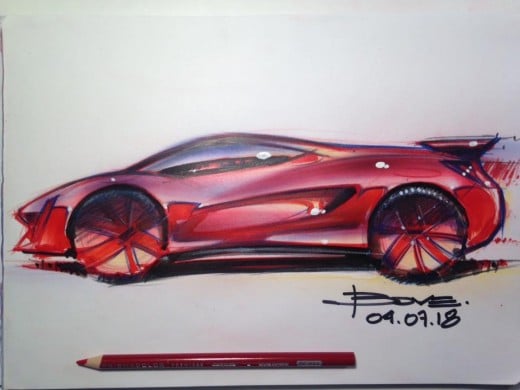
How to Render a Red Car
Hi folks, during my live tutorial sessions on my Youtube channel, many times people asked me how to render a red car.
Many times a sports car, so last week I announced to all connected people that I was going to make a tutorial about the red car illustration.
I see on social networks, from Facebook car design dedicated pages to Instagram profiles, that many of you take a red marker or a red color on Photoshop and that is it to illustrate your red car sketches.
Since you also asked about it I told myself it was the right time to make a real full tutorial about it, to draw a red car is a lot more than just the red color use. If you see a nice photo of a red Ferrari you will notice that its color is not a simple red but it is made of several colors interacting with the red paint of that car.
We have to use 5 colors and we have to start thinking with which one to start in order to have a good punchy and exciting credible illustration.
Step 1 is the line-work of our design sketch, and to do it I start using a Red Soft Prismacolor pencil.
Step 2 is about drawing all lines of my reflections (according to the sections and shapes I penned). I do it always using the same Red Soft Prismacolor pencil.
Step 3 I start using a nice Red Marker and I color the riflections, I also use a Cool Gray #4 for the shadow on the ground and the side glass reflection.
Step 4 I repeat Step 3 but on the shadow and side glass reflections I use also a Black marker. With this step I start creating depth by using 3 different tone values (red, gray and black).
Step 5 is about the use of color pastels I used Nupastels by Prismacolor which are really good quality. First color is the Red pastel mixed with some baby powder to make the pigment softer and I do it using a cotton pad. All pastels part is prepared on a different white clean paper with attention and after mixing I apply the colot with the cotton pad on my drawing. So I use the Red pastel to make the core and show the shape of the car sketch. Once finished I spray fix the drawing so the pastels gets on the paper and I can pass it over with another layer of the same red. The objective is to built a nice shading from dark reach red (the core) to a light red and to the white of the paper getting close to the marker reflections strokes.
Step 6 I repeat Step 5 3 times to make a nice shaded surface always using the spray fix between each layer.
Step 7 Now I add the sky color so the dark cold Indigo Blue, I mix it with the baby powder using a new clean cotton pad and I apply over the Red I did before. I create 3 layers to get my nice shaded surface effect. So now my red car has also the blue sky color in it.
Step 8 is about using the warm and cool light to give a more realistic effect to the illustration and also to show better how surfaces pick up lights following their face directions. I use a Violet (cold color) on top of the car and a Orange Yeallow (worm light) on the right side body of the car. To do it I use the pastels and the same method of mixing with the baby powder and the cotton pad after the color application I spray fix again. This Step is only 1 layer (one time application).
Step 9 now I have my car body done, I need to clean up some lines to make it krisp and shiny. To do so I use a Indigo Blue Soft Prismacolor pencil and I remake some of my Red lines, this encreases contrast and gives to the lines a 3D effect.
Step 10 is the last step, I apply some lines with a White Prismacolor pencil and at the very end (with attention) I apply also some highlights in the right spots using a small brush and White Guache.
In this video tutorial you can check what I tried to explain with my 10 steps.
Video Tutorial Step by Step
Well, I hope that with this Hub and the video you have a better idea of how to sketch a red car.
Check the channel for more tutorials,
Thank you!

