- HubPages»
- Arts and Design»
- Photography»
- Digital Photography
How to Edit a RAW Photo in Lightroom

Sorting through a recent photography outing is a lot of fun. With the power of editing RAW photos, you no longer need to cringe at simple mistakes, like not changing the white balance. Lightroom makes fixing this and many other problems a breeze and allows you to go back and forth with your changes to enhance and pick the best option for you.
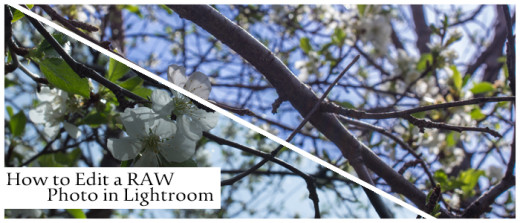
Instead of just babbling on about what all the tools do, I'm going to instead walk you through the changes that I made to one of my photos. For comparison, here is the before and the after.

How to Edit a RAW Photo
The first thing you're going to need to do is take a look at the photo. What is it that you would want to change. I generally will start with adjust the temperature of a photo, followed by the exposure, contrast, shadows and highlights. After I get the photo looking good, I'll then play around with the colors and see if I can enhance the image more. There's no set rules that I use for this but just trying out settings and seeing what happens.
Below you'll see a progression of images of how I edited my photograph. I'll explain what each step was and what my reasoning was with each step.
Walkthrough of Editing a Photo
- Change the color temperature to 5500. This warms up the photo and helps correct the overly blue cast on the image. I tried switching through the other presets under the white balance settings, but didn't find one that I liked, so instead I decided that I liked how the temperature affected the image.
- Exposure. I changed the exposure of the image to +.24. This slightly brightened up the image as it was previously a little too dark for my taste.
- Contrast. This one is more of a personal preference, but I like my photographs to be slightly less contrasty. On almost all photos I will bring the contrast down so that there isn't as much of a difference between the highlights and shadows.
- Shadows. I increased the light to the shadows by raising it by 48. This helps bring back the details of the branches.
- Vibrance. I decided to increase the vibrance by 52, bring more color into the leaves and the sky.
- Clarity. To make the foreground branch and cherry blossoms pop a little more, I increased the clarity by 45. Be careful with increasing the clarity as sometimes this will add more grain into your photograph that you have to filter out later.
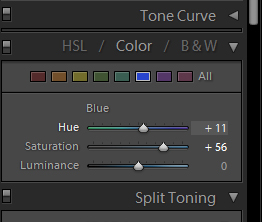
- Blue Shift. This is the step that really helps bring out the sky. I didn't like how white the sky looked, so I increased the saturation and luminance of just the blue channel.
- Temperature change. After changing the blues, I thought it looked a little too warm, so I took down the temperature by 500.
- I noticed that the highlights were a little too bright in the sky, so to help this I took down the highlights by 93.
- Finally, I still wanted a more blue sky and the flowers themselves weren't that pure white that I wanted them to be. Taking the eye dropping for the white balance I selected the cherry blossoms in the front.
How to Adjust a Single Color
Previously I mentioned only adjusting the blue channel. Lightroom has a cool option in the right panel of the develop window that allows you to select the color that you want to play around with.
To use this option just pick the color you want to manipulate and adjust the settings to play around with the color. You can also use the color curves or play around with the split toning. Each will allow you to change the settings in a different way.
Hue will change the shade of color, saturation will change how much color there is and luminance will change how much of that color that is changed by light.


Conclusion and Final Thoughts
Rather than reading through a bunch of tutorials on how to edit photos the "right way", I always encourage people to just try out and see what each setting does. Push your images too far and see what happens. If you don't try different ideas out, you'll never know if you are missing out on bringing your images true potential out.
Remember that there is a History section in Lightroom that you can actually scroll back through and click on each step. If you don't like the direction of where you're heading, you can simply start over from any point in the process.
The best way to learn is simply by doing it and creating your own workflow. Observing the workflow of others is also helpful as it gives you a new insight in how someone else works through the same problems.